2.3 可调用的模块及多线程
Created on Mon Sep 12 14:59:39 2022; Last updated on 2024-09-03T19:08:56+08:00 @author: Richie Bao
2.3.1 模块(Modules)
2.3.1.1 模块(Modules)和包(Package)
1)模块(Modules)
在 Python 解释器中(或文本编辑器)书写代码时通常都要将其保存为以 .py 为后缀名的单独文件(script,脚本),文件中可以包含变量、函数、类和可执行的代码,这就是 Python 的模块(Modules)。当程序很多时,为了方便维护,可以把脚本尽量按着可行的分类方式拆分成多个文件,即建立了多个模块。任何一个模块都可以调用其它模块中的函数。当在一个脚本中调用一个模块,例如import util,那么通过print(util.__name__)语句可以获得模块的名称(字符串)。每个模块都有自己的私有命名空间(namespace),作为模块内定义的所有函数的全局命名空间。因此在模块内使用全局变量不会与其它模块的全局变量发生冲突。如果在命令行中执行模块,可以用python util.py <arguments>方式实现。其中参数<arguments>对应模块书写的方法,如func(int(sys.argv[1]))。当导入一个模块时,解释器首先搜索具有该名称的内置模块(这些模块的名称可通过sys.builtin_module_names方式查询),如果没有找到,则将在变量sys.path给出的目录(文件路径)列表中搜索。sys.path初始化的位置包括:
- 包含输入脚本的目录(如果没有指定文件,则为当前目录)。
PYTHONPATH(语法与 shell 变量 PATH 相同的一个目录列表)。- 依赖于安装的默认值(按照约定包括
site-packages目录,由site模块处理)。
初始化后,Python 程序可以更改sys.path,且模块搜索路径搜索脚本所在目录先于标准库所在的路径。为了加速加载模块,Python 把模块的编译版本缓存在__pycache__目录中,文件名为module.version.pyc,其中version为 Python 的版本号。例如,CPython 的 3.11发行版本,util.py 的编译版本缓存为__pycache__/util.cpython-311.pyc。Python 对比编译版和源码的修改日期,以确定是否更新编译(此进程完全自动)。
2)包(Package)
包是通过使用“带点号模块名”来构造 Python 模块命名空间的一种方式,如A.B表示名为A的包中名为B的子模块。下述这个有层次的文件目录结构展示了一个包的架构,
toolkit4beginner/
├── __init__.py
├── graph/
│   ├── __init__.py
│   └── graph.py
└── utility/
    ├── __init__.py
    ├── general_tools.py
    └── stats_tools.py
包toolkit4beginner下目前包括两个子包graph和utility,还可以继续增加子包和模块,甚至子包的子包。目录或子目录需要有一个__init__.py文件才能够让 Python 将包含该文件的目录当作包来处理。__init__.py文件可以为空文件,也可以放置执行包的初始化代码或设置__all__变量,如graph子包中__init__.py文件代码,
  from .graph import boxplot_custom
from .graph import four_quadrant_diagram

__all__=[
    "boxplot_custom",
    "four_quadrant_diagram"
    ]
包toolkit4beginner下__init__.py文件代码,
  __version__ = "0.0.1"

__all__=[
    "graph",
    "utility"
    ]
配置__all__变量,当使用from toolkit4beginner.graph import *这样带有*的导入语句时只包含__all__包含的模块。如果没有定义__all__变量,则不会把toolkit4beginner.graph中的所有子模块导入到当前的命名空间,只是确保包toolkit4beginner.graph已被导入。当包由多个子包构成时,可以使用绝对导入来引用同级包的子模块,例如如果toolkit4beginner.graph.graph模块需要使用toolkit4beginner.utility包中的general_tools模块,则可以使用from toolkit4beginner.utility import general_tools。如果使用相对导入,则用前导点号来表示相对导入所涉及的当前包和上级包,例如对于stats_tools模块,可以使用
      from . import general_tools
    from .. import graph
    from .. graph import graph
脚本(Script)是用来直接运行 Python 文件做一些事情,其通常包含有任何类和函数作用域外编写的代码。模块为单个 Python 文件(.py 文件),可以包含变量、函数、类和可执行的代码。包是一个有层次的文件目录结构,定义了由 n 个模块或 n 个子包组成的 Python 应用程序执行环境。其中包是一个包含有__init__.py文件的目录,并包含有其它模块或子包。库(Library)是一个总括性术语,指为特定任务提供功能的相关模块和包的集合。其中模块和包是 Python 架构项目的基本概念。脚本和模块之间,包和库之间有时并没有明显的界定。应用程序编程接口(application programming interface,API),是两个或多个计算机程序(软件)或组件相互通信的规则和工具,是一种软件接口(software interface),为其它软件提供服务。描述如何构建或使用这种连接或接口的文档或标准称为 API 规范(specification)或实现(mplementation)。例如 Python Script 提供了一个可以应用 Python 编程语言通过 GH(Rhino)提供的 API(RhinoCommon、Rhino.Python RhinoScriptSyntax、Grasshoppe等)使用其内部功能代码,实现与GH(Rhino)交互的脚本编辑器 。API 的一个目的是隐藏系统如何工作的内部细节,只给出用户(程序员)认为有用的那部分功能接口。对于 Python, API 通常以包(库)的形式或包含于其中被调用实现与软件(例如 GH/Rhino)的交互。软件开发工具包(software development kit ,SDK)则是帮助开发人员开发软件应用程序的工具、库和指令的集合。SDK 包含预先构建的组件和指南,类似一个工具包以帮助开发人员为给定的平台(如 GH)或编程环境开发软件,提高开发的效率,并确保软件在选择的技术下正常运行。
更多关于模块和包的阐述可参考 Python 官网文档 Modules①。
2.3.1.2 Python Script 下的包和 API
通过 print(sys.path) 可以查看 Python Script 引用模块时参考的文件路径,如图 2.3-1 自定义SysPath N InstalledPkgs组件输出端SysPath输出的文件路径列表。从该列表中可以清晰的定位所用 Python 3.9 环境的文件路径,如果要在 Windows Terminal中通过pip安装包,就定位到该路径C:\Users\richi\.rhinocode\py39-rh8下执行安装。
因为可以自行为 Python Script 安装包,所以不再局限于 Python 的内置模块,但是仍然可以根据是否为 GH(Rhino)开发的应用程序接口(Application Programming Interface,API) 划分为 API(或理解为支持 API 的Python 包/库) 和 Pyton 包(包括内置模块和扩展模块)两类。为了查看当前 Python Script 已经安装的包和支持的 API,可以通过pkgutil模块中的方法提取已经安装的包名称,其结果为输出端InstalledPkgs输出的结果,从截图中可以看到已经安装了支持本书自定义的 PyPI 包moths,以及numpy、networkx②等扩展包,
如果要查看调入的模块拥有哪些方法,可以用print(dir(module))实现,例如print(dir(math))。这里为了方便从输入端指定,使用module = sys.modules[PackageName.strip()]语句,根据输入端PackageName输入的字符串提取模块的变量名后用dir()方法查看。这里直接用print()方式在输出端out中输出结果。
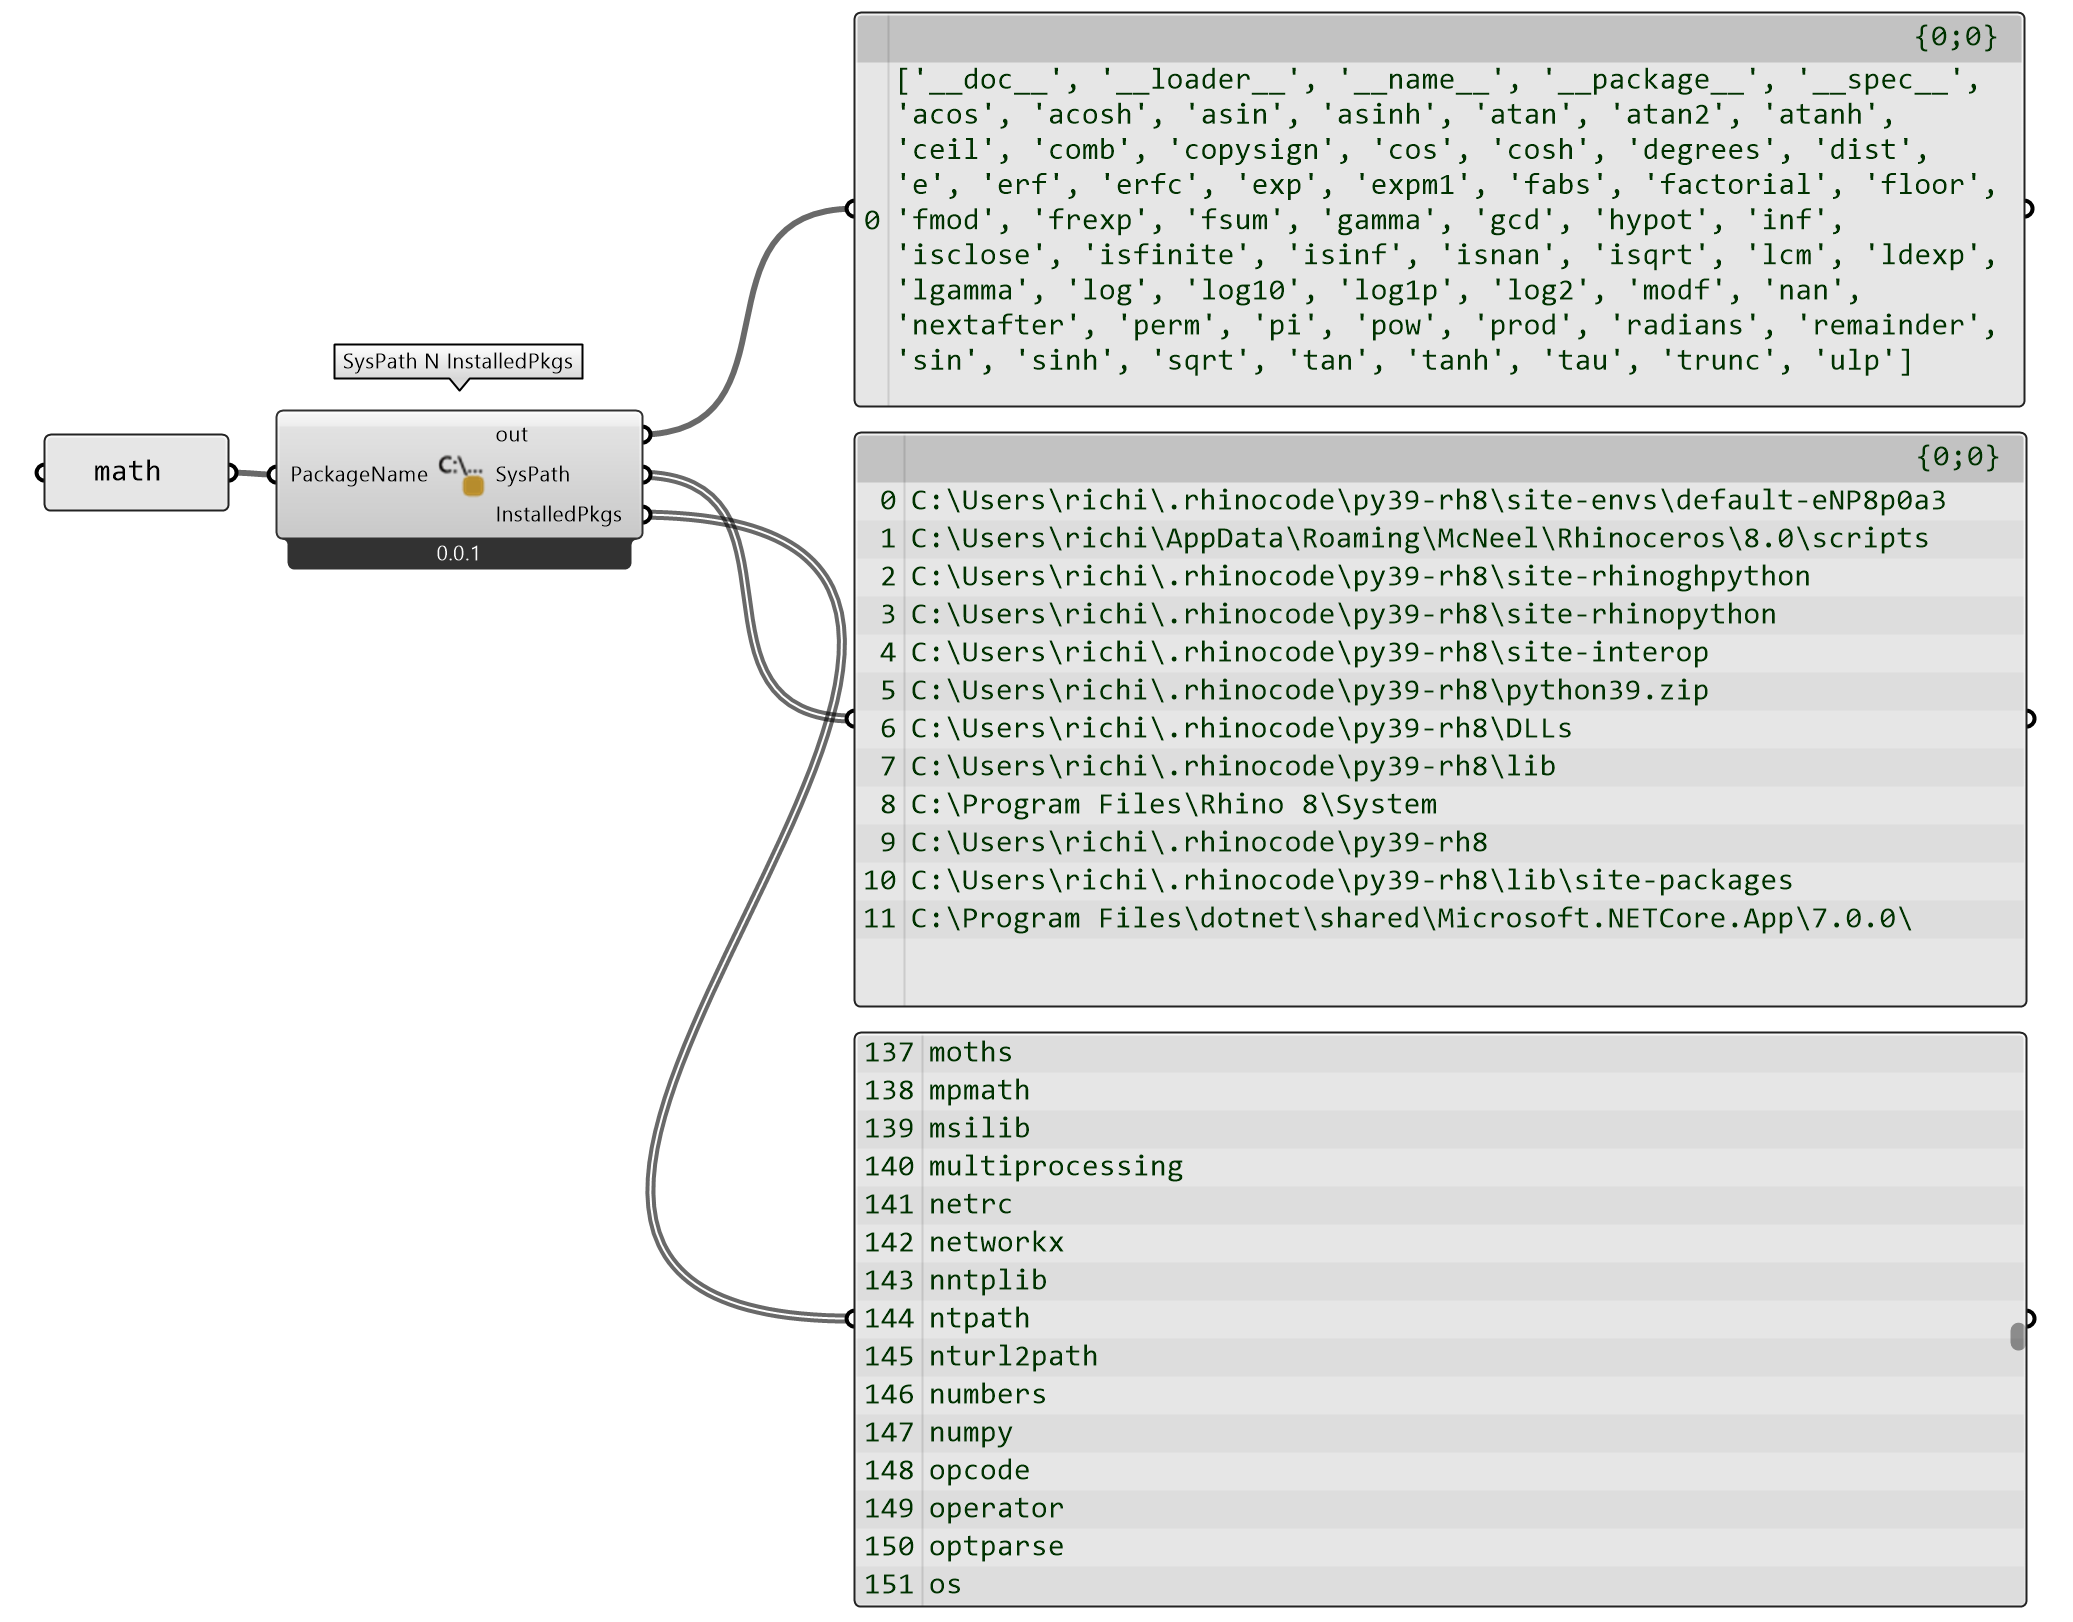
图 2.3-1 Python Script 参考文件路径和已安装的包及搜索模块的方法
SysPath N InstalledPkgs (Python Script 组件)
  import sys
import pkgutil

ghenv.Component.Name = 'SysPath N InstalledPkgs'
ghenv.Component.NickName = 'SysPath N InstalledPkgs'
ghenv.Component.Description = '查看系统路径,所安装的包和模块方法'
ghenv.Component.Message = '0.0.1'
ghenv.Component.Category = 'Moths'
ghenv.Component.SubCategory = 'Info'
ghenv.Component.AdditionalHelpFromDocStrings = '3'

InstalledPkgs = sorted([pkg.name for pkg in pkgutil.iter_modules()])
SysPath = sys.path

if PackageName:
    module = sys.modules[PackageName.strip()]
    print(dir(module))
2.3.1.3 安装扩展库示例——用 NetWorkX 库提供的方法解决 TSP 问题
以往版本的 GH 脚本编辑器(GhPython)不能够安装 Python 的扩展库,这使得无法应用 Numpy、Scipy、NetWorkx②、scikit-learn 等等算法功能包罗万象、无数众多的模块。如果要应用一些算法,虽然 Python 扩展库已有集成,但对于以往版本仍旧需要代码迁移,例如1.3.2部分代码段11中解决旅行商(TSP)问题时使用了蚁群算法,需要从底层开始编写,无疑增加了解决问题的难度、和不必要的“重复造轮子”。目前不能够安装 Python 扩展库的问题已经解决,Python 之所以被广泛应用于数据科学、人工智能、网络开发等领域,得益于其庞大的扩展库生态系统的优势也能够在 GH(Rhino)平台上得以发挥。例如图 2.3-2直接调用 NetWorkX,使用其已经集成的christofides③方法解决 TSP 问题,建立了TSP_christofides组件。在这个案例中并不需要从底层编写算法,而是由输入端的点列表建立复杂网络(图,Graph)G,用networkx.algorithms.approximation.christofides方法计算 TSP 问题。

图 2.3-2 用 NetworkX 库提供的 christofides 方法解决 TSP 问题
TSP_christofides (Python Script 组件)
  ''''
    使用 networkx 库中的 christofides 方法解决旅行商问题
    Inputs:
        Points: List[Point3d]
            位置点
        Weight: List[str]
            点之间的权重,例如 1,5,0.5 代表顶点1和之间的权重为0.5。默认权重为1
    Output:
        CycleIdx: List[int]
            排序后的位置点索引值
        CyyclePts: List[Point3d]
            排序后的位置点(几何对象)
'''

import networkx as nx
import rhinoscriptsyntax as rs
import itertools
import networkx.algorithms.approximation as nx_app

ghenv.Component.Name = 'TSP_christofides'
ghenv.Component.NickName = 'TSP_christofides'
ghenv.Component.Description = '使用 networkx 库中的 christofides 方法解决旅行商问题'
ghenv.Component.Message = '0.0.1'
ghenv.Component.Category = 'Moths'
ghenv.Component.SubCategory = 'Data Analysis'
ghenv.Component.AdditionalHelpFromDocStrings = '1'

def createG(pts):
    G = nx.Graph()

    pts_attribute = {idx: {"coordi": [*pt], "pt": pt}
                     for idx, pt in enumerate(pts)}

    for k, v in pts_attribute.items():
        G.add_node(k, pos=v["coordi"], pt=v["pt"])

    if Weight:
        print(Weight)
        weight = [[j.strip() for j in i.strip().split(",")] for i in Weight]
        weight_dict = {tuple(sorted([int(i[0]), int(i[1])])): float(
            i[2]) for i in weight}

    pairs = list(itertools.combinations(G.nodes, 2))
    for pair in pairs:
        dist = rs.Distance(G.nodes[pair[0]]['pt'], G.nodes[pair[1]]['pt'])
        if Weight:
            if pair in weight_dict.keys():
                dist *= weight_dict[pair]
        G.add_edge(pair[0], pair[1], weight=dist)

    cycleIdx = nx_app.christofides(G, weight="weight")
    cyclePts = [G.nodes[i]['pt'] for i in cycleIdx]

    return cycleIdx, cyclePts


if __name__ == "__main__":
    if Points:
        CycleIdx, CyclePts = createG(Points)
2.3.2 用 RhinoCommon 的方式,自定义变化螺旋线
在 Python Script 中书写代码时可以参考一些有用的原则,一是,广泛应用函数和类的定义,方便日后代码迁移或者输出为模块;二是,保持if __name__=="__main__":模式。除函数和类,及必须放置于全局下的属性(定义的变量)外,均置于该语句之下(命名空间),除了方便代码迁移,也可作为代码测试,并保持代码书写的结构清晰。
spiral curvve_typeA组件的8个输入端,数据结构均为Item Access;数据类型保持默认的ghdoc Object,由编辑器自动识别。
该组件调入了3个模块,一个是math,用于正弦math.sin()计算,获取 pi 值math.pi;operator模块则是配合map()函数,用于两个列表元素,两两求和的计算sin_y_generator=map(operator.mul,y_change_generator,y_generator);Rhino.Geometry(rg)是Rhino内置模块(API),用于构建、编辑几何,或者获取几何属性。这里用到了rg.Point3d()方法建立三维点,rg.Line()建立直线,rg.NurbsCurve.Create()建立Nurbs曲线,rg.Transform.Rotation()构建旋转对象(配置参数)来旋转几何体pt.Transform(rotation)。
GH(Rhino)支持的 API 包括 RhinoCommon(rc),RhinoScriptSyntax(rs) 和 Grasshopper(Node-in-Code™(nic) form GHPython) 3个模块,在同一 Python Script 组件中,尽量仅使用一种,保持风格统一的同时,也方便代码书写。
在定义螺旋线spiral(x,y,rotation_interval)时,也定义了另外两个小功能,一个是range_SES(start,end,step),可以计算浮点数(小数)的间隔序列;而sine_PSA(sequence,period,shift,amplitude)则计算给定序列的正弦值。在函数定义时,如果返回的为列表,则使用了yield生成器方法。
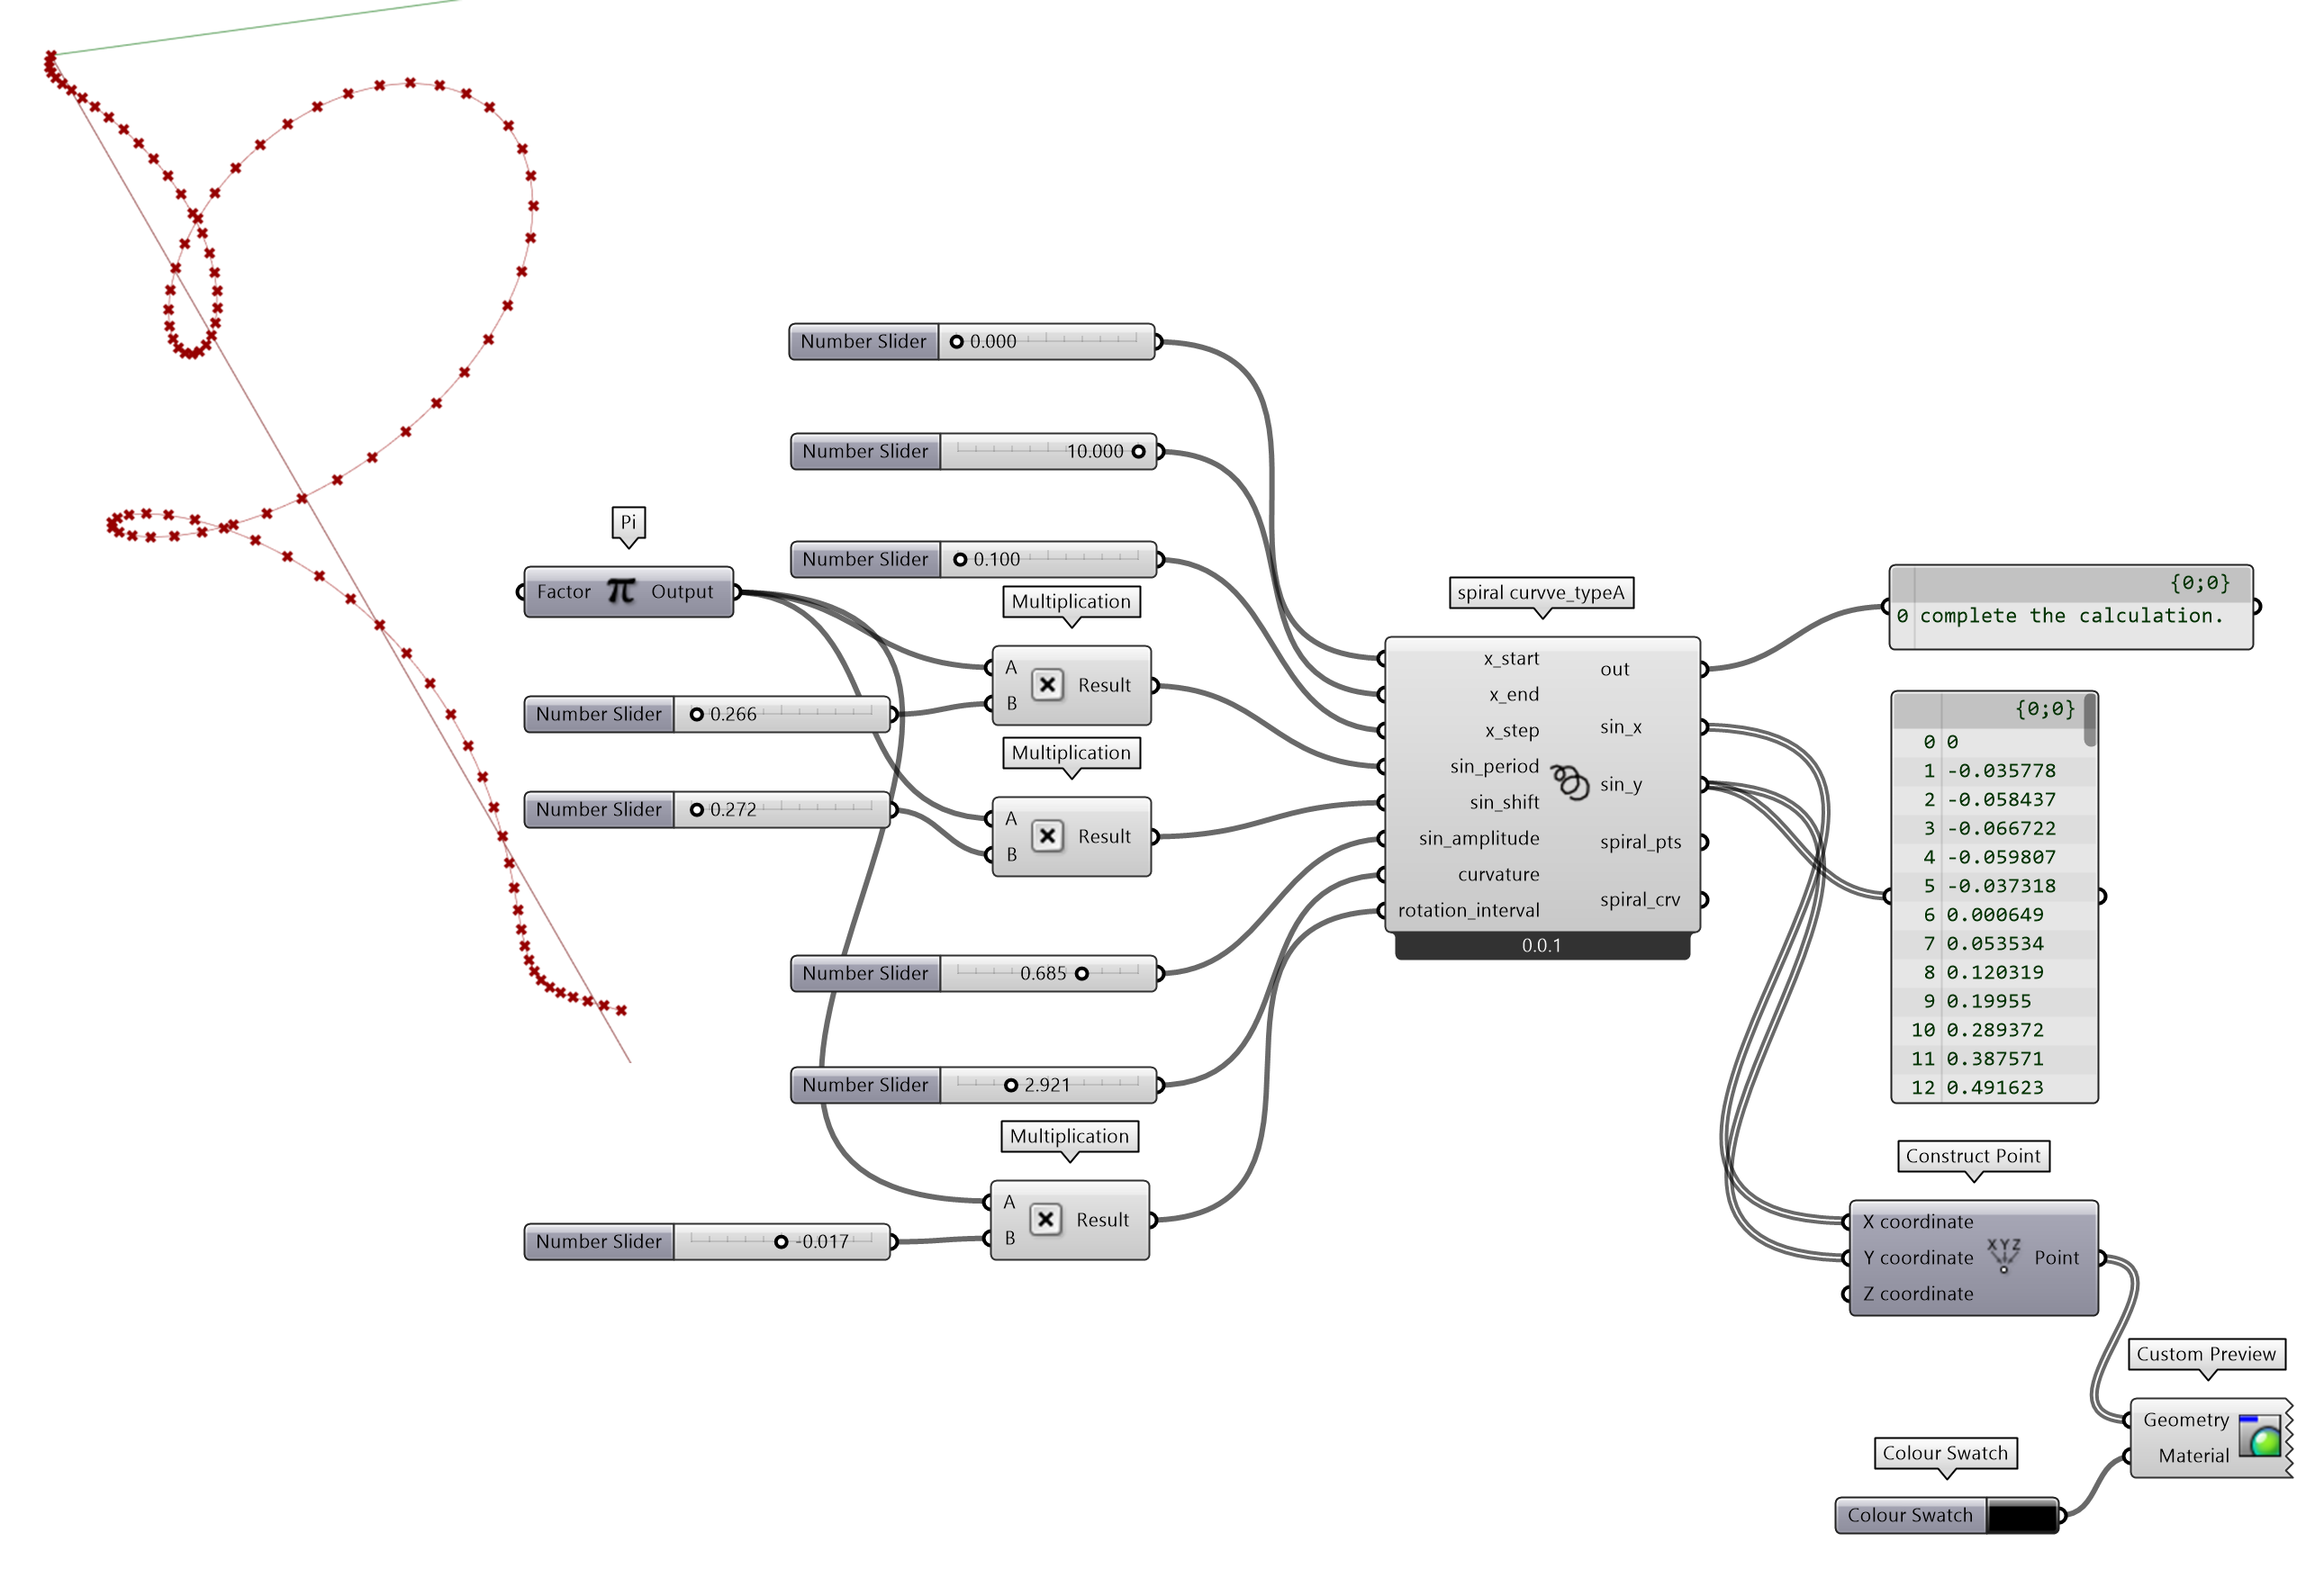
图 2.3-3 用 RhinoCommon 方式 绘制螺旋线
spiral curvve_typeA (Python Script 组件)
  """计算正弦值,并绘制螺旋线.
    Inputs:
        x_start: x轴向开始值
        x_end: x轴向结束值
        x_step: x轴向步幅值
        sin_period: 正弦函数周期
        sin_shift: 正弦函数偏移
        sin_amplitude: 正弦函数振幅
        curvature: 曲线变化振幅
        rotation_interval: 曲线旋转幅度
    Output:
        sin_x: 正弦x值
        sin_y: 正弦y值
        spiral_pts: 螺旋线点
        spiral_crv: 螺旋线
        """

import Rhino.Geometry as rg
import operator
import math

ghenv.Component.Name = 'spiral curvve_typeA'
ghenv.Component.NickName = 'spiral curvve_typeA'
ghenv.Component.Description = '螺旋形曲线——类型A'
ghenv.Component.Message = '0.0.1'
ghenv.Component.Category = 'Moths'
ghenv.Component.SubCategory = 'Design Content'
ghenv.Component.AdditionalHelpFromDocStrings = '1'


def range_SES(start, end, step):
    '''
    给定开始、结束值和步幅值,返回序列。可以计算小数

    Parameters
    ----------
    start : numerical
        开始值.
    end : numerical
        结束值.
    step : numerical
        步幅值.

    Yields
    ------
    s_v : iterable
       序列.
    '''

    s_v = start
    while s_v < end:
        yield s_v
        s_v += step


def sine_PSA(sequence, period, shift, amplitude):
    '''
    计算正弦曲线x,y值

    Parameters
    ----------
    sequence : list
        序列值.
    period : numerical
        正弦函数周期.
    shift : numerical
        正弦函数偏移.
    amplitude : numerical
        正弦函数振幅.

    Yields
    ------
    iterable
        正弦值.
    '''

    for v in sequence:
        if amplitude:
            yield amplitude*math.sin((1/period)*v+math.pi/2+shift)
        else:
            yield math.sin((1/period)*v+math.pi/2+shift)


def spiral(x, y, rotation_interval):
    '''
    给定x,y序列值,和曲线旋转幅度,绘制螺旋曲线

    Parameters
    ----------
    x : list(numerical)
        x序列值.
    y : list(numerical)
        y序列值.
    rotation_interval : numerical
        曲线旋转幅度.

    Returns
    -------
    spiral_crv : rg.NurbsCurve
        螺旋曲线.
    spiral_pts : rg.Point3d
        螺旋曲线点.

    '''
    pts = [rg.Point3d(x, y, 0) for x, y in zip(x, y)]
    axis_line = rg.Line(pts[-1], pts[0])
    axis_vector = pts[-1]-pts[0]
    angle_radians = 0
    i = 0
    spiral_pts = []
    for pt in pts:
        closestPt = axis_line.ClosestPoint(pt, False)
        rotation = rg.Transform.Rotation(angle_radians, axis_vector, closestPt)
        angle_radians += rotation_interval
        pt.Transform(rotation)
        spiral_pts.append(pt)
    spiral_crv = rg.NurbsCurve.Create(False, 3, spiral_pts)
    return spiral_crv, spiral_pts


if __name__ == "__main__":
    if x_start is not None and x_end is not None and x_step is not None:
        x_generator = range_SES(x_start, x_end, x_step)
        sin_x = list(x_generator)

        if sin_period is not None and sin_shift is not None and sin_amplitude is not None:
            y_generator = sine_PSA(sin_x, sin_period, sin_shift, sin_amplitude)
            y_change_generator = sine_PSA(
                sin_x, math.pi, math.pi*0.5, curvature)
            sin_y_generator = map(
                operator.mul, y_change_generator, y_generator)
            sin_y = list(sin_y_generator)

            if rotation_interval is not None:
                spiral_crv, spiral_pts = spiral(
                    sin_x, sin_y, rotation_interval)
                print("complete the calculation.")
同时,也将range_SES()和spiral()这两个函数置于了自定义的moths库中(通过pip install moths方式安装),可以通过如下形式调用,
  import moths.utility as moths_utility
sequence = moths_utility.range_SES(0,10,0.3)
因为可以直接从moths中调用range_SES()和spiral(),因此spiral curvve_typeA组件中的代码可以移除定义的这两个函数,直接调用mothes集成的方法。
2.3.3 clr 与 IronPython
.NET④是一个免费、跨平台、开源的开发者平台,用于构建许多不同类型的应用程序,为 Microsoft 应用程序提供所需的通用工具和库。.NET可以使用多种语言(例如 C#,VB.Net,F#)编辑器和库来构建网络、移动、桌面、游戏、物联网等。.NET的主要特征就是不同编程语言可以相互使用,从而一种语言可以应用另一种语言的方法实现。IronPython⑤则是紧密结合.NET的 Python 语言 C# 的实现(将 Python 代码编译为 C# 字节码,在 CLR 上运行)。CLR(Common Language Runtime,通用语言运行库)⑥由.NET提供,可以运行代码并提供服务,使开发过程更加容易。IronPython可以使用.NET库和 Python 库,同时,其它语言同样也可以轻松使用 Python 代码。IronPython是对.NET的一个很好的补充,为 Python 开发者提供了.NET的力量。现有的.NET开发者也可以将IronPython作为一种快速而富有表现力的脚本语言,用于嵌入、测试或从头开始编写一个新的应用程序。RhinoCommon为 Rhino 的 API(Application Programming Interface,应用程序编程接口),提供了不同的方法(函数和类)。可以使用这些方法从一个软件到另一个软件进行通信,以便开发连接或插件,从而通过 API 连接到其它应用程序,进一步扩展 Python 可以使用的工具,拓展 GH 处理问题的能力。Rhino的 开发人员已经将RhinoCommon作为常量引用包含在了解释器中,因此很容易在 Python Script 中,像调用 Python 模块一样调用;如果要导入其它的DLL⑦(Dynamic-link library, 动态链接库,一种可执行文件,它允许程序共享执行特殊任务所必需的代码和其他资源)文件,则需要使用clr模块。clr模块解释了IronPython脚本中执行的非 Python 代码,提供了向代码中添加库的功能,例如下述案例clr.AddReference("Microsoft.Office.Interop.Excel"),增加了COM⑧组件(Component Object Model)的 Excel 方法,读取 Excel 表中数据。Python、IronPython 、.NET Framework,及 CLR 模块和 Rhino API 的关系如图 2.3-4。
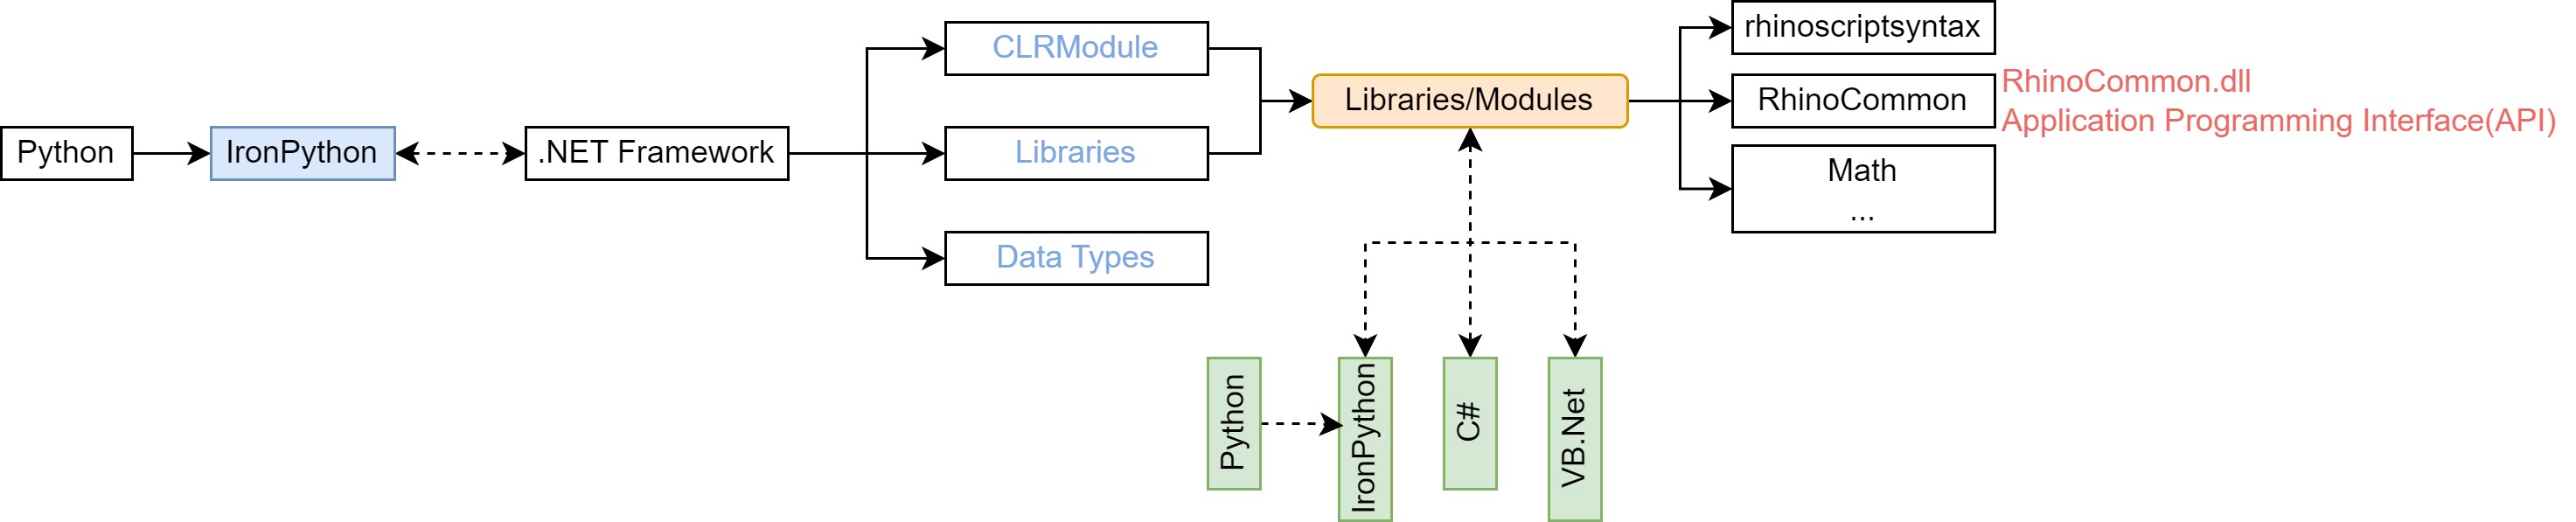
图 2.3-4 Python、IronPython 、.NET Framework,及 CLR 模块和 Rhino API 的关系
2.3.3.1 用 CLR 读取 Excel 表数据
read excel组件定义了读取 Excel 表数据的方法,例如读入 Excel 中存储的高程数据并构建地形如图 2.3-5,其主要使用clr模块调用外部的Microsoft.Office.Interop.Excel方法实现。使用嵌套循环,逐行从左到右读取数据。需要注意,columns=map(chr,range(65,91))列名仅定义了[A-Z]区间的26个字母,即26列;行数则不限。如果数据量较大,使用for循环计算通常速度较慢。为了观察计算持续时间,这里定义了时间计算函数start_time()和duration(start_time)函数。同时,可以在GH->File->Preferences->Widgets->Profiler下勾选Show Profiler widget,实现在每个组件下方提示该组件运行的时间长度。而且,在定义read_excel(file_path,worksheet_num=1,test_rowNum=None)读取 Excel 表数据文件时,增加了test_rowNum测试行数参数。如果给定测试行数,则仅读取到给定行数的所有行数据。这样可以先通过读取少数几行数据,观察数据情况,待确认无误,需要读取全部数据时再移除输入端值,实现完全读取,节约测试时间。
通常在 Python 中以dict方式读写数据,当需要将数据从输出端输出时,则需要将dict转变为GH的Tree类型数据结构。转换的方法可以直接使用ghpythonlib.treehelpers模块提供的list_to_tree方法,和tree_to_list方法。在转换时,需要从dict中提取值为嵌套列表,键信息则需要单独输出(例如以列表形式)。
Python (3) script 使用 CPython 实现,IronPython (2) Script 使用 IronPython 实现。CPython 和 IronPython 是 Python 编程语言的两种不同实现。IronPython 运行于 .NET Frame 上,与 .NET 紧密集成,允许 Python 代码与 .NET 库无缝交互。 图 2.3-6 中read excel组件演示了IronPython使用 CLR模块添加Microsoft.Office.Interop.Excel引用(命名空间)读取 Excel 的方法,因此用 GH 提供的 IronPython (2) Script 脚本解释器。在添加Microsoft.Office.Interop.Excel引用时,如果提示Could not load file or assembly 'Microsoft.Office.Interop.Excel等异常,需要在脚本编辑器中打开Install a third party package for this script按钮,从Package Source中选择NuGet,指定包(Specify Package(s))Microsoft.Office.Interop.Excel安装。NuGet⑨是 .NET 的包管理器,可以创建、上传和引用包。

图 2.3-5 读取高程数据并构建地形

图 2.3-6 读取高程数据并构建地形的程序
read excel (IronPython 2 Script 组件)
  """
    读取 Excel 表格数据。ref:https://gramaziokohler.arch.ethz.ch/teaching-materials/04_python/6_modules_libraries/
    Inputs:
        file_path: Excel文件路径;Data structure:Item Access;Type hint:default
        worksheet_num: 表索引; Data structure:Item Access;Type hint:default
        test_rowNum: 如果测试,指定测试行数,default=10;Data structure:Item Access;Type hint:int
    Output:
        data: 读取的表数据。Tree类型数据结构
"""

# r nuget "Microsoft.Office.Interop.Excel"
# r nuget "Office"

__author__ = "richiebao caDesign设计(cadesign.cn)"
__version__ = "2022.09.13"

ghenv.Component.Name = "read excel"
ghenv.Component.NickName = "read excel"
ghenv.Component.Description = "读取Excel文件数据"
ghenv.Component.Message = "0.0.1"
ghenv.Component.Category = "Moths"
ghenv.Component.SubCategory = "Database"
# ghenv.Component.AdditionalHelpFromDocStrings = '1'

import rhinoscriptsyntax as rs
import clr
import ghpythonlib.treehelpers as th

# print(help(clr))


def read_excel(file_path, worksheet_num=1, test_rowNum=None):
    """
    从Excel文件读取数据

    Parameters
    ----------
    file_path : string
        文件路径.
    worksheet_num : int, optional
        表索引. The default is 1.
    test_rowNum : int, optional
        如果测试,指定测试行数

    Returns
    -------
    data_tree : tree
        以GH的tree型数据结构返回读取的表数据.

    """
    clr.AddReference("Microsoft.Office.Interop.Excel")
    import Microsoft.Office.Interop.Excel as excel

    # Excel
    ex = excel.ApplicationClass()
    # Open Workbooks
    workbook = ex.Workbooks.open(file_path)
    # Read Worksheets
    ws = workbook.Worksheets[1]
    columns = map(chr, range(65, 91))
    # print(columns)
    data_dict = {}
    for i in range(ws.UsedRange.Rows.Count):
        # print(i)
        if i == 0:
            continue
        row_data = []
        for j in columns:
            cell_data = ws.Range("{}{}".format(j, i + 1)).Value2
            if cell_data:
                row_data.append(cell_data)
            else:
                break
        data_dict[i] = row_data
        if test_rowNum:
            print("Testing rows:%d" % test_rowNum)
            if i == test_rowNum:
                break

    workbook.Close(True)
    ex.Quit()

    # dict(nested list)2tree
    data_tree = th.list_to_tree(
        data_dict.values(),
    )  # source=[0,0]
    return data_tree


def start_time():
    """
    获取当前时间

    Returns
    -------
    start_time : datetime
        返回当前时间.

    """
    import datetime

    start_time = datetime.datetime.now()
    print("start time:", start_time)
    return start_time


def duration(start_time):
    """
    配合start_time()使用。计算时间长度。

    Parameters
    ----------
    start_time : datetime
        用于计算时间长度的开会时间.

    Returns
    -------
    None.

    """
    import datetime

    end_time = datetime.datetime.now()
    print("end time:", end_time)
    duration = (end_time - start_time).seconds / 60
    print("Total time spend:%.2f minutes" % duration)


if __name__ == "__main__":
    if file_path:
        s_t = start_time()
        if worksheet_num:
            if test_rowNum:
                data = read_excel(file_path, worksheet_num, test_rowNum)
            else:
                data = read_excel(file_path, worksheet_num)
        else:
            if test_rowNum:
                data = read_excel(file_path, test_rowNum=test_rowNum)
            else:
                data = read_excel(file_path)
        duration(s_t)
2.3.3.2 用 Python 扩展库读写 Excel 表数据
因为支持安装 Python 扩展库,增加了开发的效率,因此直接对 .NET 的使用会相对减少。将上述案例用 Python 的包 openpyxl⑩可以更方便的实现对 Excel 表的读写(支持读写 Excel 的 Python 扩展库很多,可以根据情况斟酌选择用哪个包),如图 2.3-7。组件Read Excel (openpyxl)为读取 Excel,组件Write Excel (openpyxl)为写入 Excel。在这两个组件编写过程中,对输入端的参数增加了是否有数据传入的条件语句和异常判断,可以避免组件在未传入任何数据时因为参数为空的错误变为红色。
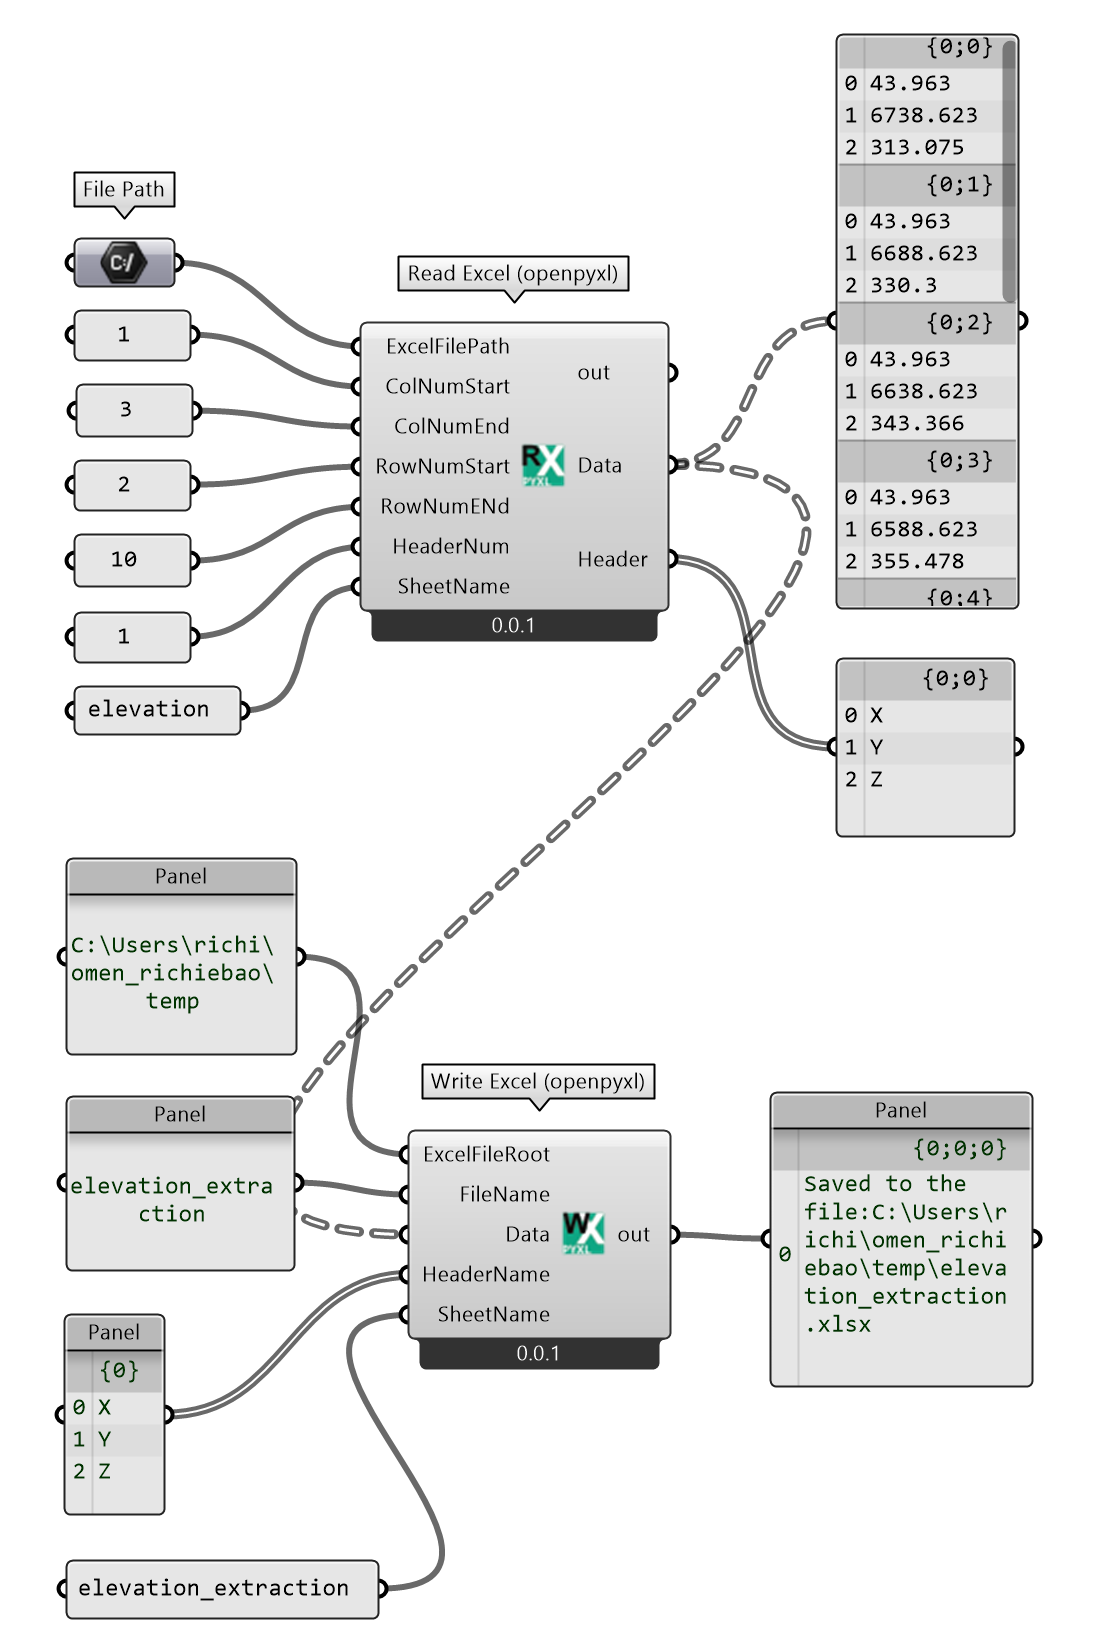
图 2.3-7 用 openpyxl 包读写 Excel 表
Read Excel (openpyxl) (Python Script 组件)
  '''
    使用 Python 包 openpyxl 读取 Excel 表
    Inputs:
        ExcelFilePath:ghdoc Object
            待读取的 Excel 文件路径
        ColNumStart:Int
            读取表起始列
        ColNumEnd:Int
            读取表结束列
        RowNumStart:Int
            读取表起始行
        RowNumENd:Int
            读取表结束行
        HeaderNum:Int
            表头索引行
        SheetName:Str
            表名
    Output:
        Data:Tree
            读取的表数据
        Header:List
            表头
'''

from openpyxl import load_workbook
import ghpythonlib.treehelpers as th

ghenv.Component.Name = 'Read Excel (openpyxl)'
ghenv.Component.NickName = 'Read Excel (openpyxl)'
ghenv.Component.Description = '使用 Python 包 openpyxl 读取 Excel 表'
ghenv.Component.Message = '0.0.1'
ghenv.Component.Category = 'Database'
ghenv.Component.AdditionalHelpFromDocStrings = '1'

def read_excel():
    data_matrix = []
    header = []

    if ExcelFilePath:
        wb_obj = load_workbook(filename=ExcelFilePath)

        if SheetName:
            wb_obj.active = wb_obj[SheetName]

        sheet_obj = wb_obj.active

        if ColNumStart:
            colNumStart = ColNumStart
        else:
            colNumStart = 1

        if ColNumEnd:
            colNumEnd = ColNumEnd
        else:
            colNumEnd = 10

        if RowNumStart:
            rowNumStart = RowNumStart
        else:
            rowNumStart = 1

        if RowNumENd:
            rowNumENd = RowNumENd
        else:
            rowNumENd = 10

        if HeaderNum:
            headerNum = HeaderNum
        else:
            headerNum = 1

        for i in range(RowNumStart, RowNumENd + 1):
            row_lst = []
            for j in range(ColNumStart, ColNumEnd + 1):
                cell_obj = sheet_obj.cell(row=i, column=j)
                # print(cell_obj.value)
                row_lst.append(cell_obj.value)
            data_matrix.append(row_lst)

        for j in range(ColNumStart, ColNumEnd + 1):
            cell_obj = sheet_obj.cell(row=headerNum, column=j)
            header.append(cell_obj.value)

    data_matrix_tree = th.list_to_tree(data_matrix)
    return data_matrix_tree, header


if __name__ == "__main__":
    Data, Header = read_excel()
Write Excel (openpyxl) (Python Script 组件)
  '''
    使用 Python 包 openpyxl 将数据写入 Excel 表
    Inputs:
        ExcelFileRoot:Str
            存储 Excel 文件的文件夹
        FileName:Str
            存储 Excel 文件名
        Data:Tree
            待存储的数据
        HeaderName:List[str]
            表头
        SheetName: Str
            表名
'''

from openpyxl import Workbook
import ghpythonlib.treehelpers as th
import os

ghenv.Component.Name = "Write Excel (openpyxl)"
ghenv.Component.NickName = "Write Excel (openpyxl)"
ghenv.Component.Description = "使用 Python 包 openpyxl 将数据写入 Excel 表"
ghenv.Component.Message = "0.0.1"
ghenv.Component.Category = "Database"

def crateWorkbookl():
    if ExcelFileRoot:
        excelFileRoot = ExcelFileRoot
    else:
        excelFileRoot = ""

    if FileName:
        fileName = FileName + ".xlsx"
    else:
        fileName = "data.xlsx"

    if HeaderName:
        headerName = HeaderName
    else:
        headerName = None

    if SheetName:
        sheetName = SheetName
    else:
        sheetName = "mySheet"

    if Data.BranchCount>0:
        filePath = os.path.join(excelFileRoot, fileName)

        data = th.tree_to_list(Data)
        columNum = len(data[0])
        data.insert(0, headerName)

        wb = Workbook()
        ws = wb.active

        ws1 = wb.create_sheet(sheetName)

        try:
            for i in range(1, len(data) + 1):
                for j in range(1, columNum + 1):
                    cell = ws1.cell(row=i, column=j)
                    cell.value = data[i - 1][j - 1]
            wb.save(filePath)
            print(f"Saved to the file:{filePath}")
        except Exception as e:
            print(e)


if __name__ == "__main__":
    crateWorkbookl()
2.3.4 Grasshopper API 和 Node-in-Code™(nic)
RhinoCommon(Rhino是 Rhino SDK 可扩展的底层 .NET 库(API)),包含使用 Rhino 所需的类、结构和函数,可以访问 Rhino 实现的功能。Grasshopper(Grasshopper SDK⑪) 提供的类和函数则提供有使用 GH 对象的方法,例如DataTree处理Tree类型数据结构等。可以帮助开发自定义组件、参数和数据类型。而ghpythonlib包括了调用 GH 组件的能力(除个别组件无法调用),通常位于ghpythonlib.components 模块之下。通过调用 GH 组件可以将大型的可视化编程代码(组件)压缩成紧密结合的工作流程,方便代码调试和代码迁移。
图 2.3-8 演示了 Data Tree 的建立,复制、分枝提取和清空、基本属性和方法,及调用GH->Sets->Tree给出处理 Data Tree 的主要内容解释。其中定义的函数lst2chunks(lst,n)是将列表按照给定的 n 数量,切分列表为多段。
2.3.4.1 Tree 型数据结构组织
Python 的核心数据结构包括list,tuple,dict和set,数据分析处理时一般使用NumPy⑫的array(数组)和Pandas⑬的DataFrame。这里演示 GH 提供的Tree方法,通过对路径的组织可以方便的处理多维数据。对Tree类型数据结果的组织,可以通过Grasshopper下GH_Path建立路径(path),通过DataTree建立 Tree 型数据, 通过 Data Tree 的方法和属性对 Tree 型数据的路径进行组织和信息提取,通过ghpythonlib调用GH->Sets->Tree下的组件方法进一步扩展 Tree 型数据的处理能力。
图 2.3-8 Tree 型数据组织示例
Data Tree explanation (Python Script 组件)
  """Data Tree类数据结构解释.
    Inputs:
        None
    Output:
        square_tree,DT_A,DT_B,branches_nestedLst_0: 测试用输出结果查看"""

from Grasshopper import DataTree
from Grasshopper.Kernel.Data import GH_Path
import ghpythonlib.components as ghc
import ghpythonlib.treehelpers as th
import Rhino.Geometry as rg
import itertools


def lst2chunks(lst, n):
    """
    将列表按照给定的 n 数量,切分列表为多段

    Parameters
    ----------
    lst : TYPE
        DESCRIPTION.
    n : TYPE
        DESCRIPTION.

    Yields
    ------
    TYPE
        DESCRIPTION.

    """
    for i in range(0, len(lst), n):
        yield lst[i : i + n]


if __name__ == "__main__":
    # help(DataTree)
    # A-建立 Data Tree
    extend_x, extend_y = 3, 3
    square_lst = ghc.Square(
        ghc.XYPlane(ghc.ConstructPoint(0, 0, 0)), 1, extend_x, extend_y
    )["points"]
    print("+++", list(square_lst))
    square_chunks = lst2chunks(list(square_lst), extend_x + 1)
    square_chunks_A, square_chunks_B = itertools.tee(square_chunks, 2)
    # 01-嵌套列表转字典
    square_tree = th.list_to_tree(list(square_chunks_A))
    print(square_tree)
    print("-" * 50)
    # 02-建立 Tree 对象,并增加分枝
    DT_A = DataTree[rg.Point3d]()  # 指定数据类型,定义 Tree 对象
    DT_B = DataTree[rg.Point3d]()
    square_nestedLst = list(square_chunks_B)
    for i in range(len(square_nestedLst)):
        path_A = GH_Path(i)
        DT_A.AddRange(
            square_nestedLst[i], path_A
        )  # AddRange() 方法追加一个指定路径的列表
        for j in range(len(square_nestedLst[i])):
            path_B = GH_Path(i, j)
            DT_B.Add(
                square_nestedLst[i][0], path_B
            )  # Add() 方法追加一个指定路径的对象
    # ---------------------------------------------------------------------------

    # B-复制 Data Tree
    square_tree_copy = DataTree[rg.Point3d](DT_A)  # 复制
    print(square_tree_copy)
    print("-" * 50)
    # ---------------------------------------------------------------------------

    # C-提取分枝与清空
    branches_all = DT_A.AllData()  # 提取所有值,返回一个列表
    print(len(branches_all))
    branch_B1 = DT_A.Branch(1)  # 根据路径索引值提取分枝
    print(branch_B1)
    branch_B2 = DT_A.Branch(
        GH_Path(0, 2)
    )  # 根据路径名提取路径分枝,用 GH_Path 方法建立路径
    print(branch_B2)
    branches_nestedLst = (
        DT_A.Branches
    )  # 将所有路径分支下的项值放置于各自的子列表下后放置于父级列表下
    branches_nestedLst_0 = branches_nestedLst[0]
    print(branches_nestedLst_0)

    DT_C = DataTree[rg.Point3d](DT_A)
    DT_C.Clear()  # 清空 DataTree,不保持类路径结构
    print(DT_C)
    DT_D = DataTree[rg.Point3d](DT_A)
    DT_D.ClearData()  # 清除项值,但是保留路径结构
    print(DT_D)
    print("-" * 50)
    # ---------------------------------------------------------------------------

    # D-DataTree 的基本属性
    print(DT_A.BranchCount)  # 统计所有路径分支的数量
    print(DT_A.DataCount)  # 统计各个路径分支下所有项值的数量
    print(list(DT_A.Paths))  # 将所有路径名置于一个列表之下
    print(DT_A.TopologyDescription)  # 获取路径分支结构

    # E-DataTree 的常用方法 path
    new_path = GH_Path(97)
    DT_A.EnsurePath(new_path)  # 增加新的路径分支
    DT_A.Add(ghc.ConstructPoint(10, 10, 10), new_path)  # 给定路径指定值
    DT_A.Insert(
        ghc.ConstructPoint(20, 20, 20), new_path, 1
    )  # 根据指定的路径和索引值插入元素
    print(
        DT_A.ItemExists(new_path, 1)
    )  # 判断指定的路径下索引值是否存在,返回布尔值
    print(DT_A.ItemExists(new_path, 2))
    print(DT_A.PathExists(new_path))  # 判断指定的路径是否存在,返回布尔值
    print(DT_A.Path(4))  # 根据指定的路径索引值返回该路径名
    DT_A.RemovePath(new_path)  # 移除指定的路径及该路径下所有项值
    print(DT_A)
    new_pts = [
        ghc.ConstructPoint(x, y, 0)
        for x, y in zip(range(11, 15), range(21, 25))
    ]
    DT_A.AddRange(new_pts, GH_Path(67, 78))  # 追加一个指定路径的列表
    DT_A.RenumberPaths()  # 将所有路径分支按照顺序从0开始重新命名
    square_tree.SimplifyPaths()  # 简化路径分支
    square_tree.MergeTree(
        th.list_to_tree(DT_A.Branch(GH_Path(4)))
    )  # 合并两个树型数据
    square_tree.Graft()  # 移植所有路径分支下的项值到各自单独的路径分支下
    DT_A.Graft(
        GH_Path(4)
    )  # 仅移植指定路径分支下的所有项值到各自单独的路径分支之下
    square_tree.Flatten()  # 数据展平,将所有路径分支下的值置于一个列表(分枝)下

    # F-调用`GH->Sets->Tree`下的方法组织 Tree 类型数据示例
    DT_E = ghc.trees.TrimTree(DT_B, 1)
    DT_E = ghc.trees.FlipMatrix(DT_E)
2.3.4.2 用 ghpythonlib API 的方式,定义随机变化空间立方体结构
“随机变化空间立方体结构”的构建如图 2.3-9,主要的逻辑是建立三维空间点,在每个点上建立随机半径的球体,随机提取球体一点实现对原有等距点的扰动。该部分由space truss cube组件实现,为了控制位置(pt_s,pt_e)和立方体方位(Rotate),间距(Distance),数量(Count),及随机变化(Raio_seed),配置对应的输入端参数。Tree型数据的组织由DataTree和GH_Path处理;同时,可以通过ghpythonlib.treehelpers提供的list_to_tree和tree_to_list实现常规 Python 数据结构与 GH 独特的Tree型数据结构之间的转换。并且,可以通过ghpythonlib.components调用GH->Sets->Tree模块下的方法,例如TrimTree,FlipMatrix等实现对Tree类型数据结构的组织。该部分主要使用ghpythonlib.components模块(ghpythonlib⑭),直接调用 GH 组件实现几何对象构建、编辑,例如ghc.Vector2Pt()通过两个点建立向量,ghc.Amplitude()实现对向量的缩放,ghc.Move()移动几何对象,ghc.UnitZ()获得 Z 轴向单元向量,ghc.ConstructDomain()构建一维区间,ghc.Sphere()构建球体,ghc.PopulateGeometry()获得几何表面上随机点,ghc.PolyLine()构建 Polyline 折线等。ghpythonlib.components几乎可调用 GH 已有的所有组件,在调用组件时,一是,可以通过 Python Script 给出的提示查看使用方法;二是,可以直接查看可视化组件本身的输入和输出端参数,辅助判断组件调用参数的配置。如果返回的参数(组件的输出端)大于1个,则会以字典形式返回,因此在提取值时,需要确定键名(或索引)。键名可通过提示帮助查看,索引返回的顺序通常与组件输出端参数的顺序一致。
space truss cube 组件定义包含两个函数,其中space_truss_cube_pts(pt_s,pt_e,Distance,Count)用于构建空间点,space_truss_cube_crvs(pts_tree)用于构建空间曲线。空间点的构建主要通过确定向量,移动复制点对象实现。将三维点组转换为空间折线(包括 X,Y 和 Z 等3个方向),则是对 Tree 类型数据的组织。而为了简化对 Tree 型数据的组织,最好的方式还是回到 Python 的基本数据结构或 Numpy 数组,通过对嵌套列表(或 Numpy 数组)的组织,实现数据结构的变换。定义transpose_2d()和transpose_3d()函数,达到上述变换的目的。
构建“随机变化空间立方体结构”后,需要组织点构建 Mesh 面。由space truss cube 组件输出的spaceStrussCube_ptsTree 型点数据的路径{A;B;C}保留了点在三个方向上的组织模式,为多为数组。通过定义Pts2MeshQuad_M组件实现点的组织(可以同时参考 1.3.1 部分第34代码段中定义的Pts2MeshQuad)。

图 2.3-9 构建空间立方体
图 2.3-10 构建空间立方体的代码
space truss cube (Python Script 组件)
  """
    构建一个空间立方体
    Inputs:
        pt_s: 位置点(方向起始点)。Data structure:Item Access;Type hint:Point3D
        pt_e: 方向结束点。Data structure:Item Access;Type hint:Point3D
        Distance: 点间距离。Data structure:Item Access;Type hint:Default
        Count: 点数量(一边)。Data structure:Item Access;Type hint:int
        Rotate: 面间旋转角度。Data structure:Item Access;Type hint:Default
        Ratio_seed: 变化随机种子。Data structure:Item Access;Type hint:Default
    Output:
        spaceStrussCube_pts: 空间立方体结构随机变化点
        spaceStrussCube_crvs:空间立方体结构随机变化曲线
"""

ghenv.Component.Name = "space truss cube pts"
ghenv.Component.NickName = "space truss cube pts"
ghenv.Component.Description = "随机变化空间立方体结构"
ghenv.Component.Message = "0.0.1"
ghenv.Component.Category = "Moths"
ghenv.Component.SubCategory = "DesignContent"

from Grasshopper import DataTree
from Grasshopper.Kernel.Data import GH_Path
import Rhino.Geometry as rg
import ghpythonlib.components as ghc
import ghpythonlib.treehelpers as th
import random
import itertools

flatten_lst = lambda lst: (
    [m for n_lst in lst for m in flatten_lst(n_lst)]
    if type(lst) is list
    else [lst]
)  # 展平嵌套列表


def split_list(lst, count):
    """
    指定长度切分列表
    """
    return [lst[i : i + count] for i in range(0, len(lst), count)]


def transpose_2d(nested_list):
    """
    二维矩阵的翻转
    """
    return [list(row) for row in zip(*nested_list)]


def transpose_3d(matrix, direction=1):
    """
    三维矩阵的翻转
    """
    if direction == 1:
        return [
            [
                [matrix[j][i][k] for j in range(len(matrix))]
                for i in range(len(matrix[0]))
            ]
            for k in range(len(matrix[0][0]))
        ]
    elif direction == 2:
        return [transpose_2d(i) for i in matrix]


def space_truss_cube_pts(
    pt_s,
    pt_e,
    Distance,
    Count,
):
    """
    建立空间立方体结构随机变化点

    Parameters
    ----------
    pt_s : Point3D
        位置点(方向起始点).
    pt_e : Point3D
        方向结束点.
    Distance : float
        点间距离.
    Count : int
        点数量(一边).

    Returns
    -------
    random_pts_tree : Tree(Point3D)
        空间立方体结构随机变化点.

    """
    # A-X向点(单排)
    vector_x = ghc.Vector2Pt(pt_s, pt_e, True)[0]
    vectors4Xmove = [
        ghc.Amplitude(vector_x, Distance * i) for i in range(Count)
    ]
    pts_x = [ghc.Move(pt_s, v)[0] for v in vectors4Xmove]

    # B-Y向点(多排)
    vector_y = ghc.Vector2Pt(
        pt_s, ghc.Rotate(pt_e, ghc.Radians(Rotate), ghc.XYPlane(pt_s))[0], True
    )[0]
    vectors4Ymove = [
        ghc.Amplitude(vector_y, Distance * i) for i in range(Count)
    ]
    pts_xy = [[ghc.Move(pt, v)[0] for v in vectors4Ymove] for pt in pts_x]

    # C-Z向点(三维矩阵)
    vector_z = ghc.UnitZ(Distance)
    vectors4Zmove = [
        ghc.Amplitude(vector_z, Distance * i) for i in range(Count)
    ]
    pts_xyz = [
        [[ghc.Move(pt_y, v)[0] for v in vectors4Zmove] for pt_y in pts_x]
        for pts_x in pts_xy
    ]
    pts_xyz_tree = th.list_to_tree(pts_xyz)

    # D-随机半径球体上随机点
    random_radius = map(
        lambda x: x * Distance / 2,
        ghc.Random(
            ghc.ConstructDomain(0, 1), len(flatten_lst(pts_xyz)), Ratio_seed
        ),
    )

    random_sphere = [
        ghc.Sphere(ghc.XYPlane(pt), r)
        for pt, r in zip(flatten_lst(pts_xyz), random_radius)
    ]

    random_pts_lst = [
        ghc.PopulateGeometry(i, 1, random.uniform(0, 10000))
        for i in random_sphere
    ]
    random_pts = split_list(random_pts_lst, Count)

    # E-转换为Tree类型数据结构
    random_pts_tree = DataTree[rg.Point3d]()
    for pts, path in zip(random_pts, pts_xyz_tree.Paths):
        random_pts_tree.AddRange(pts, path)

    return random_pts_tree


def space_truss_cube_crvs(pts_tree):
    """
    建立空间立方体结构随机变化曲线

    Parameters
    ----------
    pts_tree : Tree[Point3D]
        空间立方体结构随机变化点.

    Returns
    -------
    crvs_xyz_tree : Tree[Polyline]
        空间立方体结构随机变化曲线.

    """
    crvs_xyz = []
    crvs_z = list(ghc.PolyLine(pts_tree, False))
    crvs_xyz.append(split_list(crvs_z, Count))

    pts_lst = th.tree_to_list(pts_tree)
    pts_T_1 = transpose_3d(pts_lst)
    crvs_x = list(ghc.PolyLine(th.list_to_tree(pts_T_1), False))
    crvs_xyz.append(crvs_x)

    pts_T_2 = transpose_3d(pts_lst, direction=2)
    crvs_y = list(ghc.PolyLine(th.list_to_tree(pts_T_2), False))
    crvs_xyz.append(crvs_y)

    return th.list_to_tree(crvs_xyz)


if __name__ == "__main__":
    spaceStrussCube_pts = space_truss_cube_pts(pt_s, pt_e, Distance, Count)
    print("Finished the points calculation...")
    spaceStrussCube_crvs = space_truss_cube_crvs(spaceStrussCube_pts)
    print("Finished the curves calculation...")
Pts2MeshQuad_M (Python Script 组件)
  """
    将多维点数据转化为构建 mesh quad 所需的数据组织方式.
    Inputs:
        TreeData: Tree 型点数据。Data structure:Tree Access;Type hint:Point3D
    Output:
        PLst: Mesh Quad 型顶点格式
"""
from Grasshopper import DataTree
from Grasshopper.Kernel.Data import GH_Path
import Rhino.Geometry as rg
import ghpythonlib.components as ghc
import itertools
import rhinoscriptsyntax as rs


def pts2meshQuad(dt):
    """
    将多维点数据转化为构建 mesh quad 所需的数据组织方式

    Parameters
    ----------
    dt : Tree(Point3D)
        Tree型点数据.

    Returns
    -------
    dt4mesh : Tree(Point3D)
        构建mesh quad所需的数据组织方式.

    """
    paths = dt.Paths
    paths_idx = zip([p[len(ghc.DeconstructPath(p)) - 2] for p in paths], paths)
    key_func = lambda x: x[0]
    paths_group = itertools.groupby(paths_idx, key_func)
    paths_group_dict = {k: [i[1] for i in list(v)] for k, v in paths_group}

    dt4mesh_all = []
    p_num = 0
    dt4mesh = DataTree[rg.Point3d]()
    for branches in paths_group_dict.values():
        for m in range(len(branches) - 1):
            a_idx = branches[m]
            b_idx = branches[m + 1]
            a = dt.Branch(a_idx)
            b = dt.Branch(b_idx)

            for i in range(len(a) - 1):
                lst = []
                lst.append(b[i])
                lst.append(a[i])
                lst.append(b[i + 1])
                lst.append(a[i + 1])
                dt4mesh.AddRange(lst, GH_Path(p_num, m, i))
        p_num += 1
    return dt4mesh


if __name__ == "__main__":
    PLst = pts2meshQuad(TreeData)
2.3.5 多线程(parallel)
ghpythonlib.parallel模块提供了多线程处理函数run,这与 Python 的multiprocessing⑮的pool方法类似,可以向函数传入序列值,多线程并行计算,加快计算速度。但多线程run方法只适用于ghpythonlib可以调用的方法,即调用的对象为 GH 组件。在图 2.3-11案例中,通过srfs=run(wallOpening_typeA,args,flatten_results=False)执行多线程,其中wallOpening_typeA为自定义的函数,每次传入一组args参数,为一个 mesh 和一个距离值(distance),以序列解包的方式将args参数赋值给对应的变量名。被调用执行多线程的函数对输入序列各个值执行相同的操作,对一个三边面(mesh)执行“开洞”的操作。值以列表形式返回,可以通过配置flatten_results参数,确定是否展平结果。
该部分案例主要使用ghpythonlib模块实现,并由 3 个函数组成,其中sorting_closestPts(pts_1,pts_2)实现根据最近点,由一组列表点排序另一组列表点的方法,并在wallOpening_typeA(args)中调用,通过最近点排序点组,使得两两曲线放样ghc.RuledSurface(crvs[0],crvs[1]),尽量避免扭曲。

图 2.3-11 多线程应用示例
wallOpening_typeA (Python Script 组件)
  """Provides a scripting component.
    Inputs:
        pts_A: 用于构建一根曲线的点组A。Data structure:List Access;Type hint:Point3D
        pts_B: 用于构建一根曲线的点组B。Data structure:List Access;Type hint:Point3D
        pg_count:随机生成点的数量。Data structure:Item Access;Type hint:int
        pg_seed:控制点位置的随机种子。Data structure:Item Access;Type hint:int
        Off_Distance:偏移距离。Data structure:Item Access;Type hint:Default(float)
    Output:
        ptsOnsrf: 曲面上生成的随机点
        srf:曲面
        delaunay_mesh:三角面
        wallOpening:墙体开洞模式A
        """
import ghpythonlib.components as ghc
import ghpythonlib.treehelpers as th
from ghpythonlib.parallel import run
import random


def delaunay_mesh(pts_A, pts_B, pg_count, pg_seed):
    """
    根据两根曲线构建曲面后生成随机点建立 Mesh(3边面)对象

    Parameters
    ----------
    pts_A : list(Point3D)
        用于构建一根曲线的点组A.
    pts_B : list(Point3D)
        用于构建一根曲线的点组B.
    pg_count : int
        随机生成点的数量.
    pg_seed : int
        控制点位置的随机种子.

    Returns
    -------
    ptsOnsrf : list(Point3D)
        曲面上生成的随机点.
    srf : surface
        曲面.
    delaunay_mesh : mesh
        三角面.
    meshes : meshes
       拆解独立的三角面.

    """
    crv_A = ghc.NurbsCurve(pts_A, 3, False)[0]
    crv_B = ghc.NurbsCurve(pts_B, 3, False)[0]
    crvs = [crv_A, crv_B]
    srf = ghc.RuledSurface(crv_A, crv_B)
    ptsOnsrf = ghc.PopulateGeometry(srf, pg_count, pg_seed)
    ref_plane = ghc.PlaneFit(pts_A + pts_B)[0]
    delaunay_mesh = ghc.DelaunayMesh(ptsOnsrf, ref_plane)
    deconstruct_mesh = ghc.DeconstructMesh(delaunay_mesh)
    dm_vertices = deconstruct_mesh["vertices"]
    dm_faces = deconstruct_mesh["faces"]
    meshes = map(lambda face: ghc.ConstructMesh(dm_vertices, face), dm_faces)

    return ptsOnsrf, srf, delaunay_mesh, list(meshes)


def sorting_closestPts(pts_1, pts_2):
    """
    根据最近点,由一组列表点(pts_1)排序另一组列表点(pts_2)

    Parameters
    ----------
    pts_1 : list(Point3D)
        参考点列表.
    pts_2 : list(Point3D)
        排序点列表.

    Returns
    -------
    sorted_pts_2 : list(Point3D)
        排序后的点列表.

    """
    sorted_pts_2 = []
    for pt in pts_1:
        cp_return = ghc.ClosestPoint(pt, pts_2)
        cp = cp_return["closest_point"]
        cp_idx = cp_return["cp_index"]
        sorted_pts_2.append(pts_2.pop(cp_idx))

    return sorted_pts_2


def wallOpening_typeA(args):
    """
    墙体(幕墙)开洞模式-类型 A

    Parameters
    ----------
    args : mesh(一个三边面),float
        mesh,distance.

    Returns
    -------
    srfs : list(surface)
        开洞列表.

    """
    mesh, distance = args
    fb = ghc.FaceBoundaries(mesh)
    pts = ghc.PopulateGeometry(mesh, 3, random.uniform(0, 10000))

    triangle_pl = ghc.PolyLine(pts, True)
    triangle_srf = ghc.BoundarySurfaces(triangle_pl)
    srfs = []
    crvs = []

    for dis in [distance, ghc.Negative(distance)]:
        try:
            offset_srf = ghc.OffsetSurfaceLoose(triangle_srf, dis, True)
            pts_naked = list(ghc.BrepEdges(offset_srf)["naked"])
            naked_edges = ghc.JoinCurves(pts_naked, True)
            naked_pts = list(ghc.ControlPoints(naked_edges)["points"])  # [:3]

            fb_pts = list(ghc.ControlPoints(fb)["points"])  # [:3]
            naked_pts_sorted = sorting_closestPts(fb_pts, naked_pts)

            crv_1 = ghc.PolyLine(fb_pts, True)
            crv_2 = ghc.PolyLine(naked_pts_sorted, True)

            ruledSrf = ghc.RuledSurface(crv_1, crv_2)
            srfs.append(ruledSrf)
            crvs.append(crv_2)
        except Exception as e:
            print(e)

    if len(crvs) > 1:
        ruledSrf_crvs = ghc.RuledSurface(crvs[0], crvs[1])
        srfs.append(ruledSrf_crvs)

        return srfs
    else:
        return None


if __name__ == "__main__":
    if pts_A and pts_B:
        if pg_count is None:
            pg_count = 20
        if pg_seed is None:
            pg_seed = random.randint(1, 1000)

        ptsOnsrf, srf, delaunay_mesh, meshes = delaunay_mesh(
            pts_A, pts_B, pg_count, pg_seed
        )
        args = zip(meshes, [Off_Distance] * len(meshes))
        srfs = run(wallOpening_typeA, args, flatten_results=True)
        wallOpening = th.list_to_tree(list(srfs))
2.3.6 调用 RhinoScriptSyntax
相比 RhinoCommon(rc)和 Grasshopper(Node-in-Code™(nic) form GHPython),RhinoScriptSyntax(rs)⑯模块是用 Python Script 书写代码最友善的一个模块,主要原因包括:1,rs 迁移于 RhinoScript,具有完善的说明手册,方便查阅(对于任何编程语言,或者任何模块,只有具备了完善的手册说明和示例代码,才可以大幅度降低使用者应用的难度);2, Python Script 输入端的Type hint默认为ghdoc Object,通常不用指定输入端数据的具体类型,rs 会自动识别,这大幅度提升了代码编写的效率;3, rs 模块包含数百个易于使用的函数,可以解决大部分几何对象、文件处理、环境配置等问题。
在应用 rs 时,与 rc 和 nic 的一个重要的差异是,rs 通常操作对象的GUID,如果要获取属性(几何对象值)则需要执行相应的命令,例如在提取点坐标时,使用了x,y,z=rs.PointCoordinates(pt)方法。
rc,rs,nic 各模块均有各自的优点,编写一个组件(Python Script)时,通常以一种为主,如果某个功能只有其它模块才有,则再调用对应模块使用。例如 GH 组件包含很多具有参数化意义的功能组件,如 Domain 区间,Sets 里的各类数据处理等,这通常不包含在 rc 和 rs 中。混合使用 rc,rs 和 nic 时,对几何对象的数据类型要求可能不同,需要根据具体情况和异常提示进行转换。
图 2.3-12 RhinoScriptSyntax 应用示例
random shortest lines (Python Script 组件)
  """
    随机两两最近点连线.
    Inputs:
        pts_custom:自定义随机点列表。 DS:List Access;TH:Default
        pt_location:位置点。 DS:Item Access;TH:Default
        range_min:区间控制最小值。DS:Item Access;TH:Default
        range_max:区间控制最大值。DS:Item Access;TH:Default
        number:随机点数量。DS:Item Access;TH:Default
        shift:在自定义点和自动生成点方式间切换。DS:Item Access;TH:Default
        radius_amplitude:管道随机半径倍数。DS:Item Access;TH:Default
    Output:
        pts: 随机点
        crvs:随机两两最近点连线
        pipes:连线管道
        boundingBox:随机点外接立体边界点
"""
import rhinoscriptsyntax as rs
import random
import copy

ghenv.Component.Name = "random_shortestLines"
ghenv.Component.NickName = "random_shortestLines"
ghenv.Component.Description = "随机两两最近点连线"
ghenv.Component.Message = "0.0.1"
ghenv.Component.Category = "Moths"
ghenv.Component.SubCategory = "Database"

def random_pts(pt, range_min, range_max, num):
    """
    给定定位点,区间和数量,生成随机点

    Parameters
    ----------
    pt : rs(point<guid>)
        定位点.
    range_min : float
        区间控制最小值.
    range_max : float
        区间控制最大值.
    num : float/int
        随机点数量.

    Returns
    -------
    pts : rs(list<point>)
        随机点.

    """
    x, y, z = rs.PointCoordinates(pt)
    random_val = (
        lambda x: random.choice((1, -1)) * random.uniform(range_min, range_max)
        + x
    )
    x_delta = [random_val(x) for i in range(int(number))]
    y_delta = [random_val(y) for i in range(int(number))]
    z_delta = [random_val(z) for i in range(int(number))]
    pts = rs.AddPoints(zip(x_delta, y_delta, z_delta))

    return pts


def random_shortestLines(pts):
    """
    随机两两最近点连线

    Parameters
    ----------
    pts : rs(points)
        随机点.

    Yields
    ------
    rs(list<curve>)
        连线列表.

    """
    while len(pts) > 2:
        pt = pts.pop()
        closest_pt_returns = rs.PointClosestObject(pt, pts)
        pts.remove(closest_pt_returns[0])

        yield rs.AddLine(pt, closest_pt_returns[1])


def random_radius_pipe(crvs, radius_amplitude=1):
    """
    随机管道

    Parameters
    ----------
    crvs : rs(list<curve>)
        直线列表.
    radius_amplitude : float, optional
        随机管道半径倍数. The default is 1.

    Returns
    -------
    pipes : rs(list<pipe>)
        管道列表.

    """
    crvs_lst = list(crvs)
    n = len(list(crvs_lst))
    addPipe = lambda args: rs.AddPipe(args[0], args[1], args[2], cap=1)[0]
    radii = [random.random() * radius_amplitude for i in range(n)]
    pipes = map(addPipe, zip(crvs_lst, [0] * n, radii))
    # print(pipes[0])

    return list(pipes)


if __name__ == "__main__":
    pts = random_pts(pt_location, range_min, range_max, number)
    boundingBox = rs.BoundingBox(pts)

    if pts_custom and shift:
        crvs = random_shortestLines(pts_custom)
    else:
        crvs = random_shortestLines(pts)
    pipes = random_radius_pipe(crvs, radius_amplitude)
2.3.7 创建、保存和调用模块(modules)
与 Python 的模块创建一样,可以将定义的函数、类和属性变量等置于一个.py文件下(即模块),并存储在print(sys.path)包含的路径下(可以使用 2.3.1.2 部分定义的SysPath N InstalledPkgs组件查看包含的系统路径),通常将其置于C:\Users\[user name]\AppData\Roaming\McNeel\Rhinoceros\8.0\scripts之下,则可以在 Python Script 中调用对应的模块。将本章上述书写的代码按照几何构建类和数据处理类,将函数分别置于module_geometry.py和module_dataProcessing.py文件中,在迁移代码时,注意需要在模块开始调入相关的库。两个模块包含的函数如下:
module_geometry.py
  from Grasshopper import DataTree
from Grasshopper.Kernel.Data import GH_Path
import rhinoscriptsyntax as rs
import Rhino.Geometry as rg
import ghpythonlib.components as ghc
import ghpythonlib.treehelpers as th
import random
import itertools

def random_pts(pt,range_min,range_max,number):
def random_shortestLines(pts):
def random_radius_pipe(crvs,radius_amplitude=1):
def spiral(x,y,rotation_interval):
def space_truss_cube_pts(pt_s,pt_e,Distance,Count,):
def space_truss_cube_crvs(pts_tree):
def delaunay_mesh(pts_A,pts_B,pg_count,pg_seed):
def sorting_closestPts(pts_1,pts_2):
def wallOpening_typeA(args):
module_dataProcessing.py
  import math
import operator
import clr
import ghpythonlib.treehelpers as th

flatten_lst=lambda lst: [m for n_lst in lst for m in flatten_lst(n_lst)] if type(lst) is list else [lst]

def lst2chunks(lst,n):
def range_SES(start,end,step):
def sine_PSA(sequence,period,shift,amplitude):
def read_excel(file_path,worksheet_num=1,test_rowNum=None):
def start_time():
def duration(start_time):
Python Script 调用自定义模块同 Python 一般调用语法,例如import module_dataProcessing as mdp和import module_geometry as mg。
rs,nic 和 rc 提供的方法,如果仅允许为一个对象,而不是列表时,通常配合使用map()内置函数。
用 rs 模块往往会碰到GUID和几何对象之间的转换(例如转换为point3D),例如在rs,nic 和 rc 不同模块之间切换时。rs 模块提供了以coerce开头的方法,例如rs.coerce3dpoint,可以将点的GUID对象转换为point3D对象。因为转换经常被用到,为简化代码,可以将其定义为 lambda 函数,方便调用。

图 2.3-13 调用自定义模块应用示例
design BY custom Module (Python Script 组件)
  """
    调用自定义模块示例.
    Inputs:
        location_1:随机点组定位1。 DS:Item Access;TH:Default
        location_2:随机点组定位2。 DS:Item Access;TH:Default
        range_min:随机点组区间最小值。DS:Item Access;TH:Default
        range_max:随机点组区间最大值。DS:Item Access;TH:Default
        num:随机点数量。DS:Item Access;TH:Default
    Output:
        pts1: 随机点组1
        pts2: 随机点组2
        crvs: 组间随机两两最近点排序后连线
        boundingBoxPts: 外接矩形顶点
        boundingBox: 外接矩形
        pipes: 管道
"""

import rhinoscriptsyntax as rs
import ghpythonlib.components as ghc

import module_dataProcessing as mdp
import module_geometry as mg

import ghpythonlib.treehelpers as th


def designBYcustomModules(location_1, location_2, range_min, range_max, num):
    """
    调用自定义模块示例。随机生成两组随机点,然后组间随机两两最近点排序后连线。

    Parameters
    ----------
    location_1 : rs(point)
        随机点组定位1.
    location_2 : rs(point)
        随机点组定位2.
    range_min : float
        随机点组区间最小值.
    range_max : float
        随机点组区间最大值.
    num : float/int
        随机点数量.

    Returns
    -------
    pts1 : points3d
        随机点组1.
    pts2_sorted : points3d
        随机点组2.
    crvs : curve
        组间随机两两最近点排序后连线.
    box_pts_tree : tree(point)
        外接矩形顶点.
    boundingBox : brep
        外接矩形.

    """
    pts1 = mg.random_pts(location_1, range_min, range_max, num)
    pts2 = mg.random_pts(location_2, range_min, range_max, num)
    guids2pts = lambda pts: map(rs.coerce3dpoint, pts)
    pts2_sorted = mg.sorting_closestPts(
        list(guids2pts(pts1)), list(guids2pts(pts2))
    )
    crvs = map(rs.AddLine, pts1, pts2_sorted)

    box_pts = map(rs.BoundingBox, [pts1, pts2])
    box_pts_lst = list(box_pts)
    box_pts_tree = th.list_to_tree(box_pts_lst)
    boundingBox = map(rs.AddBox, box_pts_lst)

    return pts1, pts2_sorted, list(crvs), box_pts_tree, list(boundingBox)


if __name__ == "__main__":
    pts1, pts2, crvs, boundingBoxPts, boundingBox = designBYcustomModules(
        location_1, location_2, range_min, range_max, num
    )
    pipes = list(mg.random_radius_pipe(crvs))
⇩module_dataProcessing.py 模块下载
注释(Notes):
① Modules,Python 模块和包(https://docs.python.org/3/tutorial/modules.html)。
② networkx,是一个 Python 包,用于创建、操作和研究复杂网络的结构、动态和功能。(https://networkx.org/)。
③ christofides,旅行商问题的近似解。Christofides, Nicos. “Worst-case analysis of a new heuristic for the travelling salesman problem.” No. RR-388. Carnegie-Mellon Univ Pittsburgh Pa Management Sciences Research Group, 1976.(https://networkx.org/documentation/stable/reference/algorithms/generated/networkx.algorithms.approximation.traveling_salesman.christofides.html)。
④ .NET,是微软支持的免费开源应用程序平台(https://dotnet.microsoft.com/en-us/learn/dotnet/what-is-dotnet)。
⑤ IronPython,是 Python 编程语言的开源实现,与 .NET 紧密集成(https://ironpython.net/)。
⑥ CLR,.NET 提供了一个称为公共语言运行库(Common Language Runtime ,CLR)的运行时环境,执行代码,并提供使开发过程更容易的服务(https://learn.microsoft.com/en-us/dotnet/standard/clr)。
⑦ DLL,动态链接库(Dynamic-link library,DLL)是 Microsoft Windows 或 OS/2 操作系统中的共享库。DLL 可以以任意组合方式包含可执行代码(函数)、数据和资源(https://en.wikipedia.org/wiki/Dynamic-link_library)。
⑧ COM,组件对象模型(Component Object Model ,COM)是微软软件组件的一种二进制接口技术,支持在不同的编程语言、编程上下文、进程和机器之间以语言中立( language-neutral)的方式使用对象(https://en.wikipedia.org/wiki/Component_Object_Model)。
⑨ NuGet,是 .NET 的包管理器(https://www.nuget.org/)。
⑩ openpyxl,是一个 Python 库,用于读取/写入 Excel 2010 xlsx/xlsm/xltx/xltm 文件(https://openpyxl.readthedocs.io/en/stable/index.html)。
⑪ Grasshopper SDK,(https://developer.rhino3d.com/api/grasshopper/html/723c01da-9986-4db2-8f53-6f3a7494df75.htm)。
⑫ NumPy,用 Python 进行科学计算的基本包(https://numpy.org/)。
⑬ Pandas,是构建在 Python 编程语言之上一个快速、强大、灵活且易于使用的开源数据分析和操作工具(https://pandas.pydata.org/)。
⑭ ghpythonlib,(https://developer.rhino3d.com/guides/rhinopython/ghpython-call-components/)。
⑮ multiprocessing,是一个使用类似于 threading 模块 API 支持生成进程的包(https://docs.python.org/3/library/multiprocessing.html)。
⑯ RhinoScriptSyntax,(https://developer.rhino3d.com/api/RhinoScriptSyntax/)。