2.4 组件式模块_逐步计算与算法解析
Created on Sat Sep 24 20:57:46 2022; Last updated on 2024-09-09T21:51:23+08:00 @author: Richie Bao
除了用一些已经内置于 RH 或者 GH 中的方法,或者建立某种几何的算法,例如 GH 中的Galapagos Evolutionary Solver,Delaunay Mesh等)来构建几何外,通常会引入 RH 和 GH 未内置的已有算法,或建立新算法来解决某一分析问题,或用于空间几何的设计构建。就 Python Script,在设计领域引入算法时,通常会结合到空间几何对象,其结合的途径可以粗略划分为两种,一种是,将几何对象和算法分离,先通过抽象的索引值完成算法计算,获得计算结果信息后,再结合到空间几何对象构建设计内容或者可视化分析过程及结果,例如本节所给出的示例;再者,直接将算法用于空间几何对象的建立,而不使用抽象的索引值。
一些算法通常从一个初始状态(或者初始输入值)开始,根据算法构建的逻辑进入一个连续运算的过程,为从一个状态进入下一个状态,完成计算或者遇到终止条件,达到终止状态。过程中状态间的迭代(转换)可以是明确的,也可以是“模糊”的,例如遗传算法中的“变异”和“交叉”引入了随机性,有助于跳出局部最优解,并且在搜索空间中发现更优的解。在解读已有算法或者观察新建算法时,逐步计算并可视化的方式可以更方便的理解算法的逻辑过程,因此在 Python Script 中,可以利用空间几何图形绘制图解过程,动态呈现解析算法。逐步计算时,并不建议直接在算法本身中增加绘制图解代码,这不利于代码的迁移,而是根据需要提取算法迭代过程中的信息,再利用这些信息逐步再现算法迭代过程(为一种非实时的方式)。
在可调用的模块——创建、保存和调用模块部分,是将定义的函数置于一个.py文件中(模块),并置于指定的系统路径下,实现 Python Script 中可调入模块的方法。这一过程较为繁琐,不利于代码的迁移和多个 Python Script 组件间的调试,除了应用 PyPI 建立工具扩展包外,建议使用组件式模块的方法以达到方便调用的目的。组件式模块是将定义的函数置于 Python Script 组件中,并以类的形式组织方法,输出为实例化对象,从而可以在其它 Python Script 组件中利用类的方法调用这些函数,或类的属性提取参数值。
算法(Algorithms): 在数学和计算机科学中,算法是一个有限严格的指令序列,用于解决某类特定问题或者进行某种计算。较为高级的算法可以进行自动推理,例如聚类(k-means聚类)、搜索(爬虫)、优化(遗传算法、模拟退火算法、爬山法)、分类器(贝叶斯、决策树)、回归、神经网络等,更多的算法可以从机器学习scikit-learn① 和深度学习PyTorch②库中获取。
2.4.1 Dijkstra 算法解析总体流程
组件的构建通常会考虑组件的通用性,应用时,更具弹性,便于不同组件间的组合实现更多不同逻辑建构的可能性。因此构建的组件,尽量只完成一个功能(一件事),或者作为组件式模块的方法组合。在建立 Dijkstra 算法时(图 2.4-1,2.4-2),分为网络拓扑结构方法的建立(2_net_graph),应用拓扑结构的 Dijkstra 算法构建(2_dijkstra_algorithm),依据 Dijkstra 算法计算结果构建几何对象(2_dijkstra_shortest_path),组件式模块(2_tag_A)和 Dijkstra 算法计算结果绘制逐步计算可视化过程(2_dijkstra_step_Animating)。其中拓扑结构、Dijkstra 算法、组件式模块3个 Python Script 组件具有较强的通用性,方便被调用。
多个单功能的组件可以被组合在一个组件中,虽然简化了组件的数量,但该组件内部的功能就很难被调用。同时,调用的 GH 自有组件同样可以组合到 Python Script 中,但可能会降低所构建组件的弹性,例如,如果将Populate 2D,Delaunay Edged等组件功能也置于2_net_graph内,那么该组件则只适用于构建矩形随机点的 Delaunay 网络结构对象,其它类型的网络结构则很难接入2_net_graph中,即使分出单独的输入端实现接入,也容易另组件变得繁乱,不易使用。
因此,构建一个算法或逐步计算时,会考虑:
- 是否可以将该算法与空间几何对象分离,并能通过索引的方式对位到几何对象上;
- 如果该算法实现需要不同的方法组合,则考虑将各个方法置于不同的组件中,增加组件通用性和弹性;
- 通过
组件式模块将某类所有的方法(函数)集合为模块,输出为类对象,方便其它组件调用; - 善于组合使用 GH 已有组件,根据需要判断是否需要将其写入 Python Script 组件中。如果一定需要集成,也需要考虑是否增加输入端避免降低组件的通用性。

图 2.4-1 Dijkstra 算法图解:动画
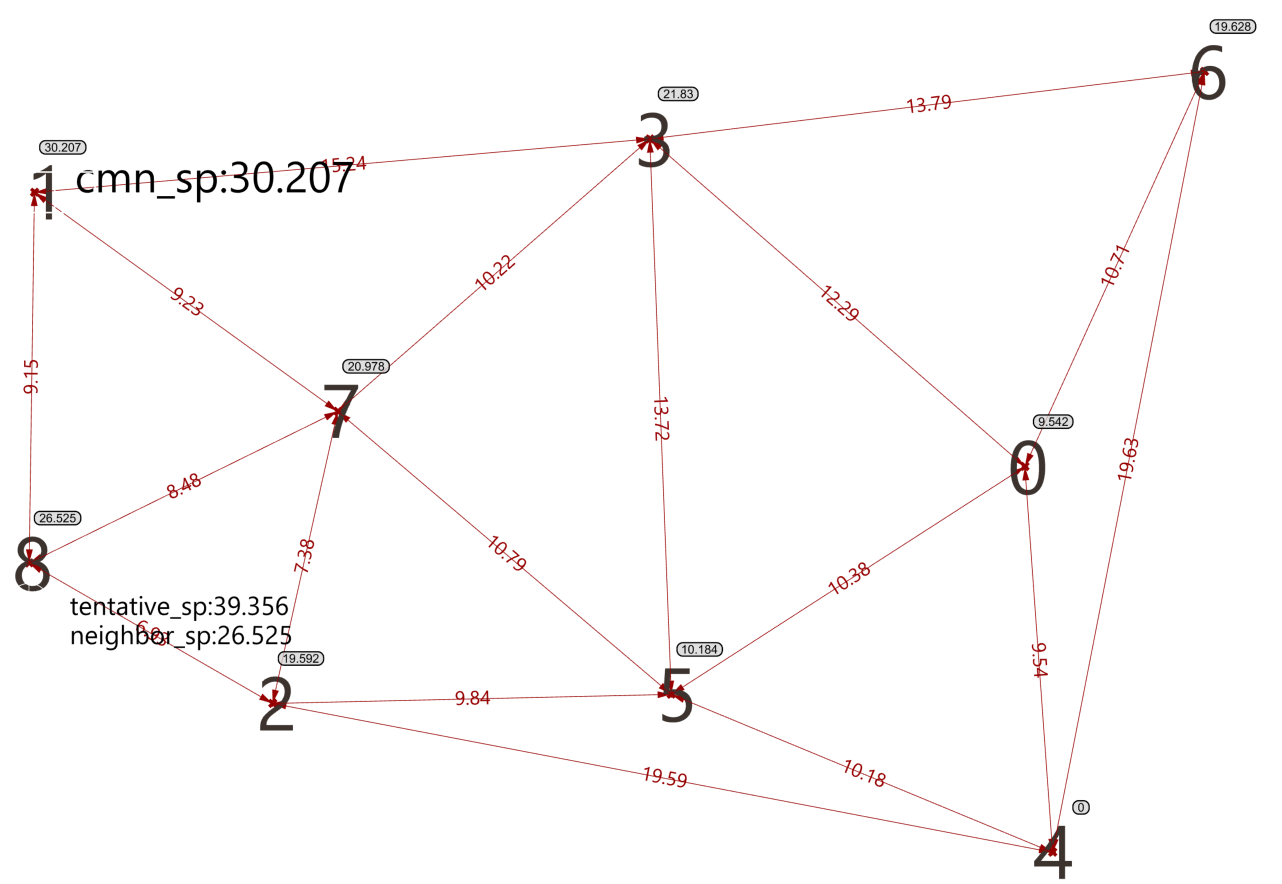
图 2.4-1 Dijkstra 算法图解
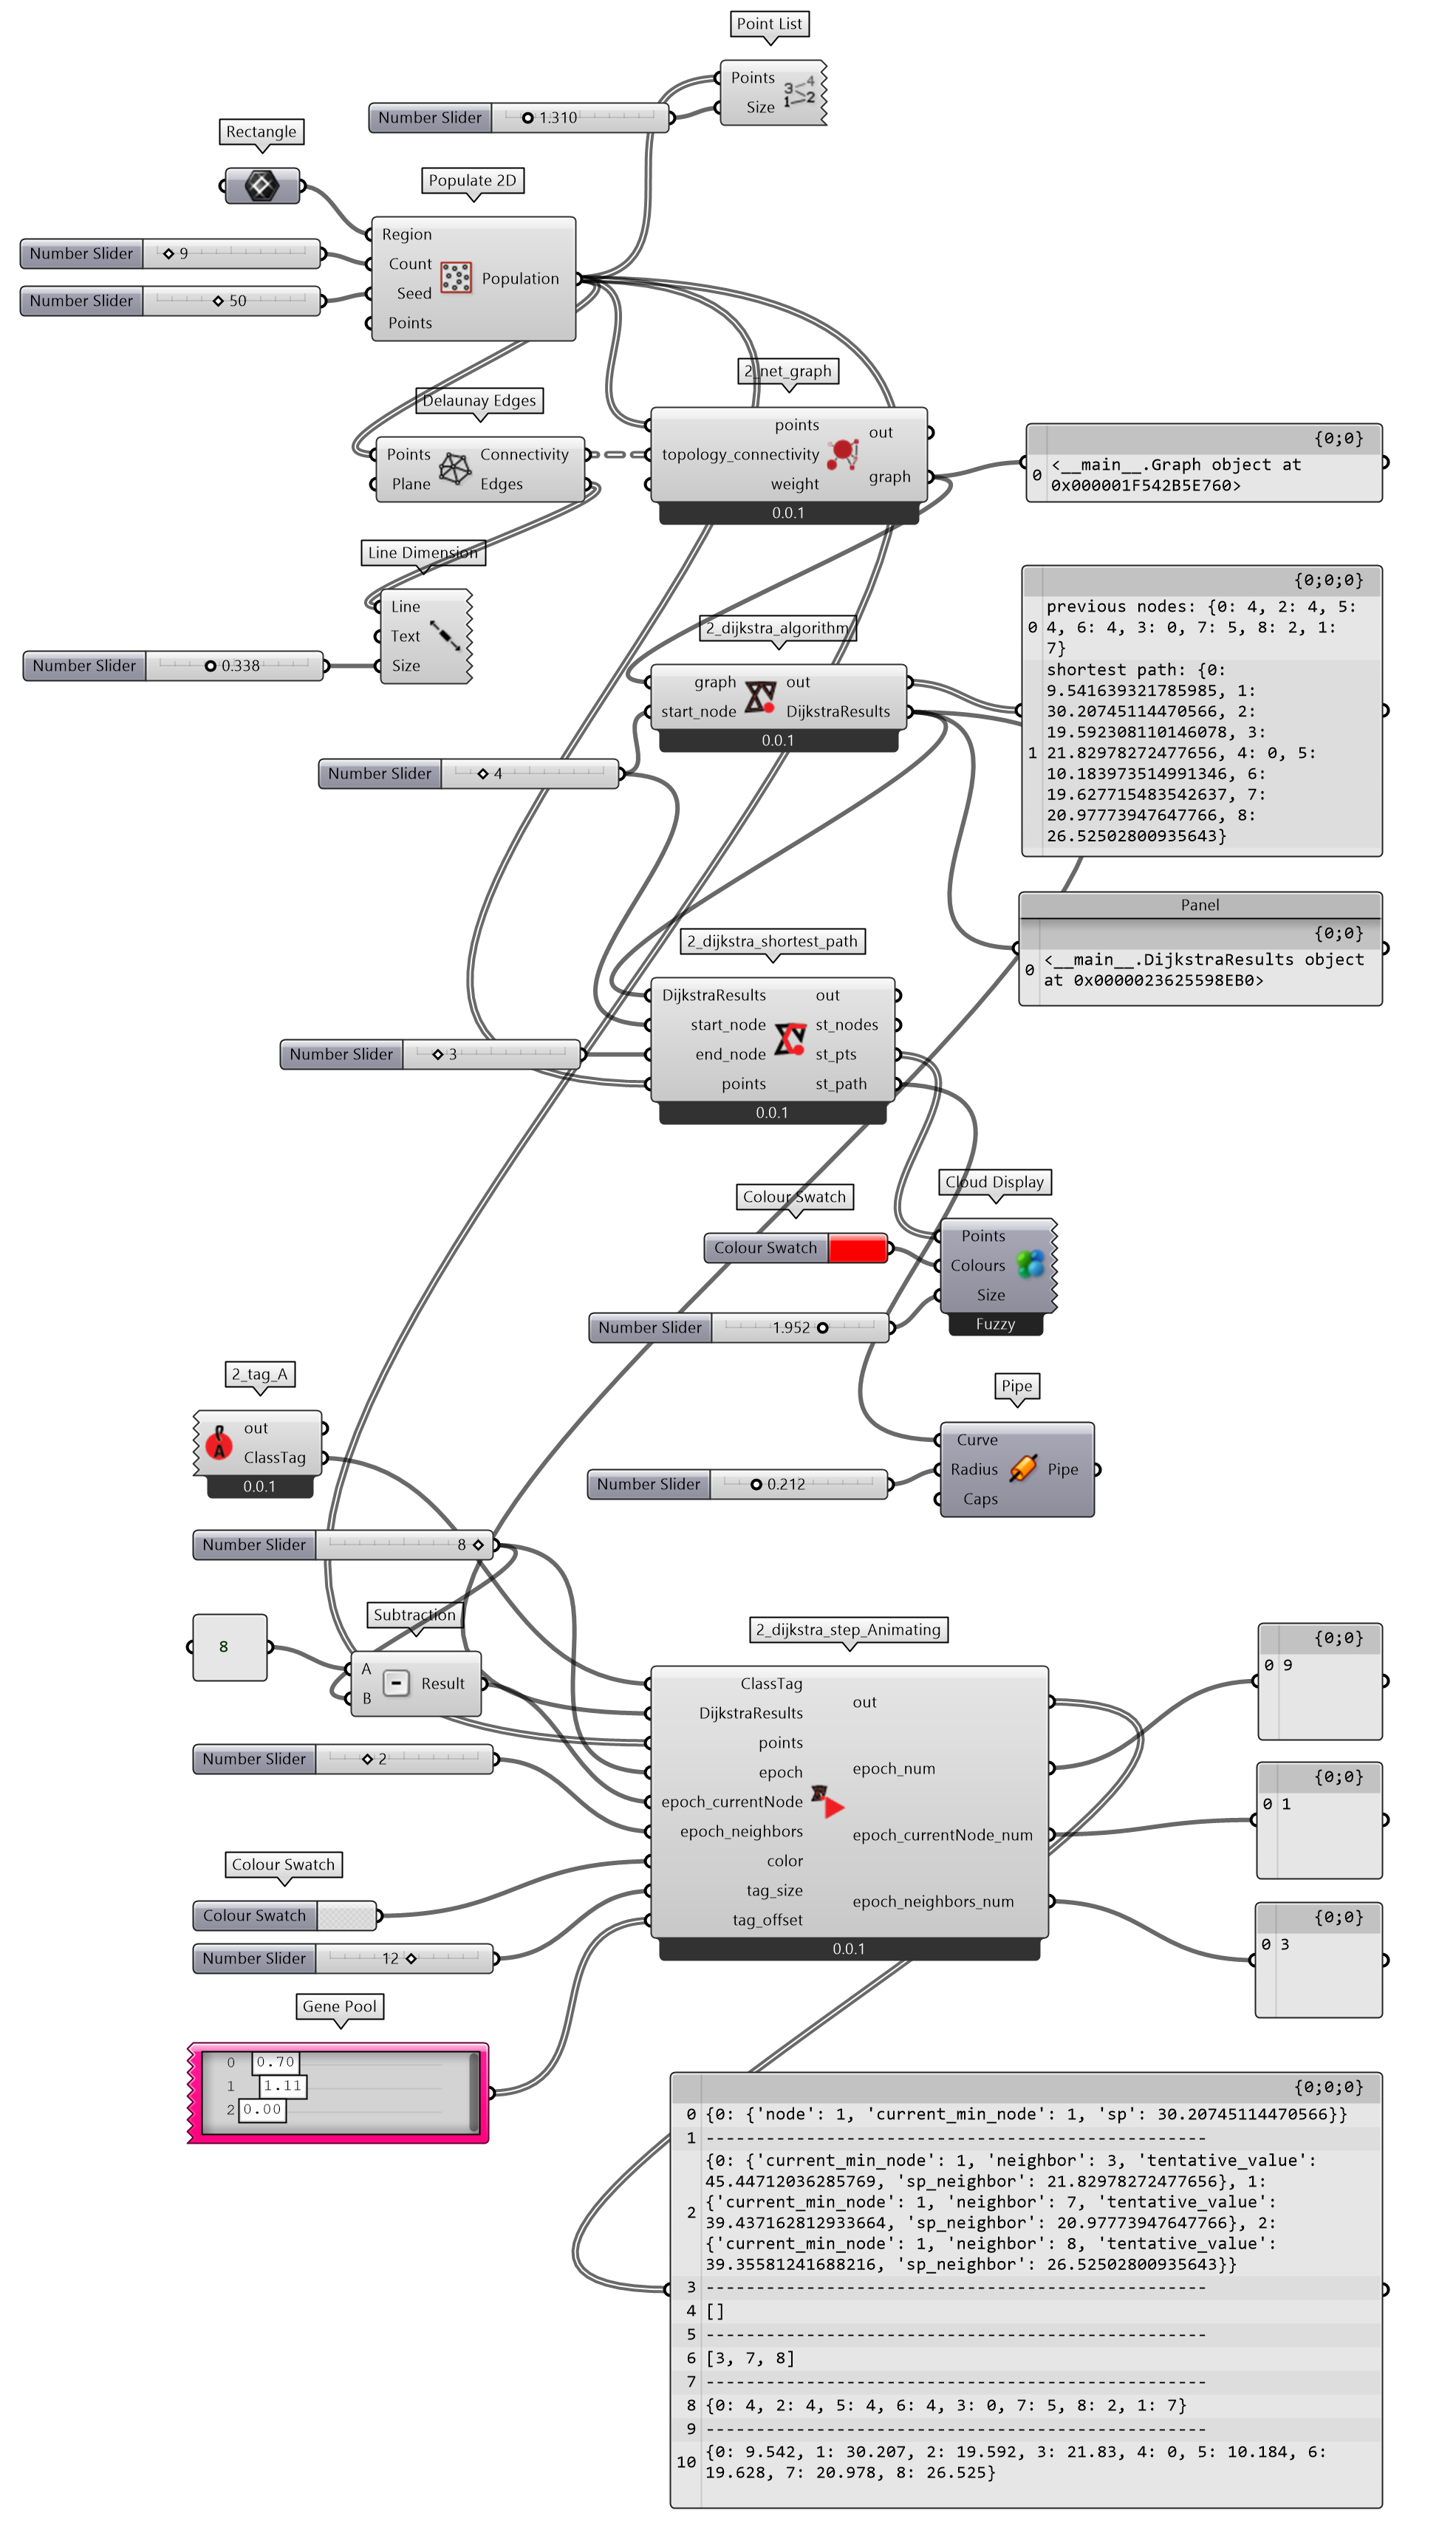
图 2.4-2 Dijkstra 算法代码
2.4.2 建立拓扑结构分析工具
在建立 Dijkstra 算法时,需要循环节点,获取节点的拓扑(连通)节点(邻域点),及节点之间的成本(距离)值。为了简化 Dijkstra 算法的代码,可以将节点等相关属性的获取功能单独用类(class Graph(object))的方法实现,包括用construct_graph()构建节点的拓扑关系嵌套字典,模式为{节点:{邻域节点:成本值}};并建立get_nodes()返回所有节点;get_outgoing_edges()返回给定节点的邻域节点;及value()获取两个节点之间的成本值。
为了拓展拓扑结构方法的能力,配置有weight权重输入端参数,如果输入对应节点的权重值,则缩放成本值;默认为 None,保持成本值不变。
connectivity_distance()函数是以输入点之间的距离为成本值,使用Graph类构建点之间的拓扑结构和方法。返回值为类Grapsh实例化对象,输出组件时包括该类所具有的方法和属性。
2_net_graph (Python Script 组件)
  """ 建立点之间的网络拓扑图.
    ref:Implementing Dijkstra’s Algorithm in Python_https://www.udacity.com/blog/2021/10/implementing-dijkstras-algorithm-in-python.html
    Inputs:
        points: 点列表,需要与topology_connectivity参数字典路径顺序保持一致。DS:List Access;TH:Point3d
        topology_connectivity: 点之间的连通关系,按points参数顺序给出可以连通的点序号。DS:Tree Access;TH:int
        weight:距离权重值列表,default:None。DS:List Access;TH:float
    Output:
        graph:包含网络图信息的类实例。class instance"""

ghenv.Component.Name = "2_net_graph"
ghenv.Component.NickName = "2_net_graph"
ghenv.Component.Description = (
    "建立拓补图,以点之间的距离为节点间的值,可以增加权重"
)
ghenv.Component.Message = "0.0.1"
ghenv.Component.Category = "Moths"
ghenv.Component.SubCategory = "Algorithm N Design"
ghenv.Component.AdditionalHelpFromDocStrings = "1"

import ghpythonlib.components as ghc


class Graph(object):
    """建立网络拓扑图,并建立获取节点(点),节点周边连通点和计算两点间值的方法"""

    def __init__(self, nodes, init_graph):
        self.nodes = nodes
        self.graph = self.construct_graph(nodes, init_graph)

    def construct_graph(self, nodes, init_graph):
        """
        This method makes sure that the graph is symmetrical. In other words, if there's a path from node A to B with a value V, there needs to be a path from node B to node A with a value V.
        """
        graph = {}
        for node in nodes:
            graph[node] = {}

        graph.update(init_graph)

        for node, edges in graph.items():
            for adjacent_node, value in edges.items():
                if graph[adjacent_node].get(node, False) == False:
                    graph[adjacent_node][node] = value

        return graph

    def get_nodes(self):
        "Returns the nodes of the graph."
        return self.nodes

    def get_outgoing_edges(self, node):
        "Returns the neighbors of a node."
        connections = []
        for out_node in self.nodes:
            if self.graph[node].get(out_node, False) != False:
                connections.append(out_node)
        return connections

    def value(self, node1, node2):
        "Returns the value of an edge between two nodes."
        return self.graph[node1][node2]


def connectivity_distance(pts, connectivity, weight=None):
    """
    给定点列表、拓扑结构和权重(option)计算网络图

    Parameters
    ----------
    pts : list(Point3d)
        点列表.
    connectivity : Tree(int)
        点之间的连通关系.
    weight : list(float), optional
        距离权重值列表. The default is None.

    Returns
    -------
    graph : Class Instance
        包含网络图信息的类实例.

    """
    paths = connectivity.Paths

    init_graph = {}
    nodes = []
    for i, path in enumerate(paths):
        nodes.append(i)
        init_graph[i] = {}
        pt = pts[i]
        pt_connectivity = connectivity.Branch(path)

        for j in pt_connectivity:
            pt_neighbor = pts[j]
            distance = ghc.Distance(pt, pt_neighbor)
            if weight:
                distance *= weight[i]
            init_graph[i][j] = distance

    graph = Graph(nodes, init_graph)

    return graph


if __name__ == "__main__":
    if points and topology_connectivity:
        graph = connectivity_distance(points, topology_connectivity, weight)
2.4.3 Dijkstra 算法及信息的类属性输出
Dijkstra 算法的基本逻辑是:
- 给定初始点;
- 并建立一个
shortest_path列表,用于存储每个迭代状态下各个节点的最短路径值,初始化为无限最大值,而初始值初始化为0; - 建立
previous_nodes字典,存储每个迭代状态下到初始点为最短路径时的前一个节点; - 建立
unvisited_nodes列表,按为最短路径对应的节点逐个循环所有节点,每循环一个则移除一个,直至完成所有节点的计算。
while unvisited_nodes:为总体循环,逐个循环节点,每循环一个迭代(周期)会剔除当前状态具有最小路径的节点current_min_node,因此循环次数为节点数。在总体循环下包括两个for循环,第一个for循环是寻找当前状态具有最小路径的节点,就是满足shortest_path[node] < shortest_path[current_min_node]条件的节点。第一次总体循环状态,除了初始点成本值为0外,其它值均配置为无限大,因此第一次总体循环下的当前节点current_min_node会为初始节点。第二个for循环是计算当前节点的各个邻域节点到初始节点的成本值。这时需要判断邻域节点(neighbor)到当前节点(current_min_node)的成本值+当前节点的成本值(即当前节点到初始点的成本值)是否小于邻域节点当前状态的成本值,从而判断是否更新邻域节点当前状态的成本值。从总体循环的第2次迭代周期开始,当前节点的邻域节点通常会包括之前总体循环的邻域节点,这些循环过的邻域节点已经更新了到初始点的成本值,因此当前节点的邻域节点到初始点的最小成本值shortest_path[neighbor]有可能大于经过当前节点到初始点的成本值tentative_value = shortest_path[current_min_node] + graph.value(current_min_node, neighbor),这时,就需要更新当前节点的邻域节点值shortest_path[neighbor] = tentative_value,及变化当前节点的邻域节点的前一个节点为当前节点previous_nodes[neighbor] = current_min_node。通过两次for循环,更新了当前节点(具有到初始点的最小成本值),及当前节点的邻域节点成本值,而后在unvisited_nodes列表中移除当前节点,开始下一轮次的总体循环,直至更新完所有节点,计算获得每个节点到初始点的最小成本值和每个节点到初始点最短路径中的前一个节点对象。
通过逐步计算动画可以更方便的观察dijkstra算法的过程。
当完成 Dijkstra 算法之后,再根据逐步计算可视化(动画)的需要收集总体循环和for子循环的数据值。收集时,需要按照迭代进程(加嵌套循环)组织数据,这里建立了steps字典,键为while总体循环次数,值为子循环step_node,step_neighbor两个字典按迭代次数收集的值(键为各自子循环的迭代次数),及总体循环中变化更新的值。
值的输出为类DijkstraResults初始化的属性值形式,通过实例化对象输出。
2_dijkstra_algorithm (Python Script 组件)
  """Provides a scripting component.
    Inputs:
        graph:网络拓扑图(由2_net_graph组件计算)。 DS:Item Access;TH:class instance
        start_node:开始点。 DS:Item Access;TH:Point3d
    Output:
        DijkstraResults:包含 previous_nodes(各个节点的前一点索引), shortest_path(各个节点到开始点的最短路径值),steps(记录每一步迭代关键信息的字典)的类的实例。class instance """

__author__ = "richiebao caDesign设计(cadesign.cn)"
__version__ = "2022.09.22"

ghenv.Component.Name = "2_dijkstra_algorithm"
ghenv.Component.NickName = "2_dijkstra_algorithm"
ghenv.Component.Description = "dijkstra_algorithm"
ghenv.Component.Message = "0.0.1"
ghenv.Component.Category = "Moths"
ghenv.Component.SubCategory = "Algorithm N Design"
ghenv.Component.AdditionalHelpFromDocStrings = "1"

import sys
import copy


def dijkstra_algorithm(graph, start_node):
    """
    dijkstra_algorithm,求取开始节点到其它所有节点的最短路径

    Parameters
    ----------
    graph : Class Instance
        网络拓扑图.
    start_node : Point3d
        开始点.

    Returns
    -------
    previous_nodes : dict
        各个节点的前一点索引.
    shortest_path : dict
        各个节点到开始点的最短路径值.
    steps : dict
        记录每一步迭代关键信息的字典.

    """
    unvisited_nodes = list(graph.get_nodes())

    shortest_path = {}
    previous_nodes = {}

    max_value = sys.maxsize
    for node in unvisited_nodes:
        shortest_path[node] = max_value
    shortest_path[start_node] = 0

    steps = {}
    epoch = 0
    while unvisited_nodes:
        current_min_node = None
        epoch_node = 0
        step_node = {}
        for node in unvisited_nodes:
            step_node[epoch_node] = {}
            step_node[epoch_node]["node"] = node
            if current_min_node == None:
                current_min_node = node
            elif shortest_path[node] < shortest_path[current_min_node]:
                current_min_node = node

            step_node[epoch_node]["current_min_node"] = current_min_node
            step_node[epoch_node]["sp"] = shortest_path[current_min_node]
            epoch_node += 1

        neighbors = graph.get_outgoing_edges(current_min_node)
        epoch_neighbor = 0
        step_neighbor = {}
        for neighbor in neighbors:
            step_neighbor[epoch_neighbor] = {}
            tentative_value = shortest_path[current_min_node] + graph.value(
                current_min_node, neighbor
            )
            if tentative_value < shortest_path[neighbor]:
                shortest_path[neighbor] = tentative_value
                previous_nodes[neighbor] = current_min_node

            step_neighbor[epoch_neighbor]["current_min_node"] = current_min_node
            step_neighbor[epoch_neighbor]["neighbor"] = neighbor
            step_neighbor[epoch_neighbor]["tentative_value"] = tentative_value
            step_neighbor[epoch_neighbor]["sp_neighbor"] = shortest_path[
                neighbor
            ]
            epoch_neighbor += 1

        unvisited_nodes.remove(current_min_node)

        steps[epoch] = {}
        steps[epoch]["step_node"] = step_node
        steps[epoch]["step_neighbor"] = step_neighbor
        steps[epoch]["shortest_path"] = copy.deepcopy(shortest_path)
        steps[epoch]["previous_nodes"] = copy.deepcopy(previous_nodes)
        steps[epoch]["unvisited_nodes"] = copy.deepcopy(unvisited_nodes)
        steps[epoch]["neighbors"] = neighbors
        epoch += 1

    return previous_nodes, shortest_path, steps


class DijkstraResults:
    """将dijkstra_algorithm()计算的返回结果已类的实例化对象输出"""

    def __init__(self, previous_nodes, shortest_path, steps):
        self.previous_nodes = previous_nodes
        self.shortest_path = shortest_path
        self.steps = steps


if __name__ == "__main__":
    if graph and start_node:
        previous_nodes, shortest_path, steps = dijkstra_algorithm(
            graph=graph, start_node=start_node
        )
        print("previous nodes:", previous_nodes)
        print("shortest path:", shortest_path)
        DijkstraResults = DijkstraResults(previous_nodes, shortest_path, steps)
2.4.4 最短路径计算——Dijkstra 算法结果的使用
2_dijkstra_algorithm组件代码返回值包括到初始点最小成本值各个节点的前一个节点信息,因此,可以计算任何一个节点到初始点的路径节点列表,只需要根据结束点提取其前一点,进而提取前一点的前一点,直至寻找到初始点为止。
2_dijkstra_shortest_path (Python Script 组件)
  """Provides a scripting component.
    Inputs:
        DijkstraResults:2_dijkstra_algorithm组件返回结果,记录有dijkstra算法信息。 DS:Item Access;TH:class instance
        start_node:开始节点索引值。 DS:Item Access;TH:int
        end_node:结束节点索引值。DS:Item Access;TH:int
        points:(节点)点列表。DS:List Access;TH:Point3d
    Output:
        st_nodes: 开始和结束点列表
        st_pts:最短路径节点列表
        st_path:最短路径折线
        """

ghenv.Component.Name = "2_dijkstra_shortest_path"
ghenv.Component.NickName = "2_dijkstra_shortest_path"
ghenv.Component.Description = "dijkstra_shortest_path"
ghenv.Component.Message = "0.0.1"
ghenv.Component.Category = "Moths"
ghenv.Component.SubCategory = "Algorithm N Design"
ghenv.Component.AdditionalHelpFromDocStrings = "1"

import ghpythonlib.components as ghc


def shortest_path(DijkstraResults, start_node, end_node, points):
    """
    用 2_dijkstra_algorithm 组件返回结果,计算最短路径

    Parameters
    ----------
    DijkstraResults : Class Instance
        2_dijkstra_algorithm组件返回结果,记录有 dijkstra 算法信息.
    start_node : Point3d
        开始节点索引值.
    end_node : Point3d
        结束节点索引值.
    points : list(Point3d)
        (节点)点列表.

    Returns
    -------
    st_nodes : list(Point3d)
        开始和结束点列表.
    st_pts : list(Point3d)
        最短路径节点列表.
    st_path : Polyline curve
        最短路径折线.

    """
    previous_nodes = DijkstraResults.previous_nodes
    print(previous_nodes)
    st_nodes = [end_node]
    while end_node != start_node:
        end_node = previous_nodes[end_node]
        st_nodes.append(end_node)

    st_pts = [points[node] for node in st_nodes]
    st_path = ghc.PolyLine(st_pts, False)
    return st_nodes, st_pts, st_path


if __name__ == "__main__":
    if DijkstraResults and start_node and end_node and points:
        st_nodes, st_pts, st_path = shortest_path(
            DijkstraResults, start_node, end_node, points
        )
2.4.5 构建组件式模块
组件式模块方法的基本思路是通过类的方法和属性在组件间传递值。组件的输入端输入类的实例化对象时,配置输入端参数为:DS:Item Access;TH:No Type Hint。2_tag_A组件的FuncsAnnotation类,包括在 RH 空间(文档,doc)下建立 text3d, textdot, box, sphere 的方法,及清除层对象,和清除 textdot 等方法。

图 2.4-3 RhinoDoc 图解
GH 空间对象要 bake(烘培)到 RH 空间中,需要访问Rhino.RhinoDoc命名空间(文档),如图 2.4-3。该空间的对象类型具有附加到对象上的属性,例如对象的颜色、图层等。因此需要创建一个属性对象attr=rd.ObjectAttributes(),配置属性对象的颜色(attr.ObjectColor)、图层(attr.LayerIndex)等属性值。同时,为了访问 RH 空间,需要建立 GH 与 RH 之间的通信,默认条件下为 GH 空间scriptcontext.doc=ghdoc,如果要访问 RH 空间则需配置为scriptcontext.doc=Rhino.RhinoDoc.ActiveDoc,当完成向 RH 空间添加对象后,需要再次将该参数值配置回ghdoc。
实现逐步计算绘制图解,就是将标签,数值、用于标识的几何对像等内容 bake 到 RH 空间的不同层中。当算法迭代,状态发生变化时,可以删除层中的已有标识,更新为最新状态的位置、计算值等内容,达到逐步计算绘制图解的目的,方便观察算法迭代状态的变化。
下述示例在构建 RH 对象时,给出了一些变化,例如在判断图层是否已经存在于 RH 空间中时,可以使用layer_find=sc.doc.Layers.Find(layername,True)方法,调用scriptcontext库;也可以使用rs.IsLayer(layer_name)方法,调用rhinoscriptsyntax库等;向 RH 中添加对象时,使用了rs.ObjectLayer(rhino_obj,layer_name)和sc.doc.Objects.AddText(text,attr) 等方法。
2_tag_A (Python Script 组件)
  """Provides a scripting component.
    Inputs:
        None
    Output:
        ClassTag: 含有绘制标注方法的类实例对象"""

ghenv.Component.Name = "2_tag_A"
ghenv.Component.NickName = "2_tag_A"
ghenv.Component.Description = "tag collection"
ghenv.Component.Message = "0.0.1"
ghenv.Component.Category = "Moths"
ghenv.Component.SubCategory = "Algorithm N Design"
ghenv.Component.AdditionalHelpFromDocStrings = "1"

import Rhino.Geometry as rg
import Rhino.DocObjects as rd
import Rhino
import scriptcontext as sc
import rhinoscriptsyntax as rs
import ghpythonlib.components as ghc


class FuncsAnnotation:
    """包含用于标注,例如text3d, textdot, box, sphere等方式,直接将对象bake到Rhino空间,同时包括清除层对象,和textdot等方法,辅助动画表述(Animating)"""

    def create_textdot(self, text_str, point, height=-1, font=-1):
        """Creates a TextDot at a given location.

        Args:
            text_string (str): A text to display.
            point (Rhino.Geometry.Point3d): A location.
            height (int): A font height.
            font (str): A font face.

        Returns:
            The Rhino.Geometry.TextDot().
        """
        textdot = rg.TextDot(text_str, point)
        if height > 0:
            textdot.FontHeight = height
        if font != -1:
            textdot.FontFace = font
        return textdot

    def clear_textdots(self):
        """从当前 Rhino 文档中删除所有 TextDots 对象"""
        textdots = sc.doc.Objects.FindByObjectType(rd.ObjectType.TextDot)
        if len(textdots) > 0:
            for tdot in textdots:
                sc.doc.Objects.Delete(tdot, True)

    def clear_objsBylayer(self, layer_name):
        """删除给定层内的所有对象"""
        sc.doc = Rhino.RhinoDoc.ActiveDoc
        if rs.IsLayer(layer_name):
            objs = rs.ObjectsByLayer(
                layer_name,
            )  # False
            if objs:
                rs.DeleteObjects(objs)
            sc.doc = ghdoc
        else:
            print("Layer not existed")

    def tag_run(
        self, Locations, Descriptions, layername, Font, Size, Color, Tag
    ):
        """
        给定位置点标注文字-主程序

        Parameters
        ----------
        Locations : Point3d
            定位点.
        Descriptions : string
            文字.
        layername : string
            层名称.
        Font : string
            字体类型.
        Size : int
            字体大小.
        Color : System Drawing Color
            文本框颜色.
        Tag : bool
            是否标注.

        Returns
        -------
        None.

        """
        sc.doc = Rhino.RhinoDoc.ActiveDoc
        self.clear_textdots()

        if Tag:
            attr = rd.ObjectAttributes()
            attr.ColorSource = rd.ObjectColorSource.ColorFromObject
            attr.ObjectColor = Color
            layer_find = sc.doc.Layers.Find(layername, True)
            if layer_find < 0:
                layer = rd.Layer()
                layer.Name = layername
                layer_find = sc.doc.Layers.Add(layer)
            attr.LayerIndex = layer_find
            for i in range(len(Locations)):
                tdot = self.create_textdot(
                    Descriptions[i], Locations[i], Size, Font
                )
                sc.doc.Objects.AddTextDot(tdot, attr)

        else:
            self.clear_textdots()
        sc.doc = ghdoc

    def create_box(self, base_p, x, y, z, color, layer_name):
        """
        绘制盒体对象(Rhino空间)

        Parameters
        ----------
        base_p : Plane
            基准平面.
        x : float
            长.
        y : float
            宽.
        z : float
            高.
        color : RGB
            颜色对象.
        layer_name : string
            层名称.

        Returns
        -------
        None.

        """
        box = ghc.CenterBox(base_p, x, y, z)
        attr = rd.ObjectAttributes()
        attr.ColorSource = rd.ObjectColorSource.ColorFromObject
        attr.ObjectColor = color

        sc.doc = Rhino.RhinoDoc.ActiveDoc
        rhino_obj = sc.doc.Objects.AddBox(box, attr)
        if not rs.IsLayer(layer_name):
            rs.AddLayer(layer_name)
        rs.ObjectLayer(rhino_obj, layer_name)

        sc.doc = ghdoc

    def create_text3d(self, description, base_p, height, layer_name):
        """
        绘制text3d文字对象

        Parameters
        ----------
        description : string
            待显示的文字.
        base_p : plane
            基准面.
        height : float(int)
            字体高度.
        layer_name : string
            层名称.

        Returns
        -------
        None.

        """
        sc.doc = Rhino.RhinoDoc.ActiveDoc
        text = Rhino.Display.Text3d(description, base_p, height)
        attr = rd.ObjectAttributes()
        attr.ColorSource = (
            rd.ObjectColorSource.ColorFromObject
        )
        if not rs.IsLayer(layer_name):
            rs.AddLayer(layer_name)

        layer = sc.doc.Layers.Find(layer_name, True)
        attr.LayerIndex = layer
        sc.doc.Objects.AddText(text, attr)

        sc.doc = ghdoc

    def create_sphere(self, base_p, radius, color, layer_name):
        """
        绘制球体

        Parameters
        ----------
        base_p : plane
            基准面.
        radius : float
            半径.
        color : RGB
            颜色对象.
        layer_name : string
            层名称.

        Returns
        -------
        None.

        """
        sphere = ghc.Sphere(base_p, radius)
        attr = rd.ObjectAttributes()
        attr.ColorSource = (
            rd.ObjectColorSource.ColorFromObject
        )
        attr.ObjectColor = color

        sc.doc = Rhino.RhinoDoc.ActiveDoc
        rhino_obj = sc.doc.Objects.AddBrep(sphere, attr)
        if not rs.IsLayer(layer_name):
            rs.AddLayer(layer_name)
        rs.ObjectLayer(rhino_obj, layer_name)

        sc.doc = ghdoc


if __name__ == "__main__":
    ClassTag = FuncsAnnotation()
2.4.6 再现逐步计算过程
2_tag_A组件提供了 bake 对象到 RH 空间的方法,因此,再现逐步计算过程只需要配置2_dijkstra_algorithm组件返回的类实例对象中记录有算法迭代信息的属性值steps所包含的总体迭代和两个内嵌for循环状态变化下,标识的变化值和位置变化等信息。实现的主要思路是根据算法各个循环的嵌套和运算先后关系,按照寻找当前节点、循环邻域节点和总体循环的顺序书写代码。当要更新状态值时,调用clear_objsBylayer方法移除 RH 层中的对象,再向其写入新的对象。
2_dijkstra_step_Animating (Python Script 组件)
  """dijkstra algorithm 逐步计算演示.
    Inputs:
        ClassTag: 由2_tag_A组件返回绘制标签的类的实例化对象。DS:Item Access;TH:class instance
        DijkstraResults: 2_dijkstra_algorithm组件返回结果,记录有dijkstra算法信息。DS:Item Access;TH:class instance
        points:节点列表。DS:List Access;TH:Point3d
        epoch:总体循环次数。DS:Item Access;TH:int
        epoch_currentNode: (最短路径)当前节点子循环次数。DS:Item Access;TH:int
        epoch_neighbors:当前节点邻里点子循环次数。DS:Item Access;TH:int
        tag_size:textdot标注大小。DS:Item Access;TH:float
        tag_offset:texydot位置偏移值。DS:Item Access;TH:float
    Output:
        epoch_num: 总体循环总次数
        epoch_currentNode_num:当前节点子循环总次数
        epoch_neighbors_num:当前节点邻里点子循环总次数
        """

__author__ = "richiebao caDesign设计(cadesign.cn)"
__version__ = "2022.09.24"

ghenv.Component.Name = "2_dijkstra_step_Animating"
ghenv.Component.NickName = "2_dijkstra_step_Animating"
ghenv.Component.Description = "dijkstra_step_Animating"
ghenv.Component.Message = "0.0.1"
ghenv.Component.Category = "Moths"
ghenv.Component.SubCategory = "Algorithm N Design"
ghenv.Component.AdditionalHelpFromDocStrings = "1"

import ghpythonlib.components as ghc
from System.Drawing import Color


def steps_animation(steps, points, epoch=0, epoch_currentNode=0, **args):
    """
    dijkstra algorithm 逐步计算演示

    Parameters
    ----------
    steps : dict
        记录每一步迭代关键信息的字典.
    points : Point3d
        节点列表.
    epoch : int, optional
        总体循环次数. The default is 0.
    epoch_currentNode : int, optional
        当前节点子循环次数. The default is 0.
    **args : KeyArguments
        绘制标签的一些参数值,包括textdot对象的颜色,大小,x,y 和 z 方向的偏移值.

    Returns
    -------
    epoch_num:int
        总体循环总次数
    epoch_currentNode_num : int
        当前节点子循环总次数.
    epoch_neighbors_num : int
        前节点邻里点子循环总次数.

    """
    paras = {
        "color": ghc.ColourRGB(0.5, 0, 0, 0),
        "tag_size": 12,
        "tag_offset_x": 0,
        "tag_offset_y": 0,
        "tag_offset_z": 0,
    }
    paras.update(args)

    step_node = steps[epoch]["step_node"]
    step_neighbor = steps[epoch]["step_neighbor"]
    shortest_path = {
        k: round(v, 3) for k, v in steps[epoch]["shortest_path"].items()
    }
    previous_nodes = steps[epoch]["previous_nodes"]
    unvisited_nodes = steps[epoch]["unvisited_nodes"]
    neighbors = steps[epoch]["neighbors"]
    print(step_node)
    print("-" * 50)
    print(step_neighbor)
    print("-" * 50)
    print(unvisited_nodes)
    print("-" * 50)
    print(neighbors)
    print("-" * 50)
    print(previous_nodes)
    print("-" * 50)
    print(shortest_path)

    # A-node loop
    sn = step_node[epoch_currentNode]
    currentMinNode, node, sp = sn["current_min_node"], sn["node"], sn["sp"]
    currentMinNode_pt, node_pt_ = points[currentMinNode], points[node]
    node_pt = ghc.ConstructPoint(
        node_pt_[0] + 1, node_pt_[1] + 0, node_pt_[2] + 0
    )
    currentMinNode_color = ghc.ColourRGB(0.2, 255, 0, 0)
    layer_anim_cmn = "anim_cmn"
    ClassTag.clear_objsBylayer(layer_anim_cmn)
    box_length = 0.5
    ClassTag.create_box(
        currentMinNode_pt,
        box_length,
        box_length,
        box_length,
        currentMinNode_color,
        layer_anim_cmn,
    )
    later_anim_node = "anim_node"
    ClassTag.clear_objsBylayer(later_anim_node)
    node_color = ghc.ColourRGB(0.2, 47, 58, 84)
    ClassTag.create_box(
        node_pt, box_length, box_length, box_length, node_color, later_anim_node
    )

    sp_pt = ghc.XYPlane(
        ghc.ConstructPoint(
            currentMinNode_pt[0] + 1,
            currentMinNode_pt[1] + 0,
            currentMinNode_pt[2] + 0,
        )
    )
    layer_anim_sp_text = "anim_sp_text"
    ClassTag.clear_objsBylayer(layer_anim_sp_text)
    ClassTag.create_text3d(
        "cmn_sp:%.3f" % round(sp, 3), sp_pt, 0.5, layer_anim_sp_text
    )

    # B-neighbor loop
    snb = step_neighbor[epoch_neighbors]
    neighbor = snb["neighbor"]
    neighbor_pt_ = points[neighbor]
    neighbor_pt = ghc.ConstructPoint(
        neighbor_pt_[0] + 0, neighbor_pt_[1] - 1, neighbor_pt_[2] + 0
    )
    tentative_v = snb["tentative_value"]
    sp_neighbor = snb["sp_neighbor"]
    sp_neighbor_color = ghc.ColourRGB(0.2, 154, 195, 21)
    layer_anim_sp_neighbor = "anim_sp_neighbor"
    ClassTag.clear_objsBylayer(layer_anim_sp_neighbor)
    ClassTag.create_sphere(
        neighbor_pt, 0.5, sp_neighbor_color, layer_anim_sp_neighbor
    )
    layer_sp_tentative_neighbor = "anim_sp_tentative_neighbor"
    ClassTag.clear_objsBylayer(layer_sp_tentative_neighbor)
    neighbor_plane = ghc.XYPlane(
        ghc.ConstructPoint(
            neighbor_pt[0] + 1,
            neighbor_pt[1] - 1,
            neighbor_pt[2] + 0,
        )
    )
    ClassTag.create_text3d(
        "tentative_sp:{:.3f}\nneighbor_sp:{:.3f}".format(
            tentative_v, sp_neighbor
        ),
        neighbor_plane,
        0.3,
        layer_sp_tentative_neighbor,
    )

    # C-overall loop
    sp_locations = [
        ghc.ConstructPoint(
            points[i][0] + paras["tag_offset_x"],
            points[i][1] + paras["tag_offset_y"],
            points[i][2] + paras["tag_offset_z"],
        )
        for i in shortest_path.keys()
    ]
    sp_vs = map(str, shortest_path.values())
    ClassTag.tag_run(
        sp_locations,
        list(sp_vs),
        "anim_sp",
        "Helvetica Neue",
        paras["tag_size"],
        paras["color"],
        True,
    )

    epoch_currentNode_num = len(step_node.keys())
    epoch_neighbors_num = len(step_neighbor.keys())

    return epoch_currentNode_num, epoch_neighbors_num


if __name__ == "__main__":
    if tag_size is None:
        tag_size = 12
    if color is None:
        color = Color.FromArgb(255, 250, 90)

    if DijkstraResults and ClassTag:
        steps = DijkstraResults.steps
        epoch_num = len(steps.keys())
        if points and tag_offset:
            epoch_currentNode_num, epoch_neighbors_num = steps_animation(
                steps,
                points,
                epoch,
                epoch_currentNode,
                color=color,
                tag_size=tag_size,
                tag_offset_x=tag_offset[0],
                tag_offset_y=tag_offset[1],
                tag_offset_z=tag_offset[2],
            )
2.4.7 Dijkstra 算法于空间几何
Dijkstra 算法通常用于计算两点间的最短路径,更多用于数据分析。不过这些算法也可以用于空间设计,例如下面的两个示例。一个是图 2.4-4 ,平面上一个点到多个点的路径绘制,形成树枝丫般的几何形态;另一个是图 2.4-5,三维空间点随机两两点之间的最短路径绘制,形成交错的空间折线形态。
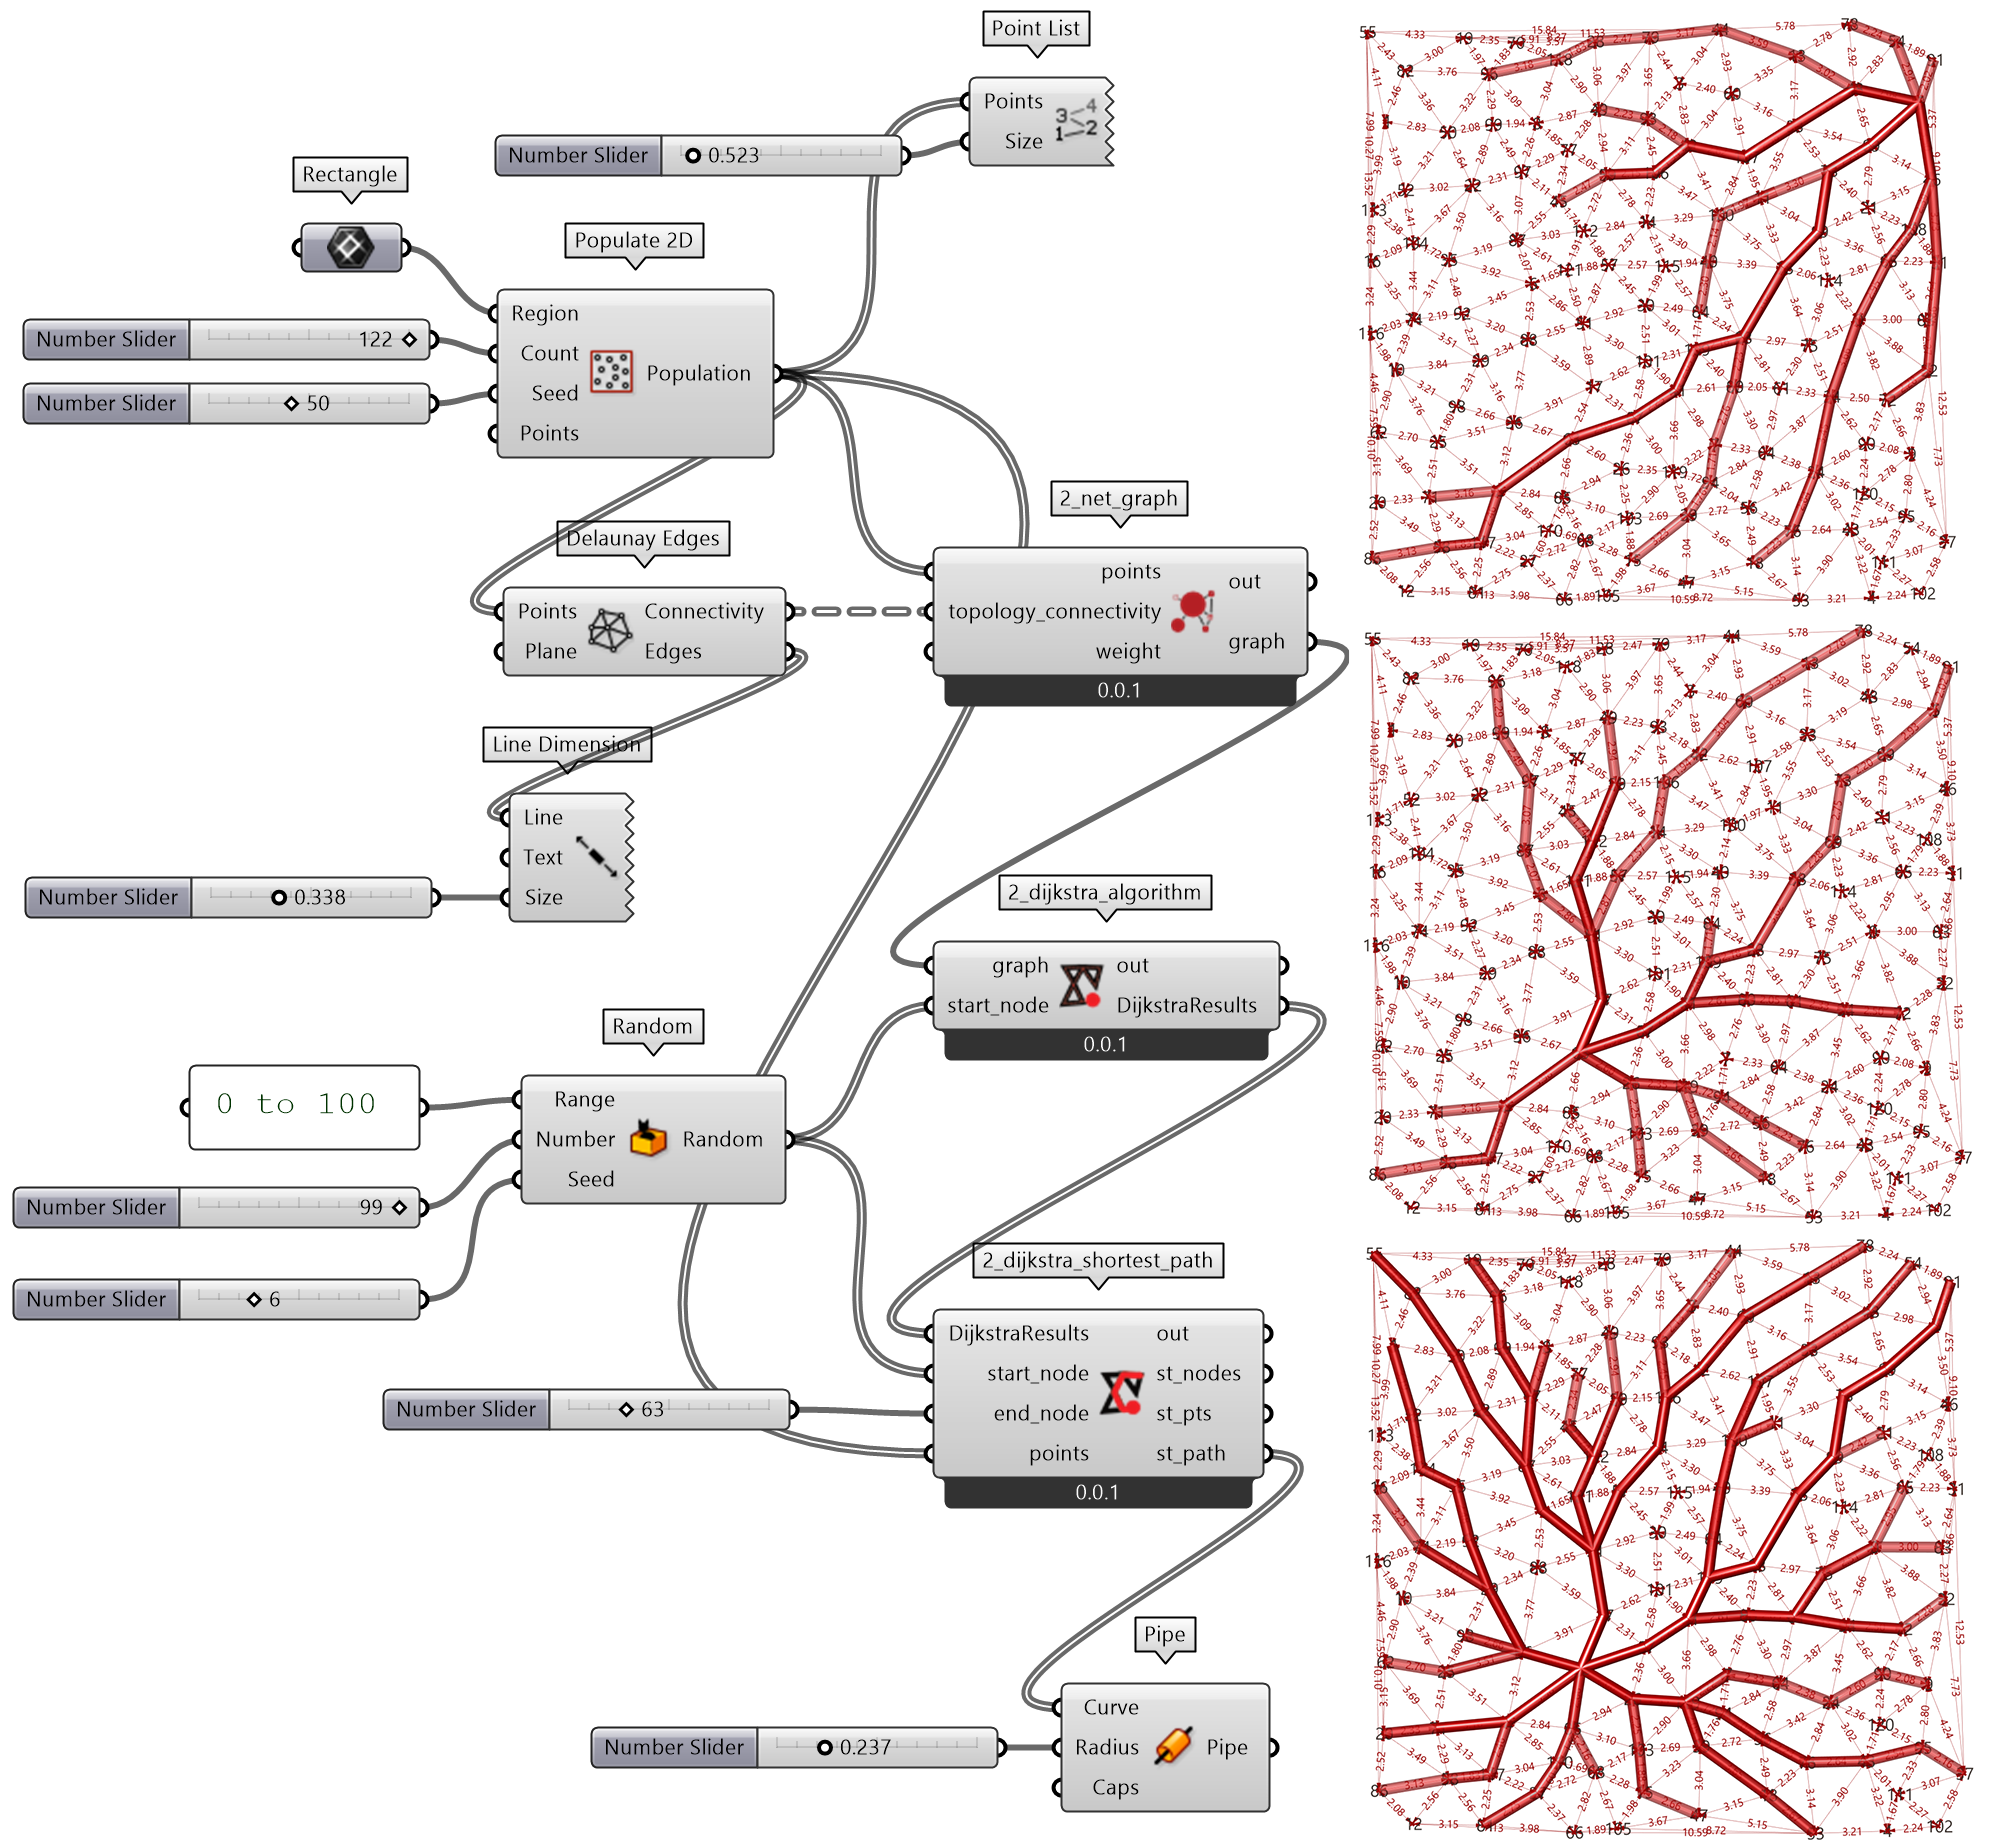
图 2.4-4 Dijkstra 算法应用示例-1
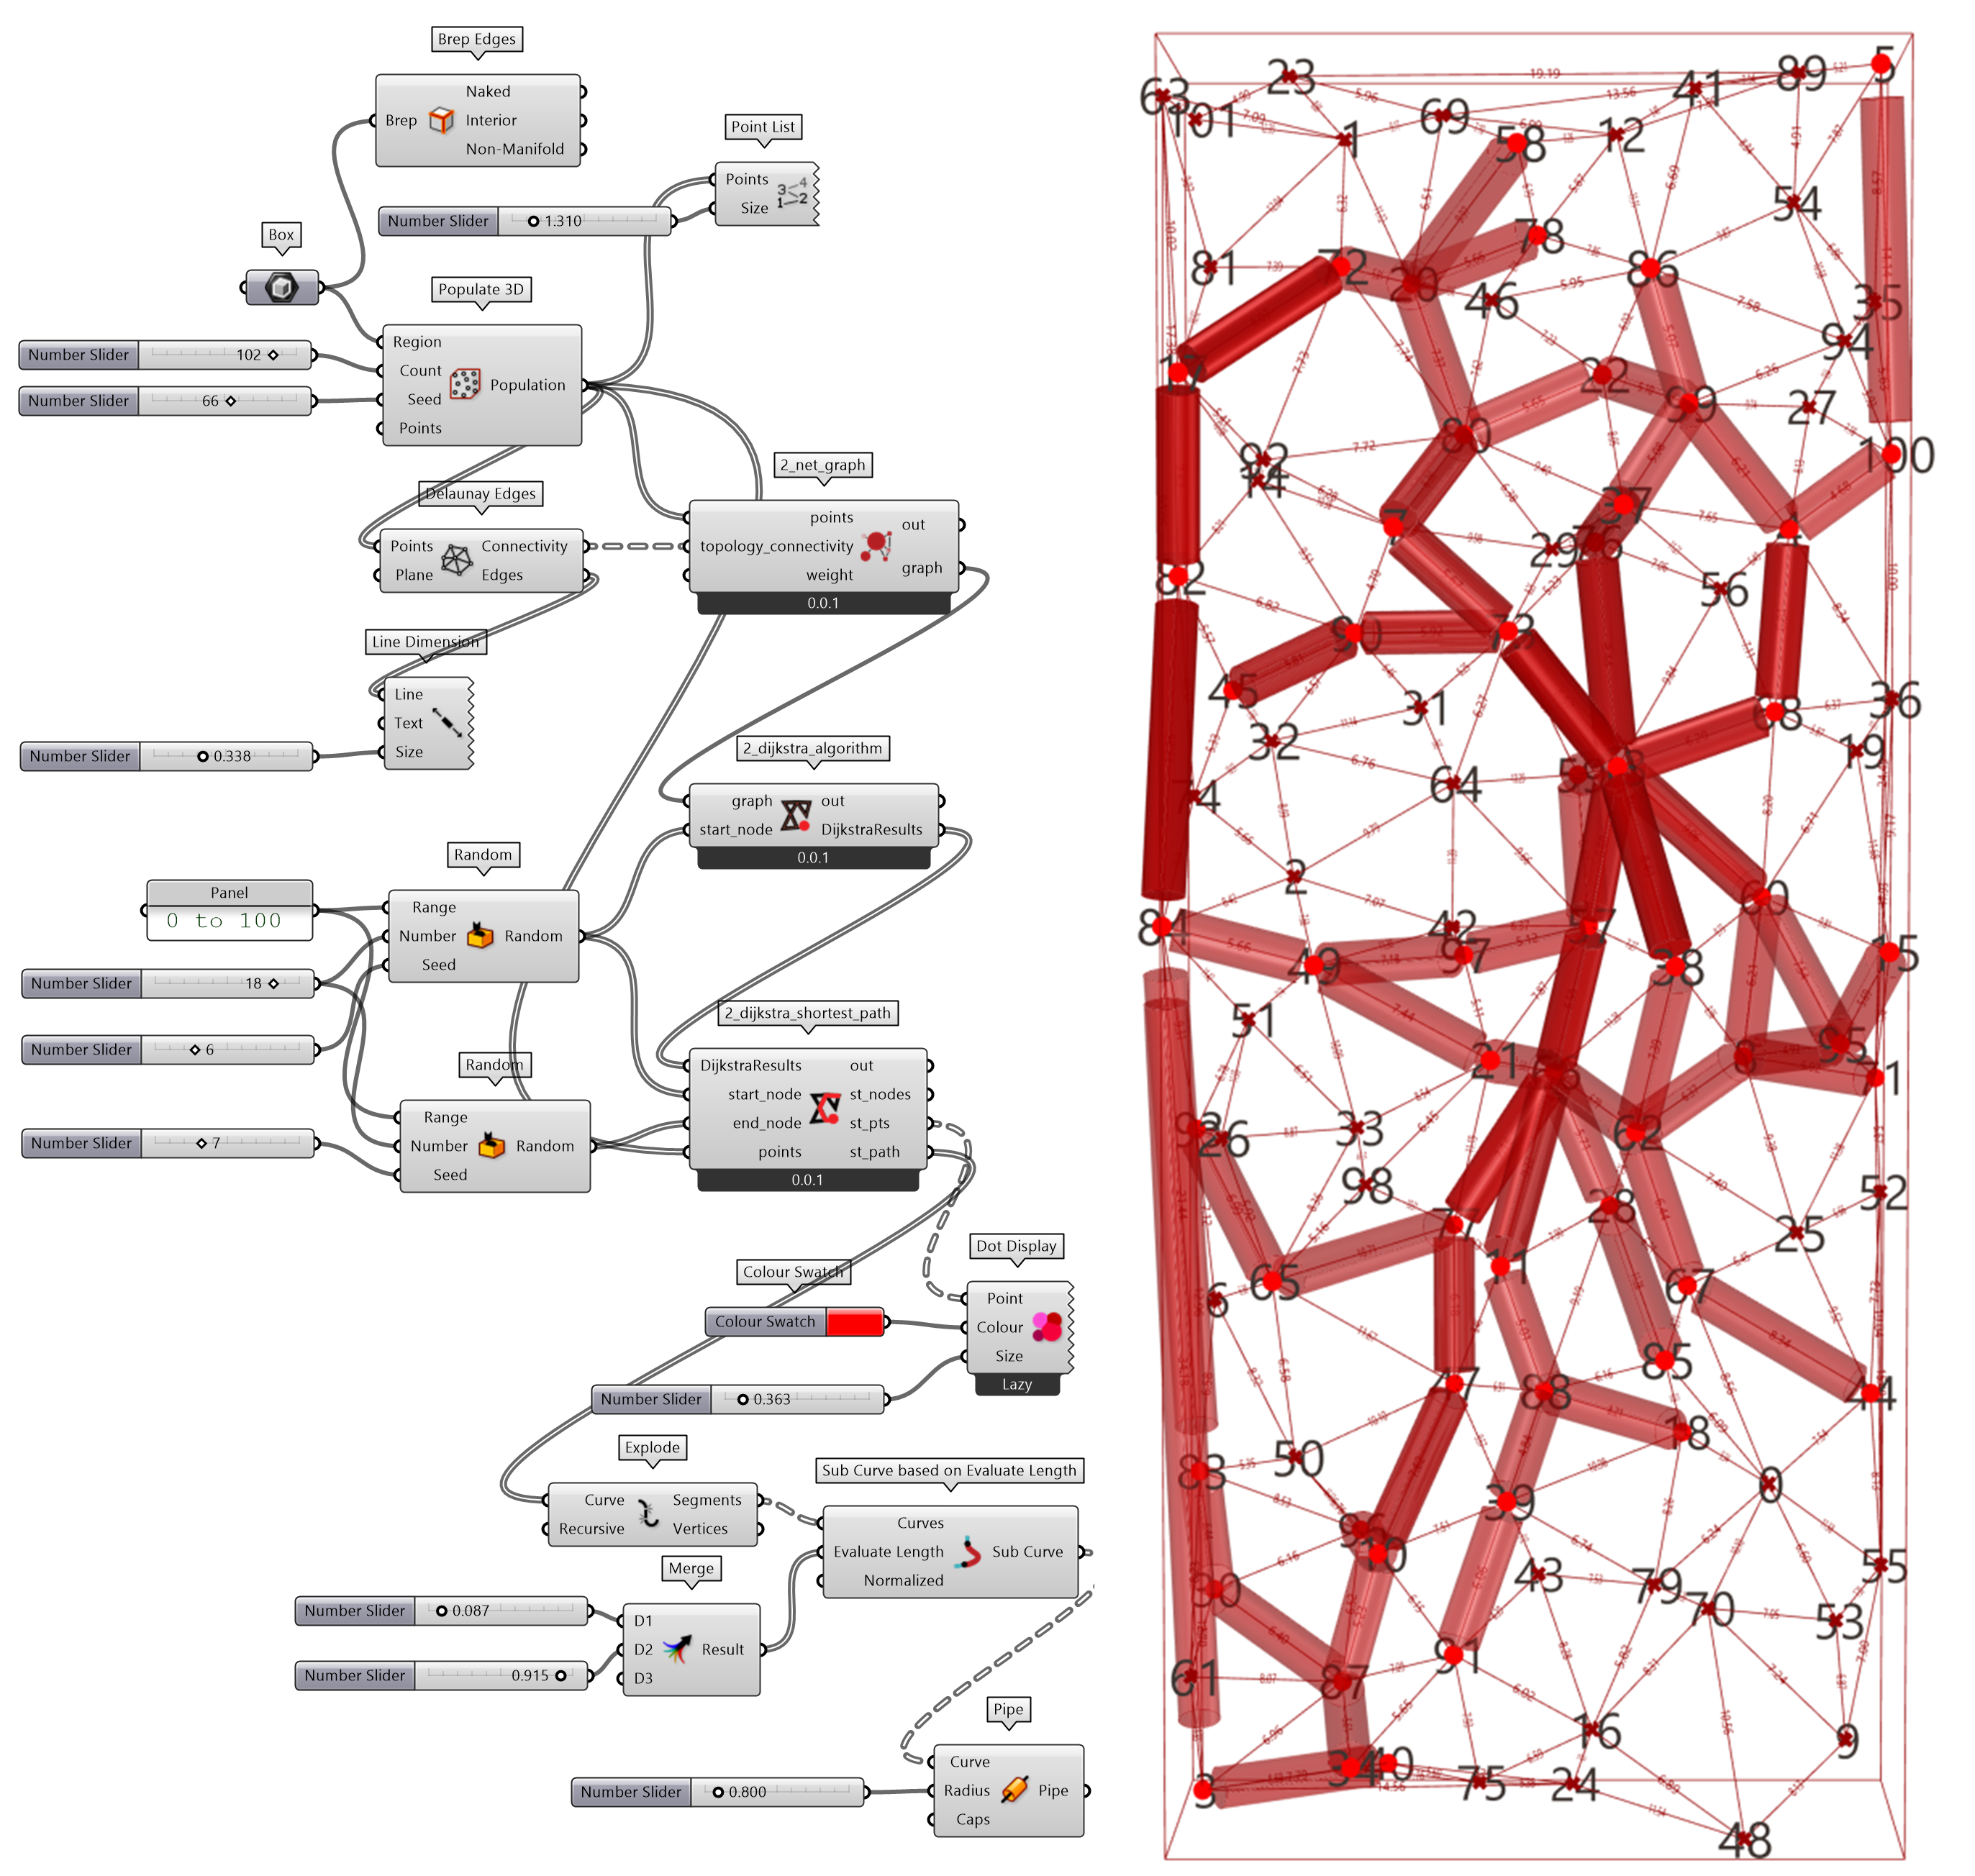
图 2.4-5 Dijkstra 算法应用示例-2
注释(Notes):
① scikit-learn,基于 NumPy, SciPy 和 matplotlib 包,任何人都可以使用的简单有效的预测数据分析工具,为商业可用- BSD 许可(https://scikit-learn.org/stable/)。
② PyTorch,是一个开源的深度学习框架,由 Facebook’s AI Research lab (FAIR) 开发并维护,在学术界和工业界广受欢迎,主要用于构建和训练神经网络https://pytorch.org/)。