2.5 工作流程——一个概念设计
Created on Wed Sep 21 17:40:01 2022; Last updated on 2024-09-10T09:54:43+08:00 @author: Richie Bao
用代码写设计的根本还是设计自身,只是因为使用的工具不再限于传统意义上的三维推敲,设计思维有所变化,这包括:
- 由对空间几何三维推敲的直接操作,转换为如何建立代码逻辑实现空间几何形态的变化(这包括 GH 组件的可视化编程和 Python 的文本式编程);
- 思考空间几何形态变化的逻辑,并以代码实现产生设计,而不再是三维推敲方式确定设计后再转换为代码逻辑的方法;
- 将算法融入到设计当中,用于设计分析并适应生成设计,或直接用于变化设计形态。
图 2.5-1概念设计构建的主要逻辑为:
- 构建空间 voronoi 单元,为空间划分的方式;
- 根据功能建立空间点位置,分配不同功能组空间数量(可转换为空间体量、建筑面积等指标)。随机提取各个功能空间组,从多个随机结果中挑选适合的空间结构形态;
- 通过 Dijkstra 算法,给定空间单元位置,建立两点间的最短路径,实现连通;
- 随机移除指定数量的 voronoi 单元,变化框架结构;
- 用 SubD 将框架形态变化为骨骼态。
对应设计逻辑,考虑组件使用的通用性和弹性如图 2.5-2 ,由 Python Script 构建组件,1_voronoi_basic design structure(BDS)对应“构建空间 voronoi 单元”;1_objs group对应“功能空间组”;1_Shortest Path_py对应“两点间的最短路径”;两点间的最短路径对应“框架骨骼态”;及用于统计建筑指标示例的1_stats_vols;和标注示例的1_textdot。

图 2.5-1 一个概念设计
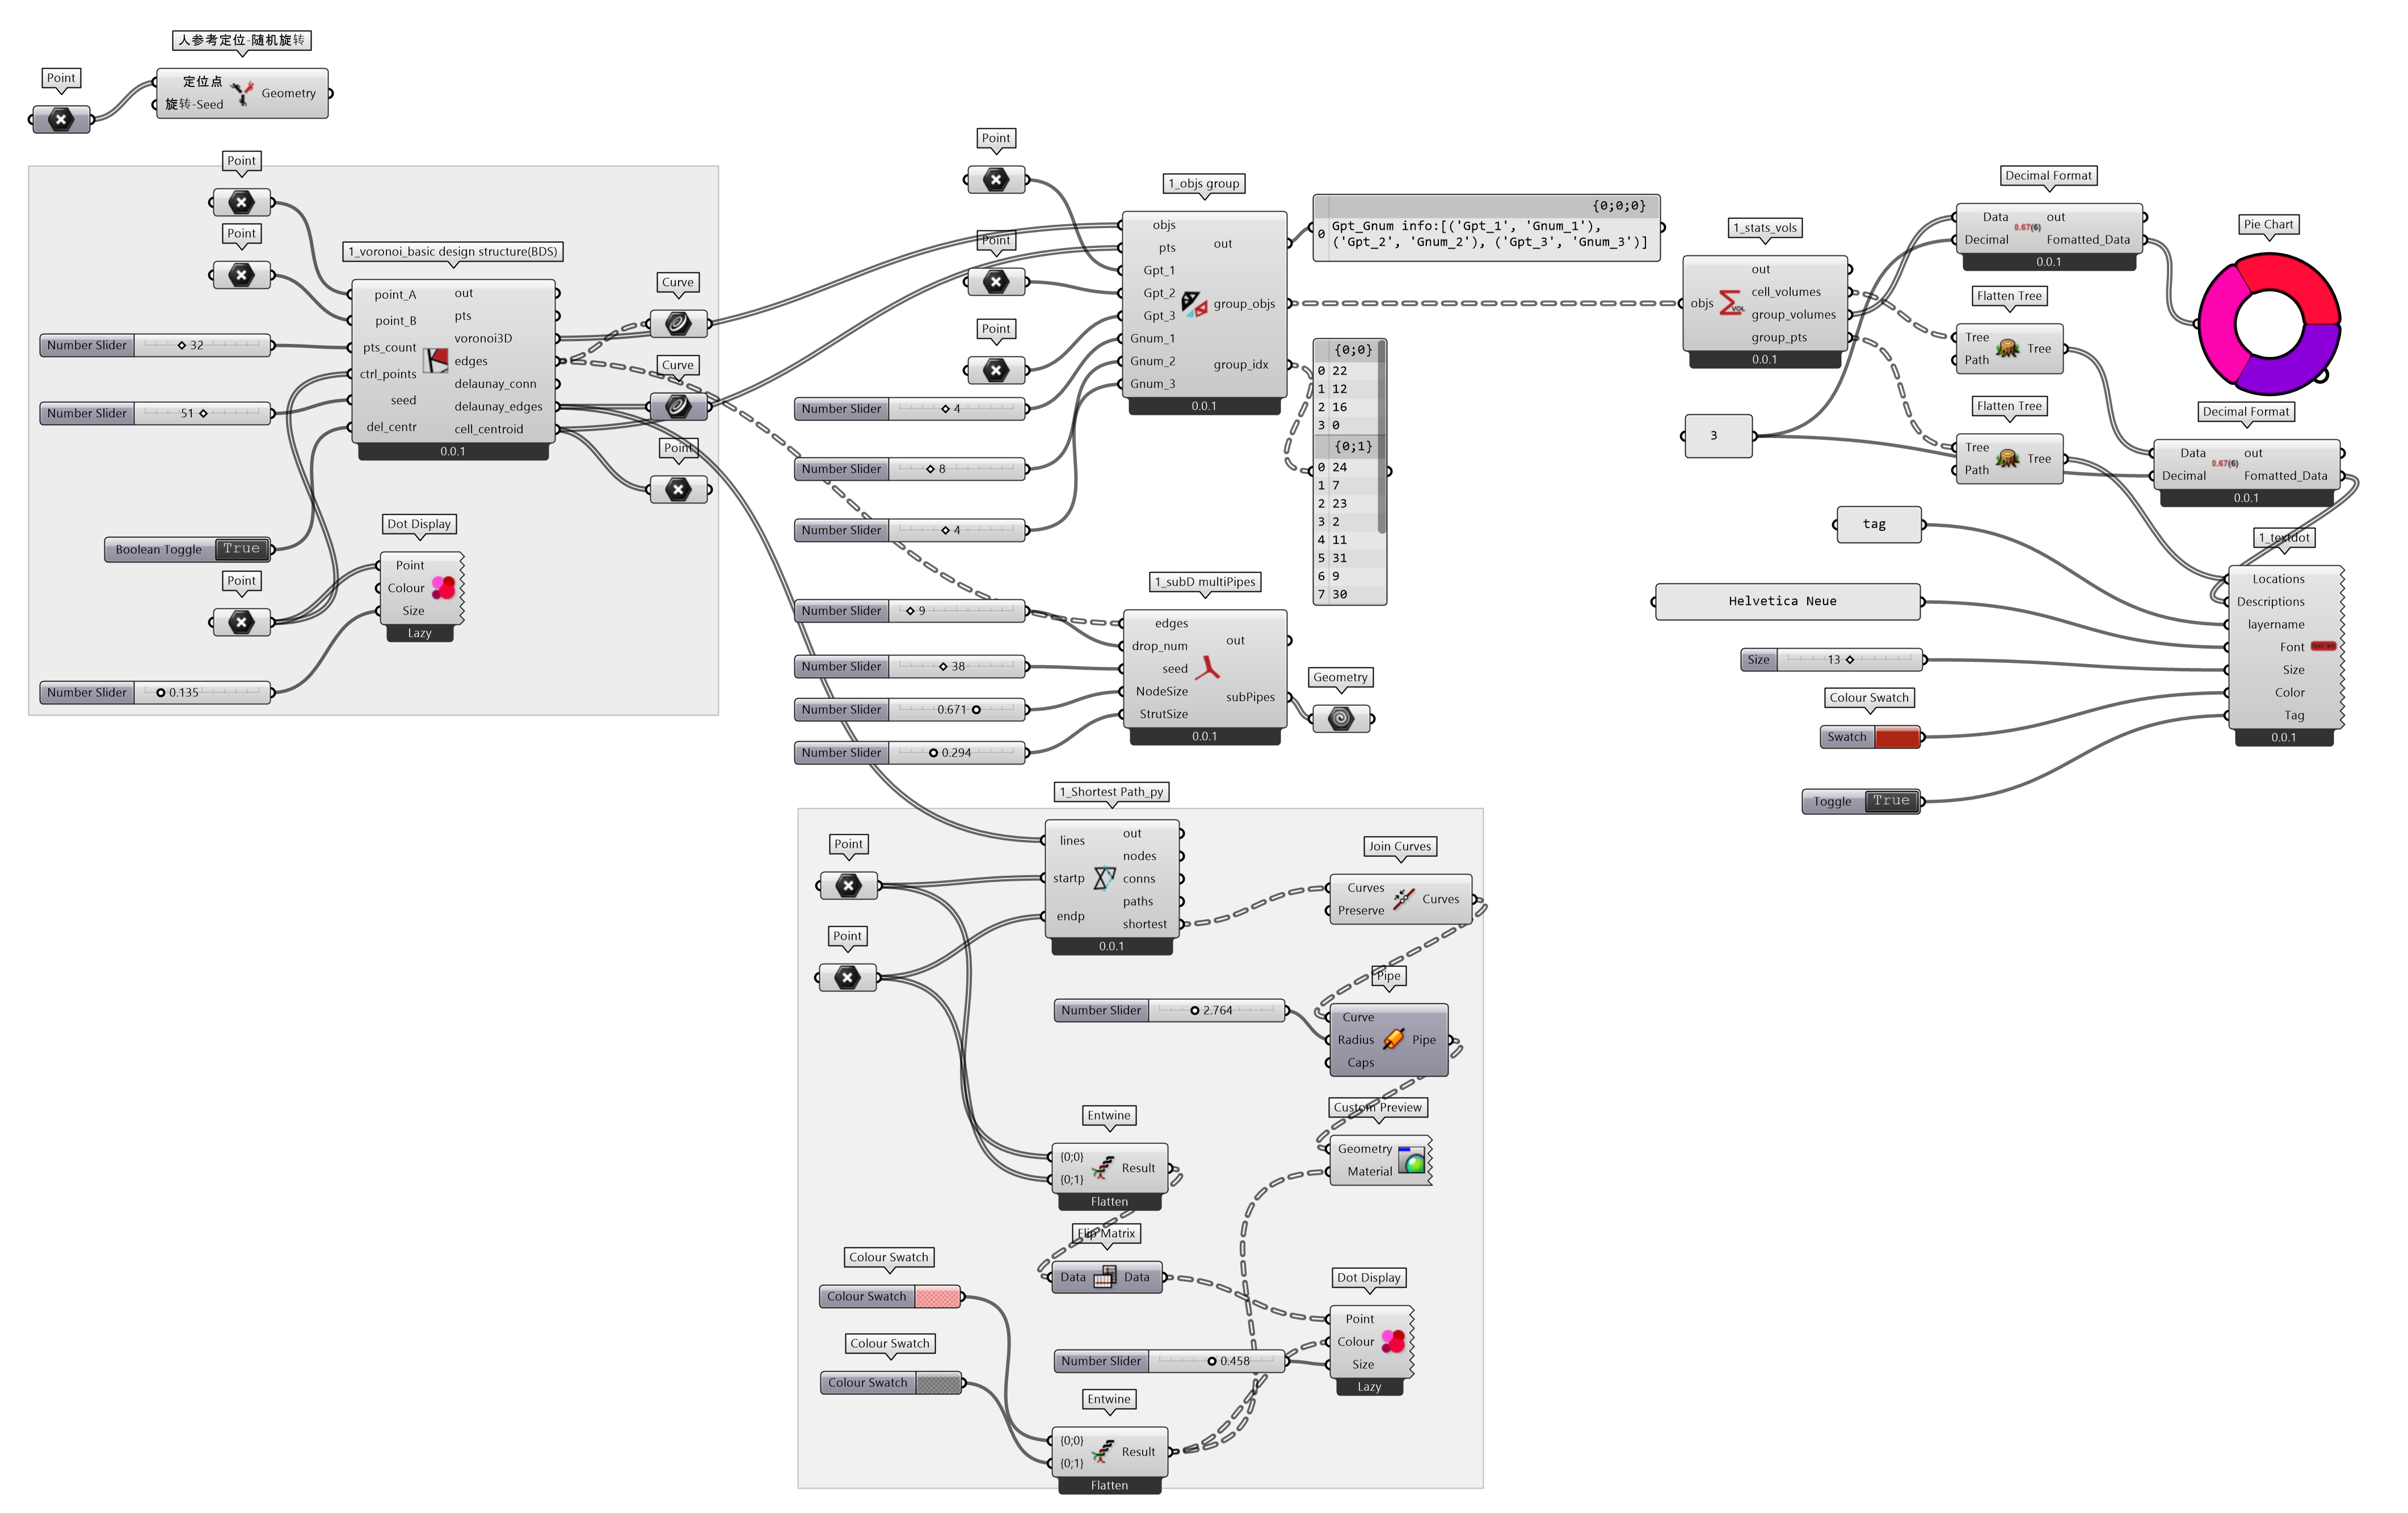
图 2.5-2 一个概念设计的程序
2.5.1 概念设计结构
ghpythonlib库,即nic可调用 GH 基础组件和扩展组件。因为 GH 为参数化设计,因此 GH 的一些组件功能并不会在RhinoCommon和RhinoScriptSyntax中。在使用ghpythonlib.components(ghc)时,可以直接参考 GH 组件,通常 GH 组件的名称就是ghc包含的方法;输入和输出端就是该方法的输入参数和返回值。如果返回值有多个值时,为字典模式,键通常为组件输出端的名称小写,或者直接参考 Python Script 交互解释器中给出的帮助提示。
构建空间 voronoi 单元直接调用了 GH 组件的Box2Pt()建立盒体,Populate3D()由盒体生成随机点,Voronoi3D()生成空间 voronoi 单元,BrepEdges()获取单元边线,Volume()提取单元中心点,DelaunayEdges()构建 Delaunay 网络。用ghc调用 GH 组件书写 Python 代码,与直接用 GH 可视化编程途径如出一辙,但是可以将多个组件组织在一个 Python Script 组件中,并借助 Python 语言的一些方法,例如lambda,map()等函数提取和组织数据;条件语句建立以不同点构建的 delaunay 网络等。因为无限扩展的 Python 工具,大幅度提升了 GH 辅助设计的能力,增强处理设计相关问题的可能性,使得解决问题的手段也更自由。
1_voronoi_basic design structure(BDS) (Python Script 组件)
  """voronoi_basic design structure(BDS).
    Inputs:
        point_A: 盒体控制点A。DS:Item Access;TH:Point3D
        point_B: 盒体控制点B。DS:Item Access;TH:Point3D
        pts_count: 随机点数量。DS:Item Access;TH:int
        ctrl_points: voronoi3D控制点。DS:List Access;TH:Point3D
        seed: 生成随机点的随机种子。DS:Item Access;TH:int
        del_centr: 是否用cell中心点建立delaunay edges,默认为生成的随机点。   DS:Item Access;TH:bool
    Output:
        pts: 生成的随机点
        voronoi3D: voronoi3D对象
        edges: voronoi3D单元边
        delaunay_conn: delaunay连接关系(diagram)
        delaunay_edges: delaunay 连通线
        cell_centroid: voronoi单元中心点
        """

ghenv.Component.Name = "1_voronoi_basic design structure(BDS)"
ghenv.Component.NickName = "1_voronoi_basic design structure(BDS)"
ghenv.Component.Description = "voronoi_basic design structure(BDS)"
ghenv.Component.Message = "0.0.1"
ghenv.Component.Category = "Moths"
ghenv.Component.SubCategory = "Algorithm N Design"
ghenv.Component.AdditionalHelpFromDocStrings = "1"

import ghpythonlib.components as ghc
import ghpythonlib.treehelpers as th


def vorono3DFromBox(pt1, pt2, count, seed=0, ctrl_points=None, del_centr=False):
    """
    构建voronoi3D对象,获取单元边界线,几何中心点和delaunay连线

    Parameters
    ----------
    pt1 : Point3D
        盒体控制点 A.
    pt2 : Point3D
        盒体控制点 B.
    count : int
        随机点数量.
    seed : int, optional
        生成随机点的随机种子. The default is 0.
    ctrl_points : list(Point3D), optional
         voronoi3D 控制点. The default is None.
    del_centr : bool, optional
        是否用 cell 中心点建立 delaunay edges,默认为生成的随机点. The default is False.

    Returns
    -------
    pts : Point3D
        生成的随机点.
    voronoi3D : Brep
        voronoi3D 对象.
    edges : Line
         voronoi3D 单元边.
    delaunay_conn : tree
        delaunay 连接关系.
    delaunay_edges : list(Line)
        delaunay 连通线.
    cell_centroid : list(Point3D)
        voronoi 单元中心点.

    """
    # 构建Voronoi3D
    box = ghc.Box2Pt(pt1, pt2, ghc.XYPlane(ghc.ConstructPoint(0, 0, 0)))
    pts = ghc.Populate3D(box, count, seed, ctrl_points)
    voronoi3D = ghc.Voronoi3D(pts)["cells"]

    # 获取边缘线
    brepEdges = lambda voronoiCell: ghc.BrepEdges(voronoiCell)["interior"]
    edges_ = map(brepEdges, voronoi3D)
    edges = th.list_to_tree([list(i) for i in list(edges_)])

    # connection
    cell_volume = ghc.Volume(voronoi3D)
    cell_centroid, cell_vol = cell_volume["centroid"], cell_volume["volume"]
    if del_centr:
        delaunayEdges = ghc.DelaunayEdges(cell_centroid)
    else:
        delaunayEdges = ghc.DelaunayEdges(pts)
    delaunay_conn, delaunay_edges = (
        delaunayEdges["connectivity"],
        delaunayEdges["edges"],
    )

    return pts, voronoi3D, edges, delaunay_conn, delaunay_edges, cell_centroid


if __name__ == "__main__":
    if pts_count is None:
        pts_count = 20

    if point_A and point_B:
        pts, voronoi3D, edges, delaunay_conn, delaunay_edges, cell_centroid = (
            vorono3DFromBox(
                point_A, point_B, pts_count, seed, ctrl_points, del_centr
            )
        )
2.5.2 分组空间模块
如果要拾取具有标识字符的多个输入端名称及对应的值,例如Gpt和Gnum,可以通过ghenv.Component.Params.Input方法获取,由属性Name提取输入端名称,由VolatileData.AllData(True)提取值。
进行分组时,为给出拾取点Gpt,由ClosestPoints()方法提取给定数量Gnum的最近点,并由最近点的索引(cp_index键)提取 voronoi 空间单元。
1_objs group (Python Script 组件)
  """分组几何对象.
    Inputs:
        objs: 待分组几何对象。 DS:List Access;TH:Geometry(Point3D.)
        pts: 参考索引点(通过计算最近点分组)。DS:List Access;TH:Point3D
        Gpt_n: 位置点列表。DS:List Access;TH:Point3D
        Gnum_n: 分组数量列表。 DS:Item Access;TH:int
    Output:
        group_objs: 分组几何对象
        group_idx: 分组索引
        """

ghenv.Component.Name = "1_objs group"
ghenv.Component.NickName = "1_objs group"
ghenv.Component.Description = "分组几何对象"
ghenv.Component.Message = "0.0.1"
ghenv.Component.Category = "Moths"
ghenv.Component.SubCategory = "Algorithm N Design"
ghenv.Component.AdditionalHelpFromDocStrings = "1"

import ghpythonlib.components as ghc
import ghpythonlib.treehelpers as th


def variable_inputs():
    """
    指定字符('Gpt','Gnum'),获取组件输入端参数变量名和对应的值

    Returns
    -------
    Gpt_Gnum : nested list(Geometry,int)
        包含'Gpt','Gnum'字符的输入参数值.
    Gpt_Gnum_keys: nested list(string)
        包含'Gpt','Gnum'字符的输入参数名.

    """
    # print([i.Name for i in ghenv.Component.Params.Input])
    Gpt_dict = {}
    Gnum_dict = {}
    input_values = lambda input: [
        item for item in input.VolatileData.AllData(True)
    ]
    # print(ghenv.Component.Params.Input)
    for i, input in enumerate(ghenv.Component.Params.Input):
        if "Gpt" in input.Name:
            Gpt_dict[input.Name] = input_values(input)
        elif "Gnum" in input.Name:
            Gnum_dict[input.Name] = input_values(input)

    Gpt_Gnum_keys = [
        (i, j)
        for j in Gnum_dict.keys()
        for i in Gpt_dict.keys()
        if i[-1] == j[-1]
    ]
    Gpt_Gnum = [(Gpt_dict[i], Gnum_dict[j]) for i, j in Gpt_Gnum_keys]
    return Gpt_Gnum, Gpt_Gnum_keys


def objs_group(objs, pts, Gpt_Gnum):
    """
    将对象按索引点,基于Gpt位置点分组

    Parameters
    ----------
    objs : Geometry
        待分组几何对象.
    pts : list(Point3D)
        参考索引点(通过计算最近点分组).
    Gpt_Gnum : list(Gpt_Gnum值)
        包含'Gpt','Gnum'字符的输入参数值.

    Returns
    -------
    group_objs_tree : tree(Geometry)
        分组几何对象.
    group_idx_tree : tree(int)
        分组索引.

    """
    group_objs = []
    group_idx = []
    for gpt, gnum in Gpt_Gnum:
        ptsCP = ghc.ClosestPoints(gpt, pts, gnum)
        ptsIdx = ptsCP["cp_index"]
        neighbor_pts = ptsCP["closest_point"]
        neighbor_objs = [objs[i] for i in ptsIdx]
        group_objs.append(neighbor_objs)
        group_idx.append(list(ptsIdx))

    group_objs_tree = th.list_to_tree(group_objs)
    group_idx_tree = th.list_to_tree(group_idx)
    return group_objs_tree, group_idx_tree


if __name__ == "__main__":
    if objs and pts:
        Gpt_Gnum, Gpt_Gnum_keys = variable_inputs()
        print("Gpt_Gnum info:{}".format(Gpt_Gnum_keys))
        group_objs, group_idx = objs_group(objs, pts, Gpt_Gnum)
2.5.3 节点连通(最短路径)- Dijkstra’s algorithm
可以对比“组件式模块_逐步计算与算法解析”部分给出的 Dijkstra 算法实现方式,此次给出的方法直接将算法与几何对象绑定。相对将几何对象和算法分离的方式,不难发现该种方式更复杂,在考虑算法的同时,需要解决空间几何对象构建的问题,增加了代码书写的难度,也容易在书写过程中增加出错的几率。
``1_Shortest Path_py` (Python Script 组件)
  """最短路径计算_python代码.
    Inputs:
        lines: 待计算的路径。 DS:List Access;TH:Curve
        startp: 开始点列表。 DS:List Access;TH:Point3d
        endp: 结束点列表。DS:List Access;TH:Point3d
    Output:
        nodes: 最短路径节点
        conns: 连通索引值
        paths: 节点索引 #/
        shortest:最短路径
        """

ghenv.Component.Name = "1_Shortest Path_py"
ghenv.Component.NickName = "1_Shortest Path_py"
ghenv.Component.Description = "最短路径计算_python代码"
ghenv.Component.Message = "0.0.1"
ghenv.Component.Category = "Moths"
ghenv.Component.SubCategory = "Algorithm N Design"
ghenv.Component.AdditionalHelpFromDocStrings = "1"

import Rhino.Geometry as rg
from Grasshopper import DataTree
from Grasshopper.Kernel.Data import GH_Path
import ghpythonlib.treehelpers as th
import System


def shortestPath(lines, startp, endp):
    """
     Dijkstra’s algorithm,求取最短路径

    Parameters
    ----------
    lines : list(Curve)
        待计算的路径连通线.
    startp : list(Point3d)
        开始点列表.
    endp : list(Point3d)
        结束点列表.

    Returns
    -------
    point_list : list(Point3d)
        最短路径节点.
    connection : list(int)
        连通索引值.
    full_path : list(int)
        节点索引 .
    finale : list(Curve)
        最短路径.

    """
    temp_point = [0, 0]
    finale = []
    point_list = DataTree[System.Object]()
    connection = DataTree[int]()
    full_path = DataTree[System.Object]()
    for i in range(len(lines) - 1):
        which_point = -1
        temp_point[0] = lines[i].PointAtNormalizedLength(0)
        temp_point[1] = lines[i].PointAtNormalizedLength(1)
        for j in range(point_list.BranchCount - 1):
            # print("-"*50)
            # print(point_list.Branch(j)[0])
            if point_list.Branch(j)[0] == temp_point[0]:
                which_point = j
        path = GH_Path(i)
        path2 = GH_Path(point_list.BranchCount)
        if which_point != -1:
            connection.Insert(which_point, path, 0)
        else:
            point_list.Insert(temp_point[0], path2, 0)
            point_list.Insert("unvisited", path2, 1)
            point_list.Insert(999999, path2, 2)
            connection.Insert(point_list.BranchCount - 1, path, 0)
        which_point = -1
        for j in range(point_list.BranchCount - 1):
            if point_list.Branch(j)[0] == temp_point[1]:
                which_point = j
        path = GH_Path(i)
        path2 = GH_Path(point_list.BranchCount)
        if which_point != -1:
            connection.Insert(which_point, path, 1)
        else:
            point_list.Insert(temp_point[1], path2, 0)
            point_list.Insert("unvisited", path2, 1)
            point_list.Insert(999999, path2, 2)
            connection.Insert(point_list.BranchCount - 1, path, 1)
        connection.Insert(temp_point[0].DistanceTo(temp_point[1]), path, 2)

    temp_distance = 999999
    for i in range(point_list.BranchCount - 1):
        pt = point_list.Branch(i)[0]
        if pt.DistanceTo(startp) < temp_distance:
            temp_distance = point_list.Branch(i)[0].DistanceTo(startp)
            real_start = i
    temp_distance = 999999
    for i in range(point_list.BranchCount - 1):
        pt = point_list.Branch(i)[0]
        if pt.DistanceTo(endp) < temp_distance:
            temp_distance = point_list.Branch(i)[0].DistanceTo(endp)
            target_node = i
    current_node = real_start
    point_list.Branch(current_node)[2] = 0
    path = GH_Path(current_node)
    full_path.Insert(current_node, path, 0)

    flag2 = False
    while flag2 == False:
        flag2 = True
        flag = False
        point_list.Branch(current_node)[1] = "current"
        while flag == False:
            currently = 999999
            flag = True
            for i in range(connection.BranchCount - 1):
                temp = connection.Branch(i)[1]
                if (
                    point_list.Branch(temp)[1] == "unvisited"
                    and connection.Branch(i)[0] == current_node
                    and connection.Branch(i)[2] < currently
                ):
                    currently = connection.Branch(i)[2]
                    currentid = connection.Branch(i)[1]
                    flag = False
                temp = connection.Branch(i)[0]
                if (
                    point_list.Branch(temp)[1] == "unvisited"
                    and connection.Branch(i)[1] == current_node
                    and connection.Branch(i)[2] < currently
                ):
                    currently = connection.Branch(i)[2]
                    currentid = connection.Branch(i)[0]
                    flag = False
            test_distance = currently + point_list.Branch(current_node)[2]
            if test_distance < point_list.Branch(currentid)[2]:
                point_list.Branch(currentid)[2] = test_distance
                path = GH_Path(currentid)
                full_path.Add(current_node, path)
            point_list.Branch(currentid)[1] = "investigating"

        point_list.Branch(current_node)[1] = "finished"
        temp_chose = 999990
        for i in range(point_list.BranchCount - 1):
            if point_list.Branch(i)[1] == "investigating":
                point_list.Branch(i)[1] = "unvisited"
            if (
                point_list.Branch(i)[1] == "unvisited"
                and point_list.Branch(i)[2] < temp_chose
            ):
                temp_chose = point_list.Branch(i)[2]
                temp_id = i
                flag2 = False
        current_node = temp_id
    temp_target = target_node
    while temp_target != real_start:
        temp = full_path.Branch(temp_target)[0]
        temp_point[0] = point_list.Branch(temp_target)[0]
        temp_point[1] = point_list.Branch(temp)[0]
        temp_target = temp
        finale.append(rg.Line(temp_point[0], temp_point[1]))

    return point_list, connection, full_path, finale


if __name__ == "__main__":
    if lines and startp and endp:
        nodes_lst, conns_lst, paths_lst, shortest_lst = [], [], [], []
        for sp, ep in zip(startp, endp):
            nodes_, conns_, paths_, shortest_ = shortestPath(lines, sp, ep)
            nodes_lst.append(nodes_.Branches)
            conns_lst.append(conns_.Branches)
            paths_lst.append(paths_.Branches)
            shortest_lst.append(shortest_)
        nodes = th.list_to_tree(nodes_lst)
        conns = th.list_to_tree(conns_lst)
        paths = th.list_to_tree(paths_lst)
        shortest = th.list_to_tree(shortest_lst)
2.5.4 结构形态
位于GH->Surface->SubD下的MultiPipe组件,在 Python Script 下调用时位于Kangaroo之下,为ghc.Kangaroo2Component.MultiPipe()。
定义结构形态的 Python Script 组件包括随机移除给定数目的空间单元和调用MultiPipe()两部分。这两部分都比较简单,可以由 GH 组件可视化编程直接实现,这里将其集合到 Python Script 中的一个目的是,仅引出MultiPipe组件输入参数的NodeSize和StrutSize,其它参数默认或固定,简化输入端。
各类 Python 库,或者 GH 在版本升级更新后,调用的方法位置有可能发生变化。可以通过网络搜索,或者查看官方提供的文档定位新的位置。
1_subD multiPipes (Python Script 组件)
  """通过给定的连续边,建立subD对象multiPipes.
    Inputs:
        edges:边。 DS:Tree Access;TH:Curve
        drop_num:移除边分支的数量。 DS:Item Access;TH:int
        seed:移除分枝的随机种子。DS:Item Access;TH:int
        NodeSize:节点大小。DS:Item Access;TH:float
        StrutSize:边径大小。DS:Item Access;TH:float
    Output:
        subPipes: subD对象multiPipes"""

__author__ = "richiebao caDesign设计(cadesign.cn)"
__version__ = "2022.09.21"

ghenv.Component.Name = "1_subD multiPipes"
ghenv.Component.NickName = "1_subD multiPipes"
ghenv.Component.Description = "通过给定的连续边,建立subD对象multiPipes"
ghenv.Component.Message = "0.0.1"
ghenv.Component.Category = "Moths"
ghenv.Component.SubCategory = "Algorithm N Design"
ghenv.Component.AdditionalHelpFromDocStrings = "1"

import rhinoscriptsyntax as rs
import ghpythonlib.components as ghc
import Rhino.Geometry as rg
import random


def randomDrop_multiPipe(curves, nodesize, strutsize, drop_num, seed):
    """
    通过给定的连续边,建立subD对象multiPipes。可以随机剔除给定数量的分枝

    Parameters
    ----------
    curves : Tree(Curve)
        边.
    nodesize : float
        节点大小.
    strutsize : float
        边径大小.
    drop_num : int
        移除边分支的数量.
    seed : int
        移除分枝的随机种子.

    Returns
    -------
    subPipes : list(subD)
        subD对象multiPipes.

    """
    random.seed(seed)
    branchCount = curves.BranchCount
    print(branchCount)

    path_idx = [random.randint(0, branchCount) for _ in range(drop_num)]
    paths = [curves.Paths[i] for i in path_idx]
    for i in paths:
        curves.RemovePath(i)
    # print(curves.BranchCount)
    subPipes = ghc.Kangaroo2Component.MultiPipe(
        curves=curves,
        nodesize=nodesize,
        endoffset=1,
        strutsize=strutsize,
        segment=0,
        kinkangle=0.6,
        cubefit=0,
    )

    return subPipes


if __name__ == "__main__":
    if seed is None:
        seed = random.randint(1, 1000)
    if edges and NodeSize and StrutSize:
        subPipes = randomDrop_multiPipe(
            edges, NodeSize, StrutSize, drop_num, seed
        )
2.5.5 统计
设计内容的各类指标统计是设计过程中辅助调整设计和最后统计报表的必要组成部分。统计输出方式,一是,直接从组件的输出端输出为 GH 的数据结构类型,如本例;二是,定义类,以类属性的方式存储数据,以类的实例化对象输出。实例化对象并不能为 GH 组件所使用,需要根据具体目的,再在 Python Script 中书写代码,完成数据的提取和 GH 数据类型的输出。
示例通过Volume()方法计算空间单元的体积和几何中心点,并进一步计算空间分组的分组总体积,分别以列表形式返回和输出。
1_stats_vols (Python Script 组件)
  """按分枝统计 Brep 对象的体积.
    Inputs:
        objs: 可以计算体积的Brep对象。DS:Tree Access;TH:Brep
    Output:
        cell_volumes: 单元对象体积
        group_volumes: 分组对象体积
        group_pts: 单元对象几何中心点
        """

ghenv.Component.Name = "1_stats_vols"
ghenv.Component.NickName = "1_stats_vols"
ghenv.Component.Description = "按分枝统计Brep对象的体积"
ghenv.Component.Message = "0.0.1"
ghenv.Component.Category = "Moths"
ghenv.Component.SubCategory = "Algorithm N Design"
ghenv.Component.AdditionalHelpFromDocStrings = "1"

import ghpythonlib.components as ghc
import ghpythonlib.treehelpers as th
import Rhino


def stats_objs(objs):
    """
    按分枝统计 Brep 对象的体积

    Parameters
    ----------
    objs : Tree(Brep)
        可以计算体积的 Brep 对象.

    Returns
    -------
    cell_volumes : float
        单元对象体积.
    group_volumes : float
        分组对象体积.
    group_pts : Point3d
        单元对象几何中心点.

    """
    cell_volumes = []
    group_volumes = []
    group_pts = []
    branchCount = objs.BranchCount
    dataCount = objs.DataCount
    topologyDescription = objs.TopologyDescription
    paths = objs.Paths
    for p in paths:
        v_p = objs.Branch(p)
        vols_return = ghc.Volume(v_p)
        vols = vols_return["volume"]
        cell_volumes.append(list(vols))
        sum_vols = sum(vols)
        group_volumes.append(sum_vols)
        pts = vols_return["centroid"]
        group_pts.append(list(pts))
    return cell_volumes, group_volumes, group_pts


if __name__ == "__main__":
    cell_volumes_, group_volumes, group_pts_ = stats_objs(objs)
    cell_volumes = th.list_to_tree(cell_volumes_)
    group_pts = th.list_to_tree(group_pts_)
2.5.6 标注
通常标注就直接使用 GH 和 RH 提供的标注组件,但是,有时需要变化 RH 空间的标注内容,例如“组件式模块_逐步计算与算法解析”部分逐步图解算法的动画。这里直接迁移了上述代码,只是由组件式模块转换为具有输入条件可直接使用的一般形式组件。
1_textdot (Python Script 组件)
  """给定位置点标注文字.
    Inputs:
        Locations: 定位点。DS:List Access;TH:Point3d
        Descriptions: 文字。DS:List Access;TH:str
        layername:层名称。DS:Item Access;TH:str
        Font: 字体类型。DS:Item Access;TH:str
        Size:字体大小。DS:Item Access;TH:int
        Color:文本框颜色。DS:Item Access;TH:System Drawing Color
        Tag: 是否标注。DS:Item Access;TH:bool
"""

ghenv.Component.Name = "1_textdot"
ghenv.Component.NickName = "1_textdot"
ghenv.Component.Description = "给定位置点标注文字"
ghenv.Component.Message = "0.0.1"
ghenv.Component.Category = "Moths"
ghenv.Component.SubCategory = "Algorithm N Design"
ghenv.Component.AdditionalHelpFromDocStrings = "1"

import Rhino.Geometry as rg
import Rhino.DocObjects as rd
import Rhino
import scriptcontext as sc


def create_textdot(text_str, point, height=-1, font=-1):
    """Creates a TextDot at a given location.

    Args:
        text_string (str): A text to display.
        point (Rhino.Geometry.Point3d): A location.
        height (int): A font height.
        font (str): A font face.

    Returns:
        The Rhino.Geometry.TextDot().
    """
    textdot = rg.TextDot(text_str, point)
    if height > 0:
        textdot.FontHeight = height
    if font != -1:
        textdot.FontFace = font
    return textdot


def clear_textdots():
    """Deletes all TextDots from the active Rhino document."""
    textdots = sc.doc.Objects.FindByObjectType(rd.ObjectType.TextDot)
    if len(textdots) > 0:
        for tdot in textdots:
            sc.doc.Objects.Delete(tdot, True)


def tag_run(Locations, Descriptions, layername, Font, Size, Color, Tag):
    """
    给定位置点标注文字-主程序

    Parameters
    ----------
    Locations : Point3d
        定位点.
    Descriptions : string
        文字.
    layername : string
        层名称.
    Font : string
        字体类型.
    Size : int
        字体大小.
    Color : System Drawing Color
        文本框颜色.
    Tag : bool
        是否标注.

    Returns
    -------
    None.

    """
    sc.doc = Rhino.RhinoDoc.ActiveDoc  # ACTIVE_DOC
    clear_textdots()

    if Tag:
        attr = rd.ObjectAttributes()
        attr.ColorSource = rd.ObjectColorSource.ColorFromObject
        attr.ObjectColor = Color
        layer_find = sc.doc.Layers.Find(layername, True)
        if layer_find < 0:
            layer = rd.Layer()
            layer.Name = layername
            layer_find = sc.doc.Layers.Add(layer)
        attr.LayerIndex = layer_find
        for i in range(len(Locations)):
            tdot = create_textdot(Descriptions[i], Locations[i], Size, Font)
            sc.doc.Objects.AddTextDot(tdot, attr)

    else:
        clear_textdots()
    sc.doc = ghdoc


if __name__ == "__main__":
    tag_run(Locations, Descriptions, layername, Font, Size, Color, Tag)