2.7.4 人体姿态估计
Created on 2024-10-06T19:54:39+08:00 @author: Richie Bao
建筑空间通常是为人所使用,因此人个体或群体及其行为构成了空间所要承载的内容,并使得建筑空间形式和设计尺寸受到其制约。既往大量设计经验的积累和住宅空间人体工程学尺寸数据汇总成册,为设计空间尺寸和尺度的把握提供了基础性数据信息。在计算机视觉领域,人体姿态估计(Human Pose Estimation)旨在检测和识别图像或视频中人体关键点,并确定人体的姿态或肢体位置。人体姿态估计广泛应用于人机交互、动作识别、虚拟现实、运动分析和监控系统,及游戏等领域。为了探索人行为与空间形态的关系,在空间形态分析和设计中引入人体姿态估计可以更直接的观察分析空间形态与人的关系,可探索的方向包括,
- 由图片生成三维人体模型用于设计过程中适宜于所设计空间形态或其所能够承载行为的参照。
- 由视频或姿态预测生成动态的三维人体行为模型,辅助空间设计对动态行为的观察,分析空间形态设计的合理性。
- 由设计的空间形态生成潜在各类的人体姿态,通过对人体姿态和行为的分类,分析评估空间可能的用途。
- 根据设计目的置入已经估计的各类人体姿态,生成可能的空间形态或装修设计布局,辅助设计。
- 辅助建筑空间或室内装修,及家具电器设计的人体工程学研究,包括儿童和老人等特殊群体。
- 用于设计空间的表达。
本部分并不深入探索上述内容,而主要解释应用人体姿态估计开源库(Python),实现在 GH 中 Python Script 下用图片、影像或已训练的姿态(分布)数据和模型生成设计所需的三维人体姿态模型的方法,建立人体姿态估计实现组件,为探索上述内容做准备。
2.7.4.1 应用 MediaPipe 库
MediaPipe ①提供了一套应用人工智能(artificial intelligence,AI)和机器学习(machine learni,ML)的库和工具,可以非常方便的嵌入到开发的应用程序中。MediaPipe 解决方案(Solutions)可跨多个平台使用,对于 Python,包括有多个模型,有对象检测(Object detection)、图像分类(Image classification)、图像分割(Image segmentation)、交互式分割(Interactive segmentation)、手部标记检测(Hand landmark detection)、手势识别(Gesture recognition)、图像嵌入(Image embedding)、人脸检测(Face detection)、人脸关键点检测(Face landmark detection)、人脸风格化(Face stylization)、人体姿态检测(Pose landmark detection)、文本分类(Text classification)、文本嵌入(Text embedding)、语言检测器(Language detector)和音频分类(Audio classification)等。人体姿态估计(Pose landmark detection)②机器学习模型可以检测一个图像或一个视频中人体的关键点(包括图像坐标和三维世界坐标系坐标),以此来识别人体关键的身体位置,分析姿势,并对动作进行分类,其配置参数包括,
-
static_image_mode:如果设置为False,则将输入的多个图像视为视频流(video stream)。模型试图在第一张图像中检测出最突出的人对象,并定位关键点,而后在其后的图像中,只是追踪这些关键点,而不调用新的检测,直至目标失踪,以便减少计算和延迟。如果设置为True,则将输入的多个图像视为静态,可能并不相关的图像,对每个图像均执行人体检测。 -
model_complexity:配置模型的复杂度,其分为0,1 或 2 三个级别,默认为 1。值越大预测的关键点精度越高,但推断时长也会随之增加。 -
smooth_landmarks:如果设置为True,将在不同的输入图像中放置关键点以减少抖动。但是如果static_image_mode也设置为True则忽略。 -
enable_segmentation:如果配置为True,除了估计人体姿势的关键点外,同时还生成分割掩码(segmentation mask)。 -
smooth_segmentation:如果配置为True,跨不同的输入图像过滤分割掩码以减少抖动。如果enable_segmentation为False或者static_image_mode为True则忽略。 -
min_detection_confidence:人体检测模型(person-detection model)最小置信度,值域为 [0.0,1.0],默认值为 0.5。 -
min_tracking_confidence:关键点追踪模型(landmark-tracking model )最小置信度,值域为 [0.0,1.0]。如果追踪失败,在下一输入图像中调用人体检测模型。较高的值可以增加解算的鲁棒性,但会增加计算成本。如果参数static_image_mode为真则忽略。
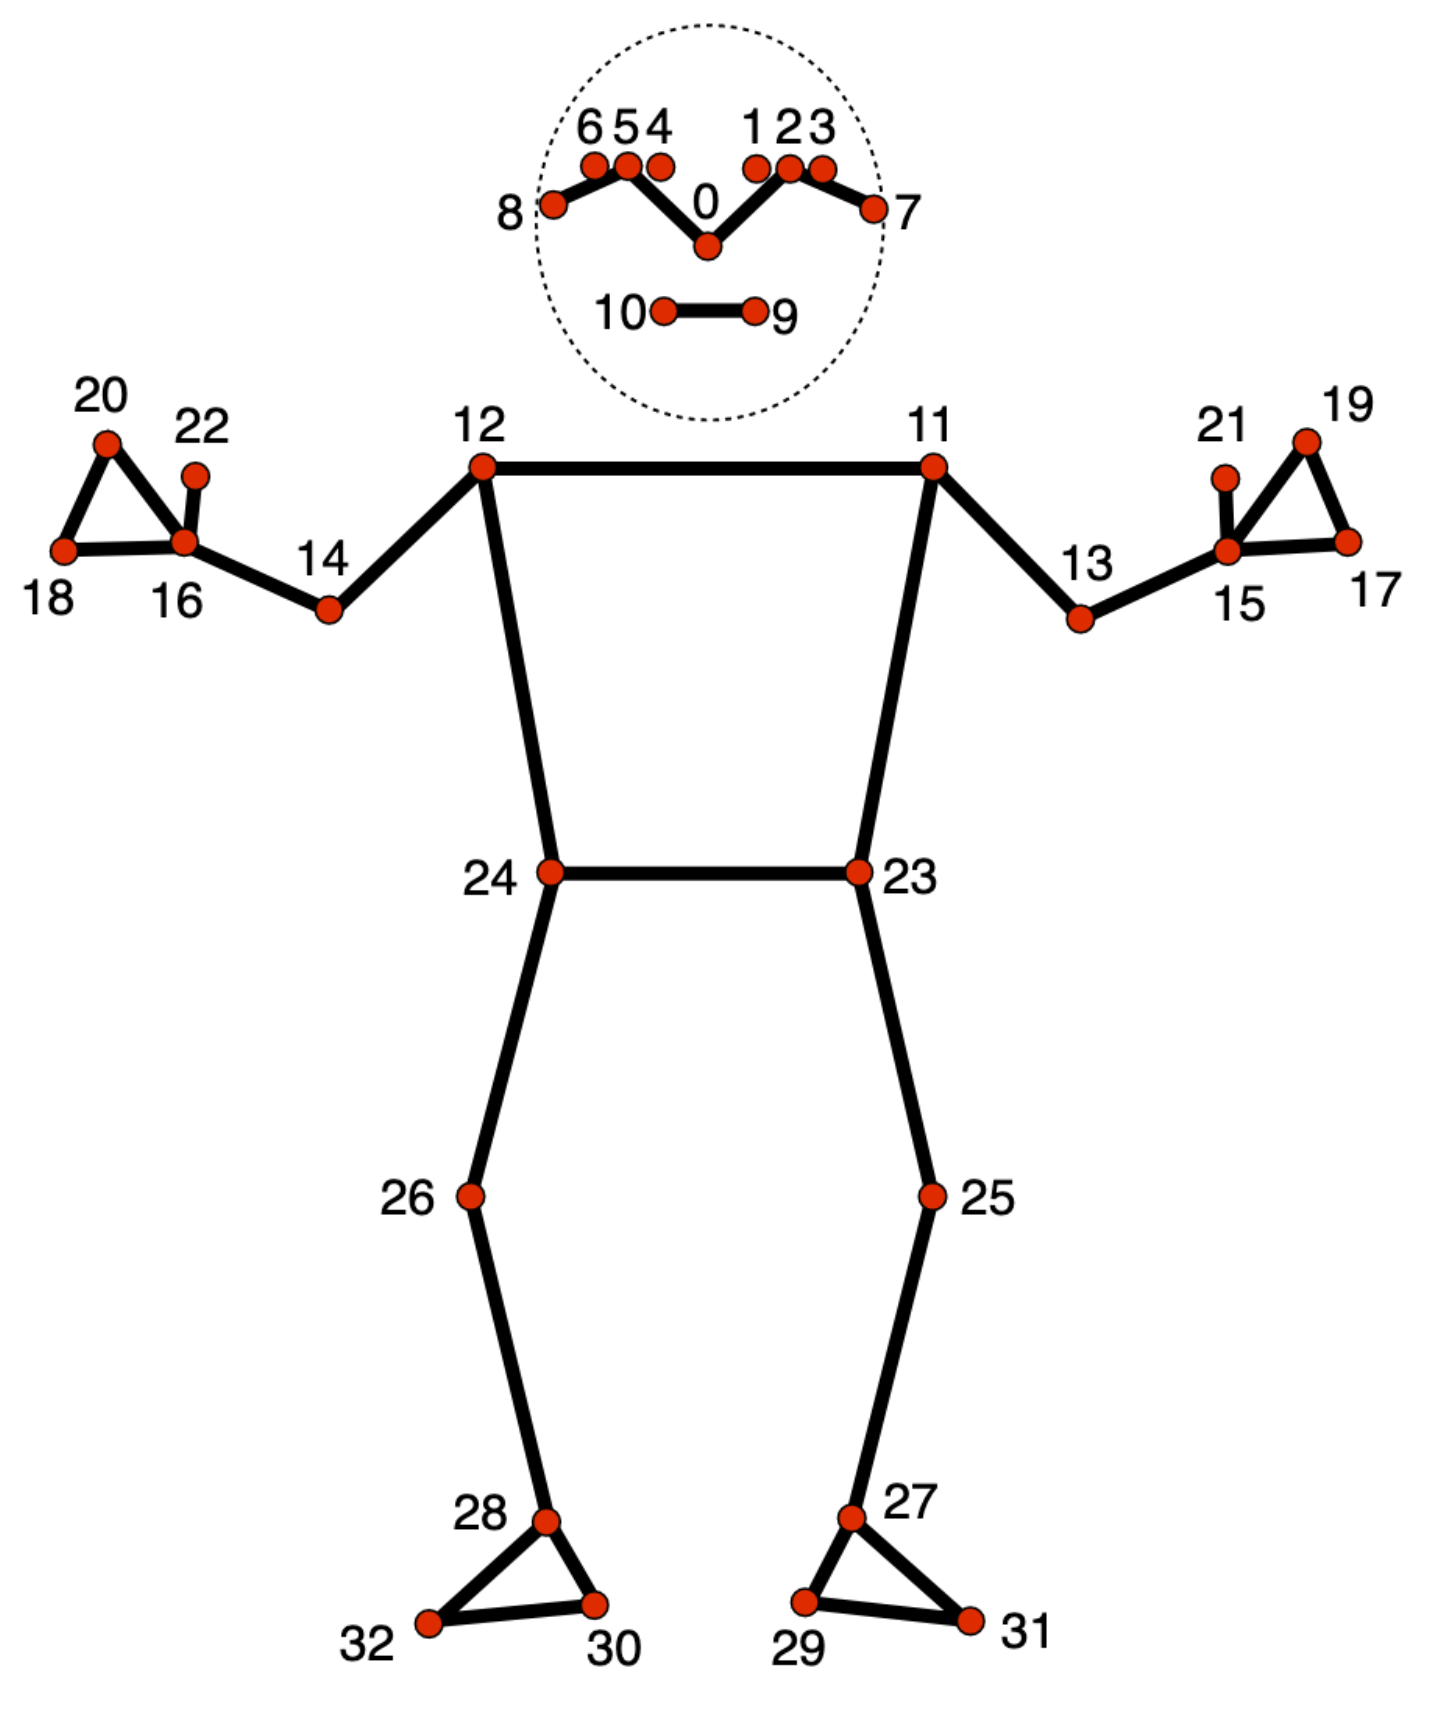
图 2.7.4-1 MediaPipe 人体姿态估计关键点,图引自Pose landmark detection guide(Google AI for Developers)②
MediaPipe 的姿态估计主要包括姿态(人体)检测模型(Pose detection model)和姿态(人体)关键点模型(Pose landmarker model),其中关键点数为33个,对应人体部分如图 2.7.4-1,对应列表如下:
  0 - nose
1 - left eye (inner)
2 - left eye
3 - left eye (outer)
4 - right eye (inner)
5 - right eye
6 - right eye (outer)
7 - left ear
8 - right ear
9 - mouth (left)
10 - mouth (right)
11 - left shoulder
12 - right shoulder
13 - left elbow
14 - right elbow
15 - left wrist
16 - right wrist
17 - left pinky
18 - right pinky
19 - left index
20 - right index
21 - left thumb
22 - right thumb
23 - left hip
24 - right hip
25 - left knee
26 - right knee
27 - left ankle
28 - right ankle
29 - left heel
30 - right heel
31 - left foot index
32 - right foot index
1)MediaPipe 人体姿态估计的图像模式
MediaPipe 人体姿态估计有三种模式,图片、视频和直播(LIVE_STREAM,例如摄像机)。定义组件MediaPipePoseImage实现单张图片的人体姿态估计,并定义MediaPipePoseMove组件,方便对位于原点估计结果对象的移动,包括关键点及其连接线,如图 2.7.4-2。
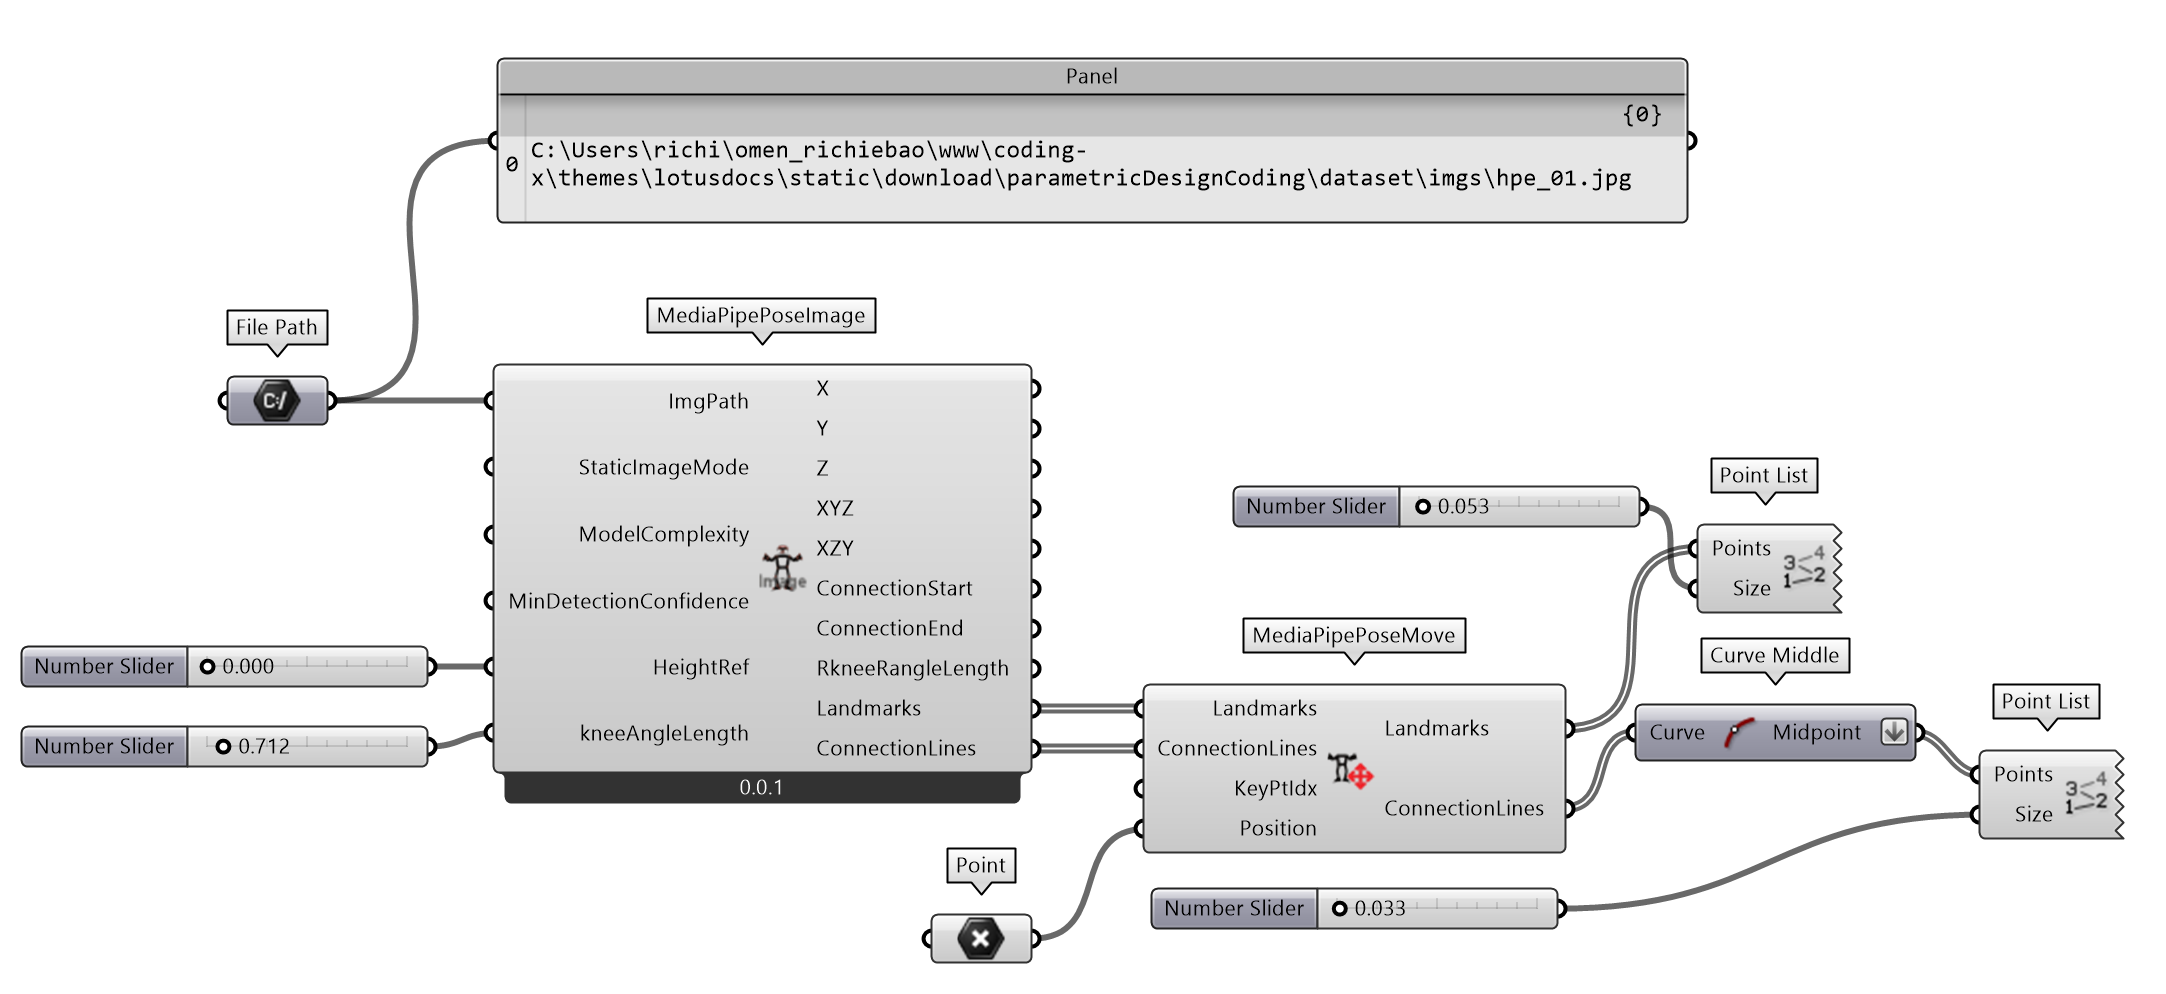
图 2.7.4-2 MediaPipe 人体姿态估计(图片)组件建构
GH 的 Python Script 环境需要安装 MediaPipe ③库和OpenCV④库。为了将人体姿态估计结果适合的置于 RH 的三维空间坐标系下,增加了HeightRef输入参数调整模型的高度;kneeAngleLength参数则通过调整小腿的长度来调整人体高度。同时,调换关键点的 Y 和 Z 轴,使人体模型立于 RH 坐标系的 XY 平面上。
MediaPipePoseImage (Python Script 组件)
  """
用 MediaPipe 库的人体姿态估计提取图像中人体关键点信息,包括关键点之间的连线。
Input:
    ImgPath: Item Access; str
        图像文件路径
    StaticImageMode: Item Access; bool
        如果设置为 False,则将输入的多个图像视为视频流(video stream)。。如果设置为 True,则将输入的多个图像视为静态,可能并不相关的图像,对每个图像均执行人体检测
    ModelComplexity: Item Access; int
        配置模型的复杂度,其分为0,1 或 2 三个级别,默认为 1。值越大预测的关键点精度越高,但推断时长也会随之增加
    MinDetectionConfidence: Item Access; float
        人体检测模型(person-detection model)最小置信度,值域为 [0.0,1.0]
    HeightRef: Item Access; float
        参考位置高度
    kneeAngleLength: Item Access; float
        由小腿长度,用于控制人体身高
Output:
    X: List[float]
        关键点坐标 X 值
    Y: List[float]
        关键点坐标 Y 值
    Z: List[float]
        关键点坐标 Z 值
    XYZ: Tree[float]
        关键点坐标 XYZ 次序
    XZY: Tree[float]
        关键点坐标 XZY 次序
    ConnectionStart: Tree[float]
        连接线起始点
    ConnectionEnd: Tree[float]
        连接线结束点
    RkneeRangleLength: float
        实际提取的右小腿长度
    Landmarks: List[Point3D]
        关键点坐标
    ConnectionLines: List[Line]
        关键点连接线
"""

import mediapipe as mp
import cv2
import math
from mediapipe.tasks.python import vision

import ghpythonlib.treehelpers as th
import rhinoscriptsyntax as rs

ghenv.Component.Name = "MediaPipePoseImage"
ghenv.Component.NickName = "MediaPipePoseImage"
ghenv.Component.Description = (
    "用 MediaPipe 库的人体姿态估计提取人体关键点信息,包括关键点之间的连线"
)
ghenv.Component.Message = "0.0.1"
ghenv.Component.Category = "Moths"
ghenv.Component.SubCategory = "Human Pose Estimation"
ghenv.Component.PanelSection = 1


def distance_3d(point1, point2):
    """
    计算三维空间中两点之间的欧氏距离。

    Args:
        point1 (tuple): 第一个点为 (x1, y1, z1)
        point2 (tuple): 第二个点为 (x2, y2, z2)

    Returns:
        float: 两点之间的距离
    """
    x1, y1, z1 = point1
    x2, y2, z2 = point2
    return math.sqrt((x2 - x1) ** 2 + (y2 - y1) ** 2 + (z2 - z1) ** 2)


def poseDetection(
    static_image_mode=True, model_complexity=2, min_detection_confidence=0.3
):
    # 初始化 MediaPipe 姿势(Pose)
    mp_pose = mp.solutions.pose
    image = cv2.imread(ImgPath)

    # 2. 运行 MediaPipe 的 Pose
    with mp_pose.Pose(
        static_image_mode=True, min_detection_confidence=0.3, model_complexity=2
    ) as pose:
        results = pose.process(cv2.cvtColor(image, cv2.COLOR_BGR2RGB))
        if results.pose_world_landmarks:
            nose_world_landmark = results.pose_world_landmarks.landmark[
                mp_pose.PoseLandmark.NOSE
            ]
            wlandmarks = results.pose_world_landmarks.landmark

            x = [wlandmark.x for wlandmark in wlandmarks]
            y = [wlandmark.y for wlandmark in wlandmarks]
            z = [wlandmark.z for wlandmark in wlandmarks]
            xyz = list(zip(x, y, z))

            XYZ = th.list_to_tree(xyz)
            RkneeRangleLength = distance_3d(xyz[26], xyz[28])
            scale = kneeAngleLength / RkneeRangleLength

            X = [i * scale for i in x]
            Y = [i * scale for i in z]
            Z = [-i * scale + HeightRef for i in y]
            xyz = list(zip(X, Y, Z))
            XZY = th.list_to_tree(xyz)

            connection_start = []
            connection_end = []
            ConnectionLines = []
            for connection in vision.PoseLandmarksConnections.POSE_LANDMARKS:
                cx_s = wlandmarks[connection.start].x
                cy_s = wlandmarks[connection.start].y
                cz_s = wlandmarks[connection.start].z
                pt_s = [cx_s * scale, cz_s * scale, -cy_s * scale + HeightRef]
                connection_start.append(pt_s)

                cx_e = wlandmarks[connection.end].x
                cy_e = wlandmarks[connection.end].y
                cz_e = wlandmarks[connection.end].z
                pt_e = [cx_e * scale, cz_e * scale, -cy_e * scale + HeightRef]
                connection_end.append(pt_e)

                ConnectionStart = th.list_to_tree(connection_start)
                ConnectionEnd = th.list_to_tree(connection_end)

                ConnectionLines.append(rs.AddLine(pt_s, pt_e))

            Landmarks = rs.AddPoints(xyz)

        else:
            print("No pose world landmarks detected.")

    return (
        X,
        Y,
        Z,
        XYZ,
        XZY,
        ConnectionStart,
        ConnectionEnd,
        RkneeRangleLength,
        Landmarks,
        ConnectionLines,
    )


if __name__ == "__main__":
    try:
        (
            X,
            Y,
            Z,
            XYZ,
            XZY,
            ConnectionStart,
            ConnectionEnd,
            RkneeRangleLength,
            Landmarks,
            ConnectionLines,
        ) = poseDetection(StaticImageMode, ModelComplexity, MinDetectionConfidence)
    except Exception as e:
        print(e)
同时移动或者变换不同几何对象时,可以通过Group组件将所有对象成组后操作,并分离后用Ungroup组件返回原对象,如图 2.7.4-3。
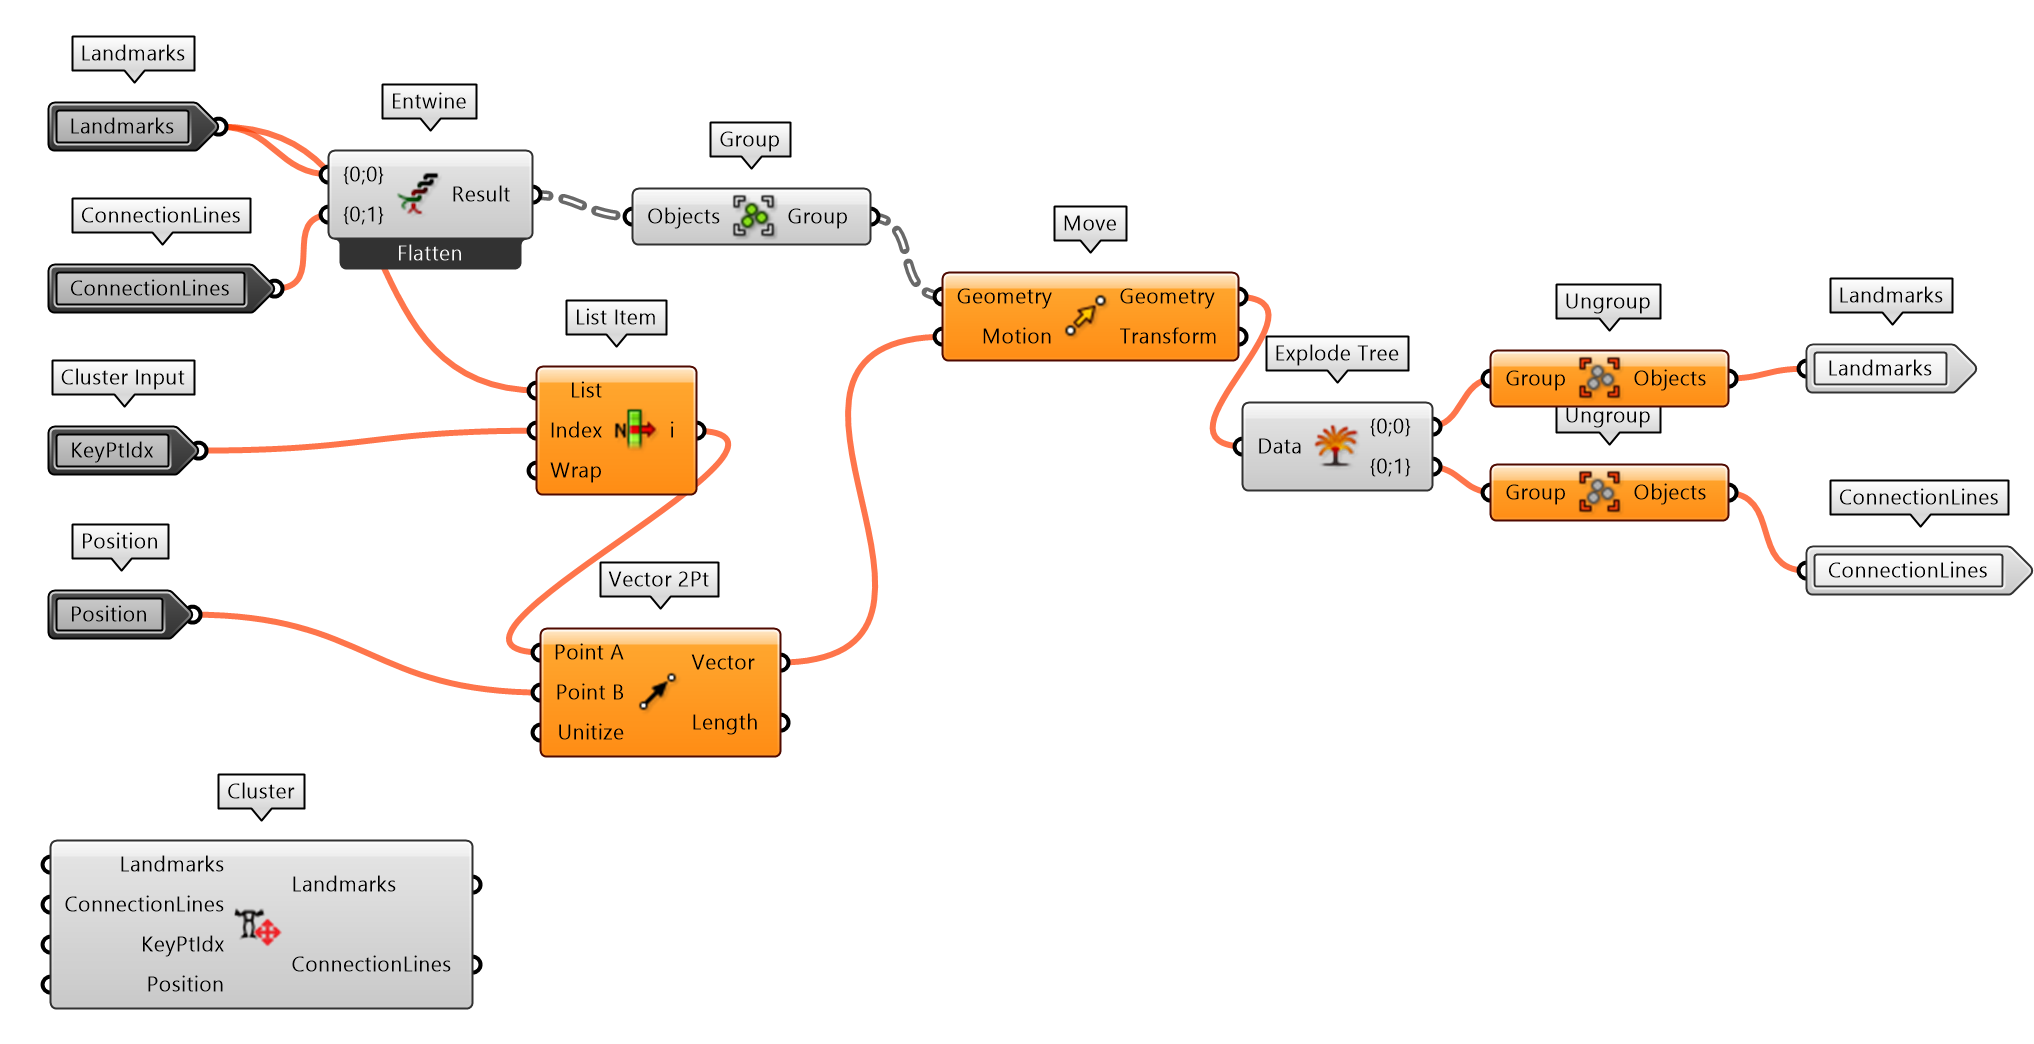
图 2.7.4-3 MediaPipePoseMove 组件定义
测试定义的 MediaPipe 人体姿态估计(图片)组件MediaPipePoseImage,如图 2.7.4-4。测试结果较好的估计了图像中人体姿态,并在估计的三维关键点和连接线上标识了索引顺序,其关键点对应到 MediaPipe 图 2.7.4-1 关键点列表。
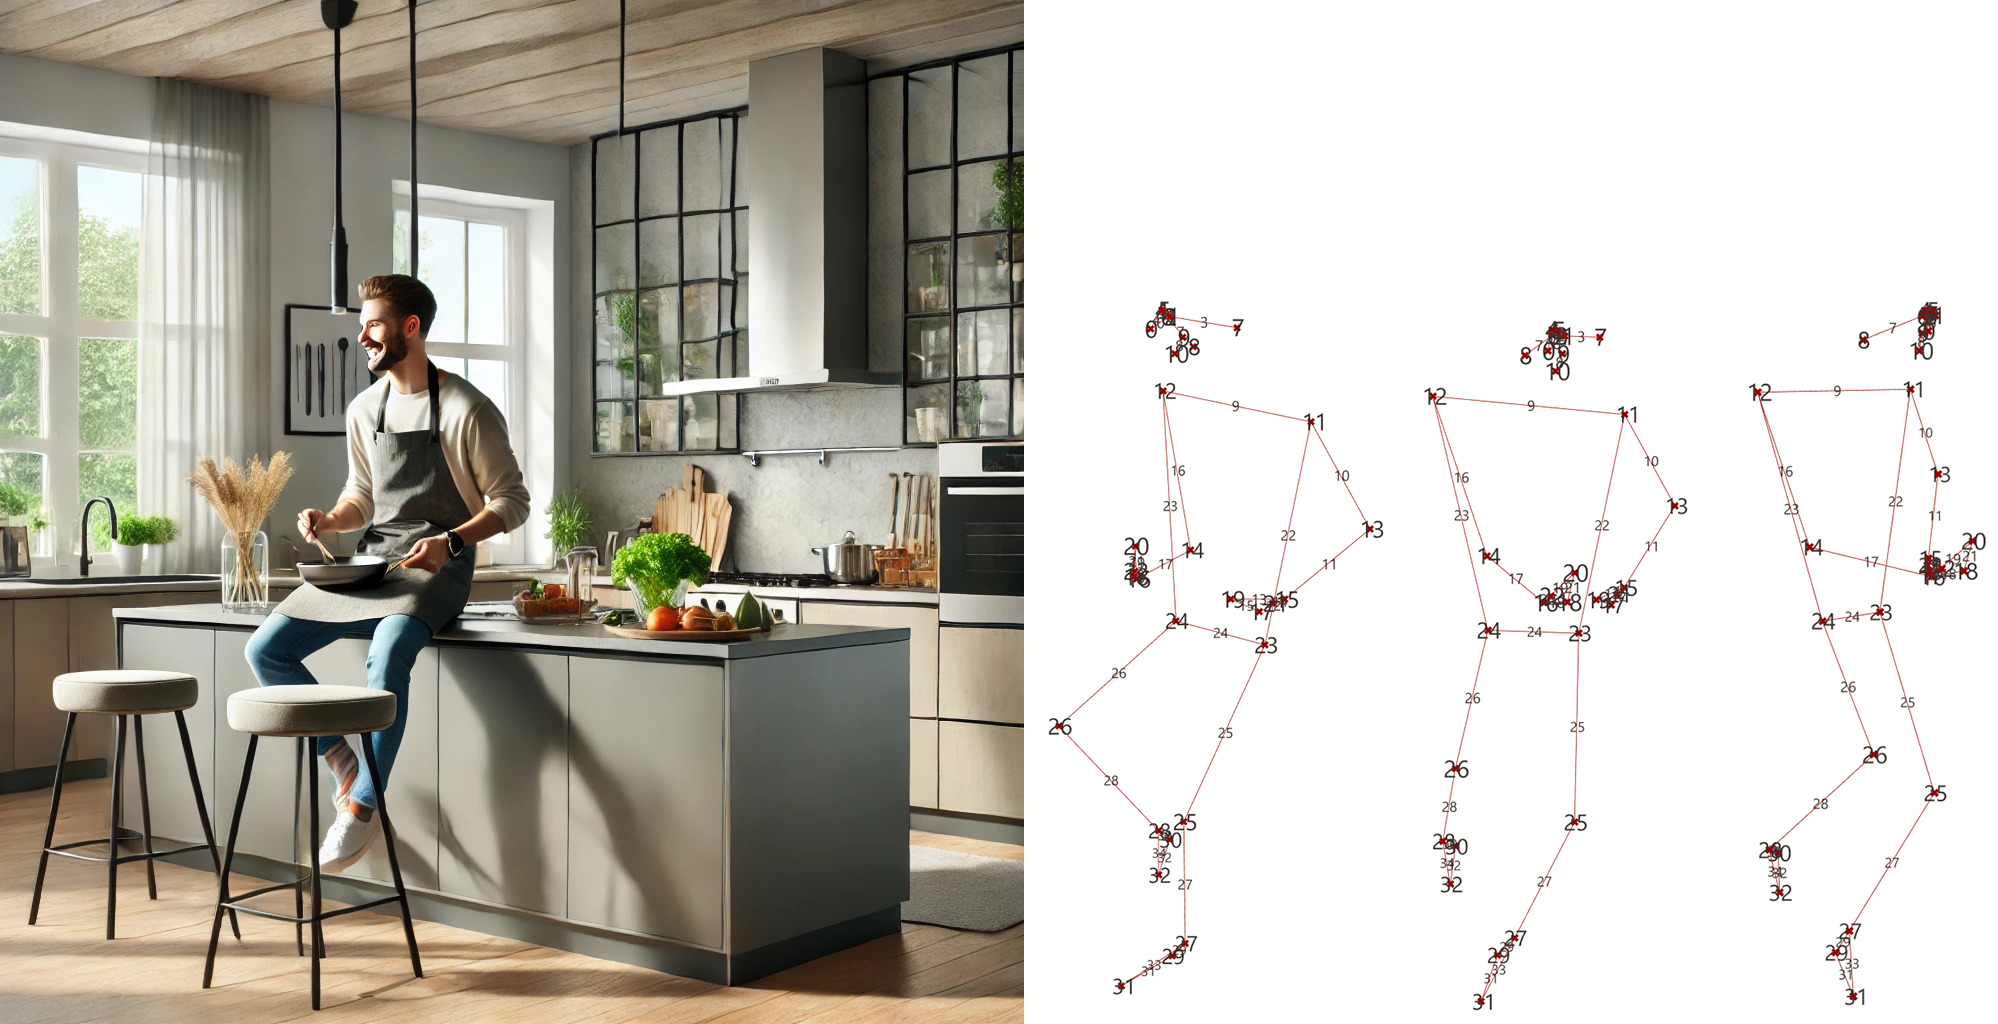
图 2.7.4-4 MediaPipe 人体姿态估计(图片)组件测试结果,左图由 ChatGPT image generator 生成,右图为人体姿态估计结果(不同观察视角)
2)MediaPipe 人体姿态估计的视频模式
定义MediaPipePoseVideo组件(图 2.7.4-5),应用 MediaPipe 人体姿态估计提取视频中人体对象的关键点及其连接线。首先使用 OpenCV ⑤提供的cv2.VideoCapture()方法打开视频文件,用read()方法读取帧图像,再用与定义MediaPipePoseImage组件类似的方法提取关键点及其连接线。为了减少视频帧数的计算量或者提取特定间隔的帧图像,增加输入端FrameInterval参数来指定读取帧的间隔。每帧估计的关键点坐标及其连接线分别依次存储于LandmarksAnim和ConnectionLinesAnime列表中,并输出。
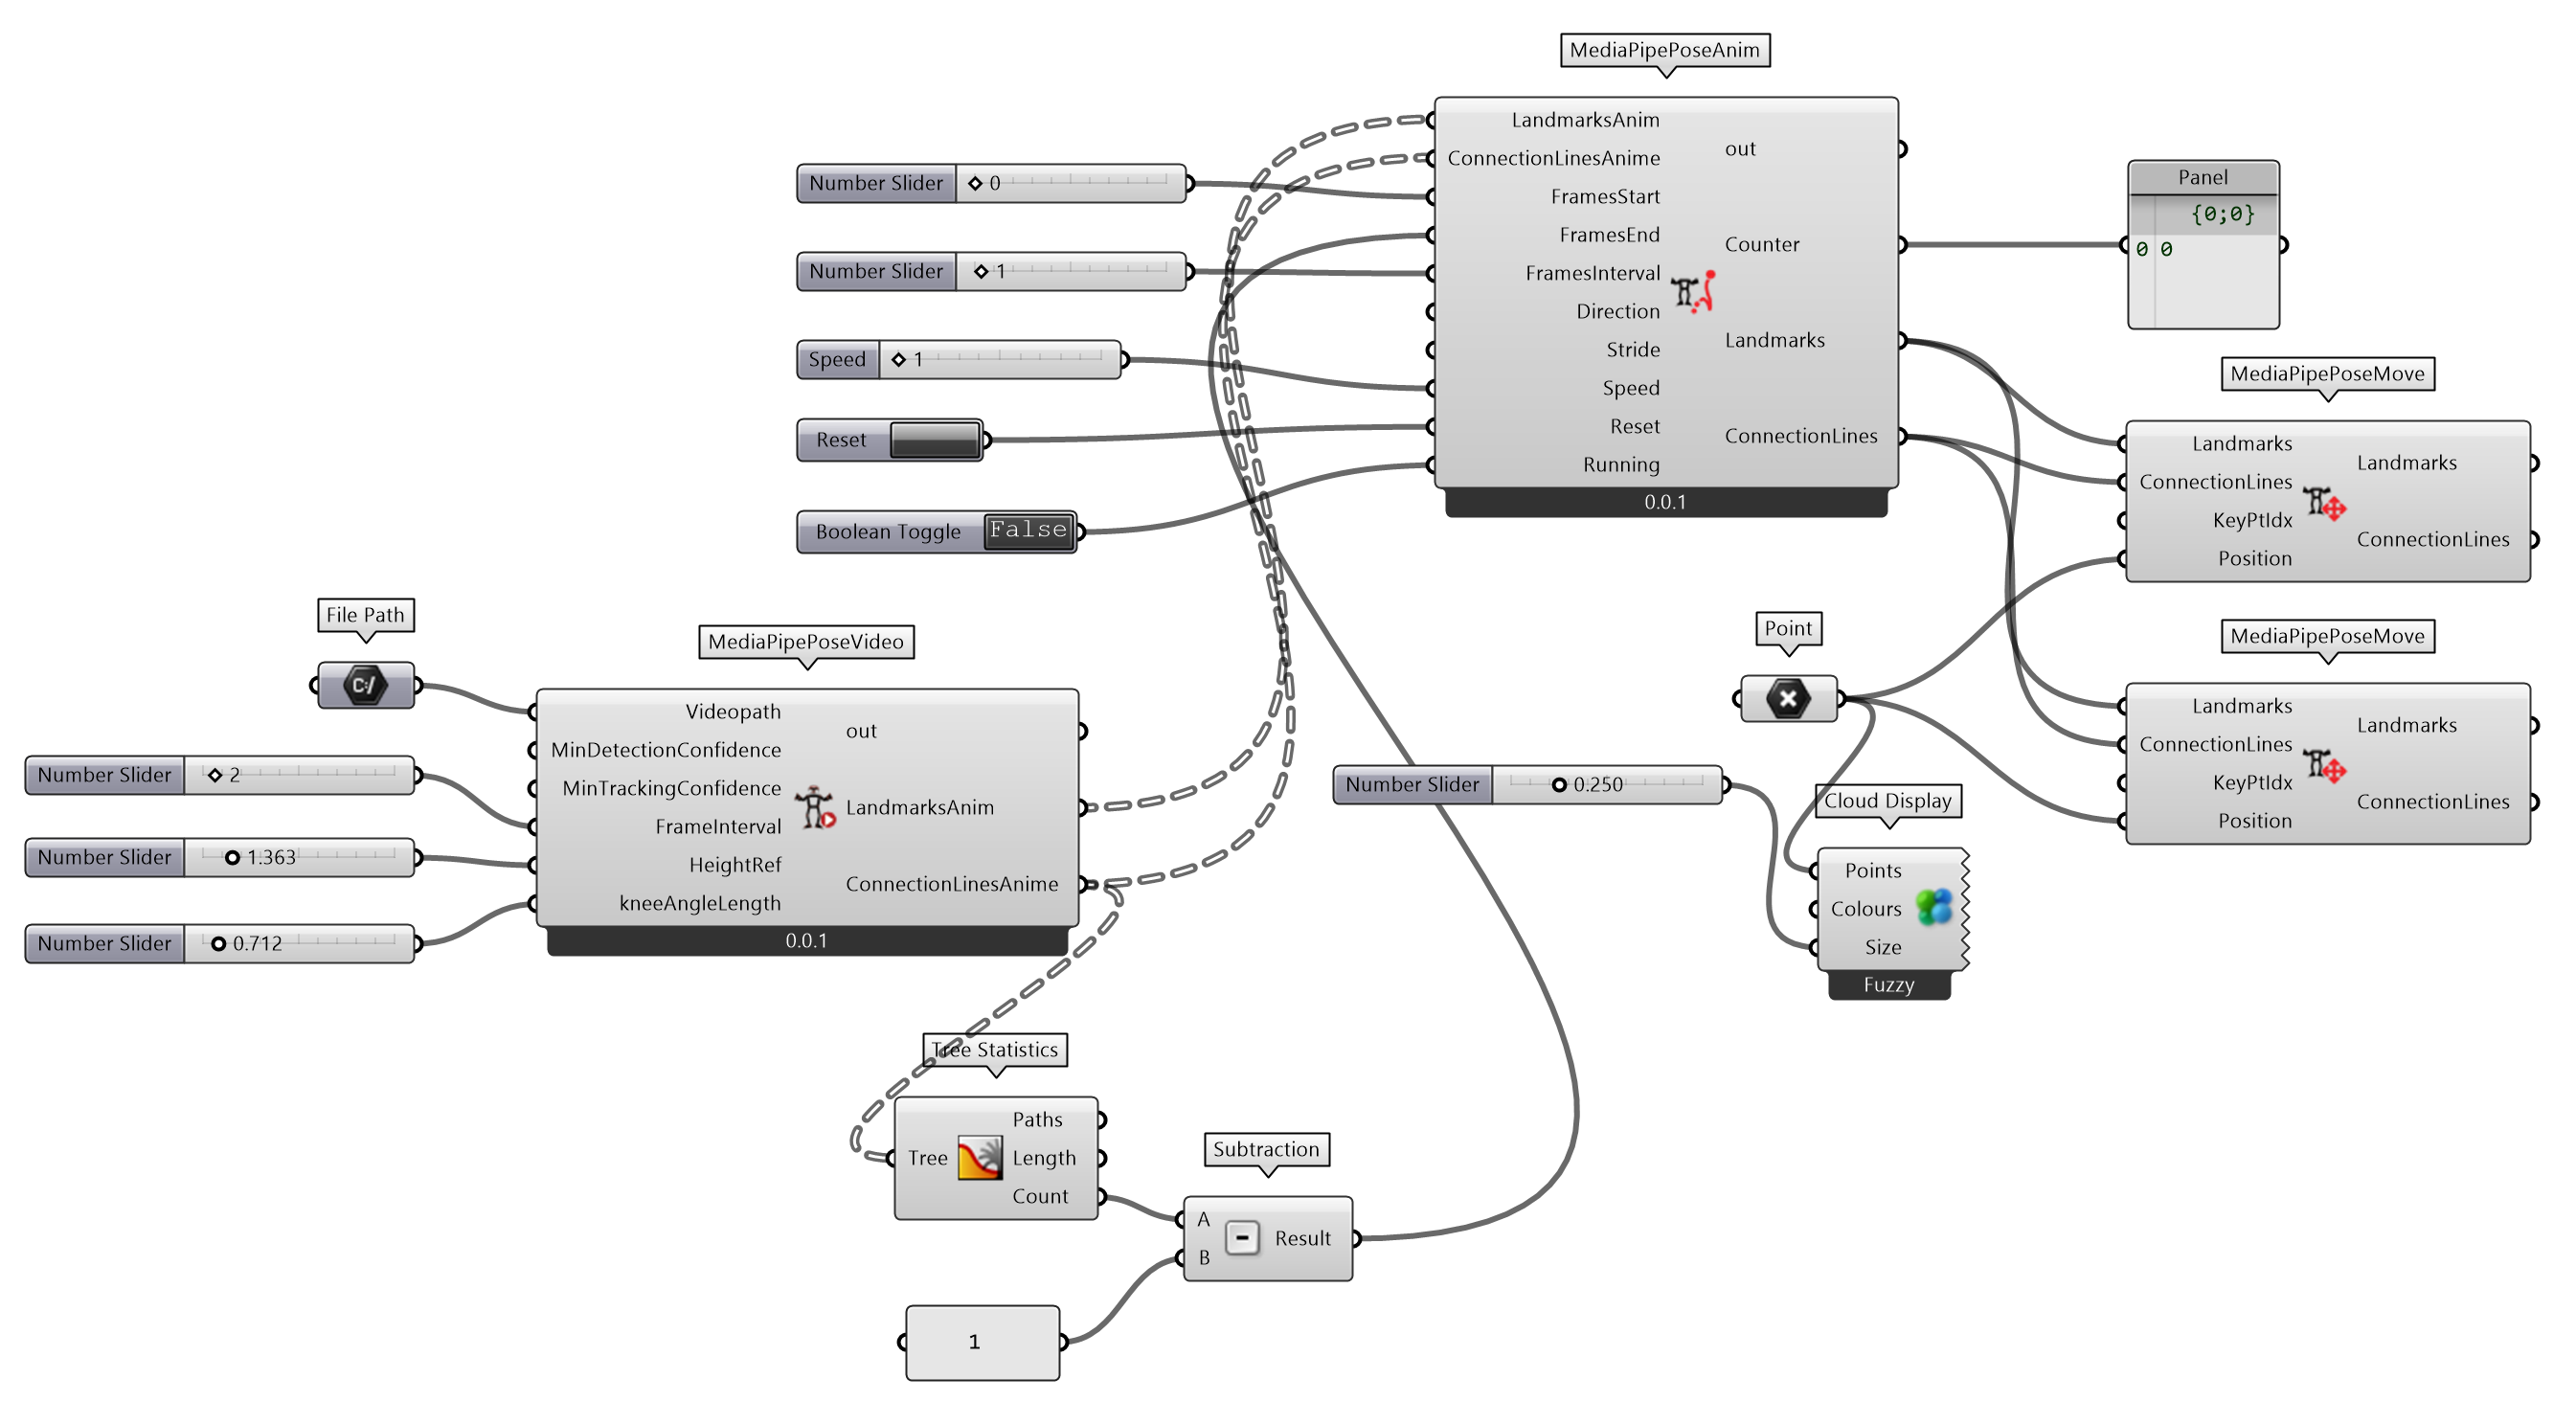
图 2.7.4-5 MediaPipe 人体姿态估计(视频)组件构建
MediaPipePoseVideo (Python Script 组件)
  """
用 MediaPipe 库的人体姿态估计提取视频中人体关键点信息,包括关键点之间的连线。
Inputs:
    Videopath: Item Access; str
        视频文件路径
    MinDetectionConfidence: Item Access; float
        人体检测模型(person-detection model)最小置信度,值域为 [0.0,1.0]
    MinTrackingConfidence: Item Access; float
        关键点追踪模型(landmark-tracking model )最小置信度,值域为 [0.0,1.0]
    FrameInterval: Item Access; int
        间隔帧数
    HeightRef: Item Access; float
        参考位置高度
    kneeAngleLength: Item Access; float
        由小腿长度,用于控制人体身高
Output:
    LandmarksAnim: Tree[Point3D]
        视频各帧图像关键点坐标
    ConnectionLinesAnime: Tree[Line]
        视频各帧图像关键点连接线

"""

import cv2
import mediapipe as mp
import math
from mediapipe.tasks.python import vision

import ghpythonlib.treehelpers as th
import rhinoscriptsyntax as rs

ghenv.Component.Name = "MediaPipePoseVideo"
ghenv.Component.NickName = "MediaPipePoseVideo"
ghenv.Component.Description = "用 MediaPipe 库的人体姿态估计提取视频中人体关键点信息,包括关键点之间的连线"
ghenv.Component.Message = "0.0.1"
ghenv.Component.Category = "Moths"
ghenv.Component.SubCategory = "Human Pose Estimation"
ghenv.Component.PanelSection = 1


def distance_3d(point1, point2):
    """同 MediaPipePoseImage 组件中 distance_3d() 定义"""

def poseDetection_video(
    min_detection_confidence=0.5, min_tracking_confidence=0.5
):
    # 打开视频文件
    cap = cv2.VideoCapture(Videopath)
    # 初始化 MediaPipe 姿势(Pose)
    mp_pose = mp.solutions.pose

    # 运行 MediaPipe 的 Pose
    with mp_pose.Pose(
        static_image_mode=False,
        min_detection_confidence=min_detection_confidence,
        min_tracking_confidence=min_tracking_confidence,
    ) as pose:
        frame_count = 0
        LandmarksAnim = []
        ConnectionLinesAnime = []
        while cap.isOpened():
            ret, frame = cap.read()
            if not ret:
                break  # 如果没有更多的帧可用,则中断循环

            # 只处理基于输入参数 FrameInterval 的第 n 帧
            if frame_count % FrameInterval == 0:
                image_rgb = cv2.cvtColor(frame, cv2.COLOR_BGR2RGB)
                image_rgb.flags.writeable = False
                # 处理帧图像并提取人体姿态估计关键点坐标及其连接线
                results = pose.process(image_rgb)

                if results.pose_world_landmarks:
                    nose_world_landmark = results.pose_world_landmarks.landmark[
                        mp_pose.PoseLandmark.NOSE
                    ]

                    wlandmarks = results.pose_world_landmarks.landmark
                    x = [wlandmark.x for wlandmark in wlandmarks]
                    y = [wlandmark.y for wlandmark in wlandmarks]
                    z = [wlandmark.z for wlandmark in wlandmarks]
                    xyz = list(zip(x, y, z))

                    RkneeRangleLength = distance_3d(xyz[26], xyz[28])
                    scale = kneeAngleLength / RkneeRangleLength

                    X = [i * scale for i in x]
                    Y = [i * scale for i in z]
                    Z = [-i * scale + HeightRef for i in y]
                    xyz = list(zip(X, Y, Z))
                    XYZ = th.list_to_tree(xyz)

                    connection_start = []
                    connection_end = []
                    ConnectionLines = []
                    for (
                        connection
                    ) in vision.PoseLandmarksConnections.POSE_LANDMARKS:
                        cx_s = wlandmarks[connection.start].x
                        cy_s = wlandmarks[connection.start].y
                        cz_s = wlandmarks[connection.start].z
                        pt_s = [
                            cx_s * scale,
                            cz_s * scale,
                            -cy_s * scale + HeightRef,
                        ]
                        connection_start.append(pt_s)

                        cx_e = wlandmarks[connection.end].x
                        cy_e = wlandmarks[connection.end].y
                        cz_e = wlandmarks[connection.end].z
                        pt_e = [
                            cx_e * scale,
                            cz_e * scale,
                            -cy_e * scale + HeightRef,
                        ]
                        connection_end.append(pt_e)

                        ConnectionStart = th.list_to_tree(connection_start)
                        ConnectionEnd = th.list_to_tree(connection_end)

                        ConnectionLines.append(rs.AddLine(pt_s, pt_e))

                    Landmarks = rs.AddPoints(xyz)
                    LandmarksAnim.append(Landmarks)
                    ConnectionLinesAnime.append(ConnectionLines)

            frame_count += 1

    LandmarksAnim = th.list_to_tree(LandmarksAnim)
    ConnectionLinesAnime = th.list_to_tree(ConnectionLinesAnime)

    return LandmarksAnim, ConnectionLinesAnime


if __name__ == "__main__":
    try:
        LandmarksAnim, ConnectionLinesAnime = poseDetection_video(
            MinDetectionConfidence, MinTrackingConfidence
        )
    except Exception as e:
        print(e)
视频文件的人体姿态估计结果是提取视频连续帧图像的关键点对象。为了观察其动态的效果,定义MediaPipePoseAnim组件,可以依次播放每帧估计的结果。各帧的关键点对象一般重叠位于原点位置,为了获得在 XY 平面上移动的情境,组件中定义move_points_along_vector_3d()函数,给定点列表points,移动的方向向量vector_2d和每步移动的距离distance叠加距离移动空间点。
MediaPipePoseAnim (Python Script 组件)
  """
还原视频中用 MediaPipe 库的人体姿态估计提取视频中人体关键点信息和连接线的动画

Inputs:
    LandmarksAnim: Tree[Point3D]
        连续帧图像关键点
    ConnectionLinesAnime: Tree[Line]
        连续帧图像关键点连接线
    FramesStart: Item[int]
        起始帧
    FramesEnd: Item[int]
        结束帧
    FramesInterval: Item[int]
        帧间隔数
    Direction: Item[Vector3D]
        移动方向
    Stride:Item[float]
        每步移动的距离
    Stride: Item[float]
        更新速度
    Reset: Item[bool]
        重启计时
    Running: Item[bool]
        执行动画
"""

import Grasshopper as gh
import ghpythonlib.treehelpers as th
import numpy as np
import rhinoscriptsyntax as rs

ghenv.Component.Name = "MediaPipePoseAnim"
ghenv.Component.NickName = "MediaPipePoseAnim"
ghenv.Component.Description = "还原视频中用 MediaPipe 库的人体姿态估计提取视频中人体关键点信息和连接线的动画"
ghenv.Component.Message = "0.0.1"
ghenv.Component.Category = "Moths"
ghenv.Component.SubCategory = "Human Pose Estimation"
ghenv.Component.PanelSection = 1


def move_points_along_vector_3d(points, vector_2d, distance):
    """
    在 XY 平面上沿2D向量连续移动3D点

    Args:
        points (list of tuples):初始3D点的列表,点格式为 (x, y, z).
        vector_2d (tuple): 一个2D向量(vx, vy),定义了 XY 平面上的移动方向
        distance (float): 矢量方向每一步移动的距离
        steps (int): 移动点的步数

    Returns:
        list of list: 包含每步更新点的列表。
    """
    # 二维矢量归一化,得到单位方向矢量
    vx, vy = vector_2d
    magnitude = np.sqrt(vx**2 + vy**2)
    direction = (vx / magnitude, vy / magnitude)

    # 用于存储点随时间变化的新位置
    trajectory = []

    # 沿给定方向,按每步移动的距离移动点
    for i in range(len(points)):
        # 更新列表中的每个点
        new_positions = [
            [
                float(rs.PointCoordinates(pt)[0] + direction[0] * distance * i),
                float(rs.PointCoordinates(pt)[1] + direction[1] * distance * i),
                rs.PointCoordinates(pt)[2],
            ]
            for pt in points[i]
        ]
        trajectory.append(rs.AddPoints(new_positions))

    return trajectory


def updateComponent(Speed):
    """更新此组件类似于使用 GH 定时器"""

    def callBack(e):
        ghenv.Component.ExpireSolution(False)

    ghenv.Component.OnPingDocument().ScheduleSolution(
        Speed, gh.Kernel.GH_Document.GH_ScheduleDelegate(callBack)
    )


LandmarksAnim = th.tree_to_list(LandmarksAnim)
ConnectionLinesAnime = th.tree_to_list(ConnectionLinesAnime)

print("+++",Direction)

if Direction is not None:
    vector_2d = [Direction[0], Direction[1]]
    LandmarksAnim = move_points_along_vector_3d(
        LandmarksAnim, vector_2d, Stride
    )
    start_pts = [
        [rs.AddPoint(rs.CurveStartPoint(p)) for p in g]
        for g in ConnectionLinesAnime
    ]
    start_pts_moved = move_points_along_vector_3d(start_pts, vector_2d, Stride)
    end_pts = [
        [rs.AddPoint(rs.CurveEndPoint(p)) for p in g]
        for g in ConnectionLinesAnime
    ]
    end_pts_moved = move_points_along_vector_3d(end_pts, vector_2d, Stride)
    ConnectionLinesAnime = [
        [rs.AddLine(s, e) for s, e in zip(sg, eg)]
        for sg, eg in zip(start_pts_moved, end_pts_moved)
    ]

frames = list(range(FramesStart, FramesEnd, FramesInterval))

# 实例化或重置计数器变量
if "count" not in globals() or Reset:
    count = FramesStart

# 更新变量和组件
if Running and not Reset and count < FramesEnd:
    count += FramesInterval
    updateComponent(Speed)
    Landmarks = LandmarksAnim[count]
    ConnectionLines = ConnectionLinesAnime[count]

    if count >= FramesEnd:
        count = FramesStart

# 输出计数
Counter = count
图 2.7.4-6 演示了应用定义组件捕捉连续视频帧的结果(部分截图)。

图 2.7.4-6 视频样本,视频引自PHOX Boutique |
图 2.7.4-6 MediaPipe 人体姿态估计(视频)结果 |
|---|
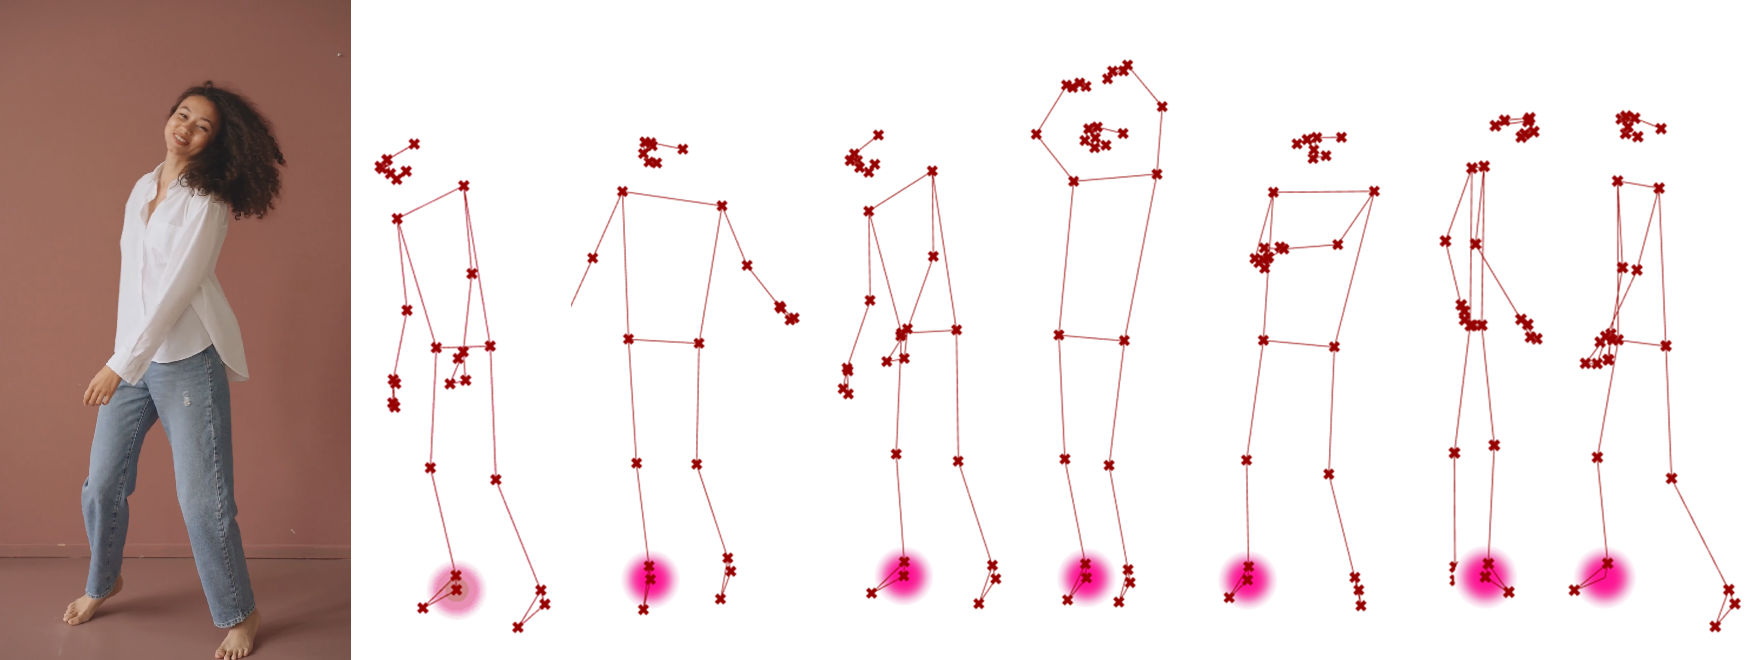
图 2.7.4-6 图左为视频样本截图,视频引自PHOX Boutique⑥;图右为 MediaPipe 人体姿态估计(视频)结果
MediaPipe Studio⑦提供了一个在线交互演示平台,包括人体姿态估计,可以方便的查看 MediaPipe 库实现的功能,并分析输入参数对结果的影响等。
2.7.4.2 SMPL-X 和 AGORA
1)SMPL 系列模型
蒙皮多人线性模型(Skinned Multi-Person Linear Model,SMPL)是基于蒙皮(skinning)和混合形状(blend shapes),从数千个 3D 人体扫描数据中学习的 3D 人体模型。SMPL 实现所用的公式模型主要为简单的线性模型,意味着可以从大量数据中训练 SMPL,并使人体模型尽可能的简单,且标准化,可以真实的模拟各类人体形态,摆出自然的姿势,蒙皮随姿势变形,自然真实。
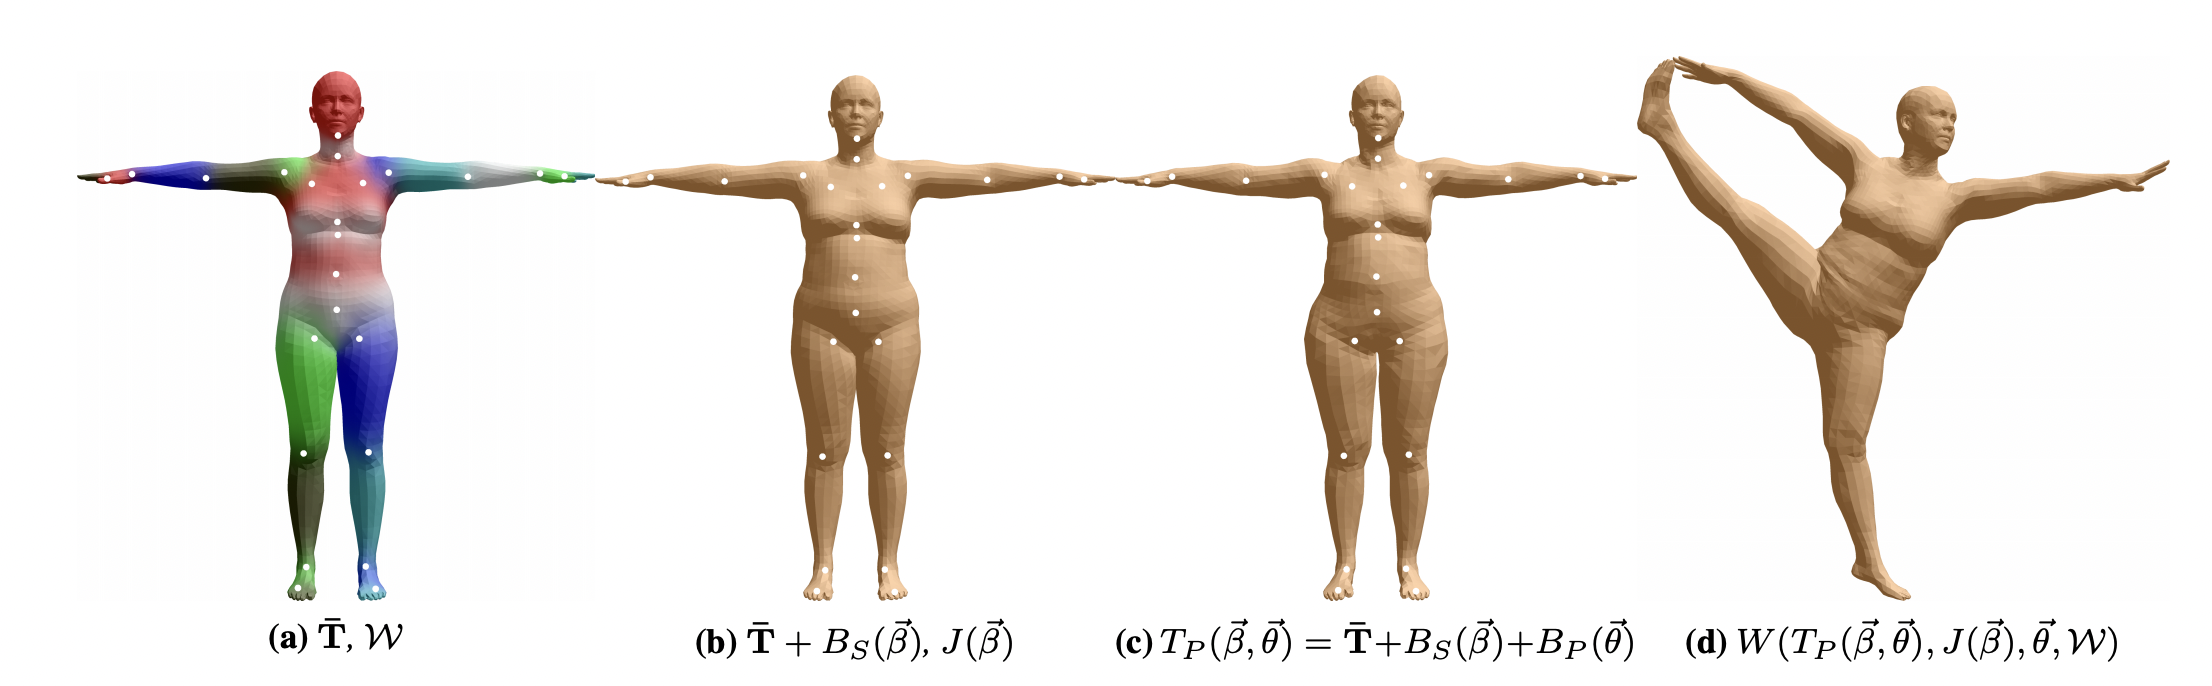
图 2.7.4-7 SMPL model。(a)带有用颜色表示的混合权重和白点表示的关键点(joints)的3D人体模板网格(template mesh)(b)仅使用本体驱动(identity-driven)的混合形状(blendshape)贡献的人体模型;关键点在混合形状向量 $\vec{\beta}$ 中是线性的(c)加入姿态混合形状(pose blend shapes),以准备用于d 中的分腿姿态;注意到蒙皮在臀部有扩张 (d)通过双四元数蒙皮(dual quaternion skinning)变形顶点,摆出分腿姿态。图引子参考文献[1]
SMPL 模型将人体形状分解为与本体相关(identity-dependent)的形状(shape)和与姿态相关(pose-dependent)的非刚性形状;采用基于顶点的蒙皮方法,并使用校正(corrective)的混合形状。一个混合形状表示为一个由顶点偏移量组成的向量(相对于人体模板)。首先使用一个由艺术家创建的包含有 $N = 6890$ 个顶点和 $k = 23$ 个关键点的网格模型,该模型的男女拓扑结构相同,具有空间分辨率的变化、清晰的四边形结构、分段部件、初始混合权重和骨骼绑定(skeletal rig)。
根据标准的蒙皮操作,该模型由一个均值模板形状定义,其由零姿态(zero pose)下 $\vec{\theta}^*$ 中 $N$ 个顶点连接的向量 $\overline{\mathbf{T}} \in \mathbb{R}^{3 N}$ 表示;一组混合权重$\mathcal{W} \in \mathbb{R}^{N \times K}$(图 2.7.4-7 (a));一个混合形状函数$B_S(\vec{\beta}): \mathbb{R}^{|\vec{\beta}|} \mapsto \mathbb{R}^{3 N}$,该函数以形状参数向量 $\vec{\beta}$ 作为输入(图 2.7.4-7 (b)),输出一个用于雕刻本体的混合形状;一个用于预测$K$个关键点位置的函数(图 2.7.4-7 (b)中的白点),即$J(\vec{\beta}): \mathbb{R}^{|\vec{\beta}|} \mapsto \mathbb{R}^{3K}$,它是形状参数$\vec{\beta}$ 的函数;以及一个姿态相关的混合形状函数 $B_P(\vec{\theta}): \mathbb{R}^{|\vec{\theta}|} \mapsto \mathbb{R}^{3 N}$,以姿态参数向量$\vec{\theta}$作为输入,并且考虑了与姿态相关的形变(图 2.7.4-7 (c))。这些校正混合形状函数的结果在末姿态(rest pose)下叠加在一起,如图 2.7.4-7 (c)。最后,一个标准的混合蒙皮函数 $W(⋅)$ (线性(LBS)或双四元数)(DQBS)被用来根据估计的关键点旋转顶点,并由混合权重定义平滑效果。结果模型为$M(\vec{\beta}, \vec{\theta} ; \Phi): \mathbb{R}^{|\vec{\theta}| \times|\vec{\beta}|} \mapsto \mathbb{R}^{3 N}$,映射形状和姿态参数到顶点。$\Phi$为学习到的模型参数。
模板网格(Template Mesh,$T$):一个定义了 3D 拓扑(如顶点数量、多边形、骨架关节)的 3D 网格,用于 SMPL 模型。
形状成分(Shape Components, $\beta$):与本体相关的网格表面描述符(surface descriptors)表示为模板网格$T$连接点(concatenated vertex)的偏移量。可以将这些描述符视为可以添加到模板形状网格$(T + \beta)$之上的一组增量层,以便创建不同的人体形状。基本上,这一层可以创建不同的、真实的人体本体。通常,SMPL 人体模型包含多达 300 个形状成分,但使用 10 个形状成分就能够涵盖由身体形状变化(如身高、体重、腰围、肩宽等)引起的大多数变化。使用更多成分可以更精细地控制特定身体特征,例如酒窝、皮肤褶皱和面部特征的变化。
姿态成分(Pose Components, $\theta$):与姿态相关的网格表面描述符表示为模板网格$T$连接点的偏移量。可以将这些描述符视为可以添加到模板形状$T$和形状成分$(T + \beta)$之上的另一组增量层,以便表示旋转关节时,由肌肉变形引起的身体形变。例如,当 3D 模板网格的手肘折叠时,此层将创建手肘周围肌肉的膨胀效果。
动力学成分(Dynamics Components,$\phi$):与软组织相关的网格表面描述符表示为模板网格$T$的连接点的偏移量。可以将这些描述符视为可以添加到其他层$(T + \beta + \theta + \phi)$之上的另一组增量层,以便表示在快速运动期间(如跑步时)由软组织变形引起的动态效应,例如脂肪组织的抖动。
SMPL 模型公式催生了许多研究成果,并推动了相关模型的进一步发展,这些模型使用相同的公式创建新的模型,以专注于身体特定部分(如手部、面部),或者表示为一种新的身体类型(如婴儿),甚至创建类似于动物的模型表示,如表2.7.4-1。
| 模型 | 描述 | 链接 |
|---|---|---|
| SMPL | 人体模型(不包含手部和面部关节) | https://smpl.is.tue.mpg.de/ |
| SMPL+H | 人体 + 手部模型(不包含面部关节) | https://mano.is.tue.mpg.de/ |
| MANO | 手部模型 | https://mano.is.tue.mpg.de/ |
| SMPL-X | 人体 + 手部 + 面部模型 | https://smpl-x.is.tue.mpg.de/ |
| STAR | 人体模型(更紧凑且更快速的 SMPL 模型) | https://star.is.tue.mpg.de/ |
| SMIL | SMPL 婴儿模型 | https://ps.is.mpg.de/publications/hesse-micai-2018 |
| SMAL | SMPL 动物模型 | https://ps.is.mpg.de/code/smal |
2)用 AGORA 数据集提取 SMPL-X 参数构建人体模型
AGORA 数据集⑧是一个具有高真实感和高精度的真实值(ground truth)3D 人体数据集,是通过将 SMPL-X 人体模型(含面部和手势)拟合到 3D 扫描来创建参考 3D 姿势和人体形状,并同时考虑了服饰。从 AGORA 网页下载可使用 SMPL-X 数据进行姿势和形状估计训练的数据 BFH-processed-npz 或 Body-processed-npz 用于参数的提取。
定义AGORA-SMPLXHumanPose组件实现用 AGORA 数据集提取 SMPL-X 参数构建人体模型的方法。SMPL-X 参数和 AGORA 数据集对应的数据名为,betas对应shape,body_pose对应pose_world,global_orient对应trans_world,transl 对应trans_world。因为用到 SMPLX 方法,需要在 Python Script 环境下通过pip install smplx 安装 smplx库。输出端参数Vertices为蒙皮的顶点,Faces为对应蒙皮顶点的三边面顶点索引;Joints为关键点。
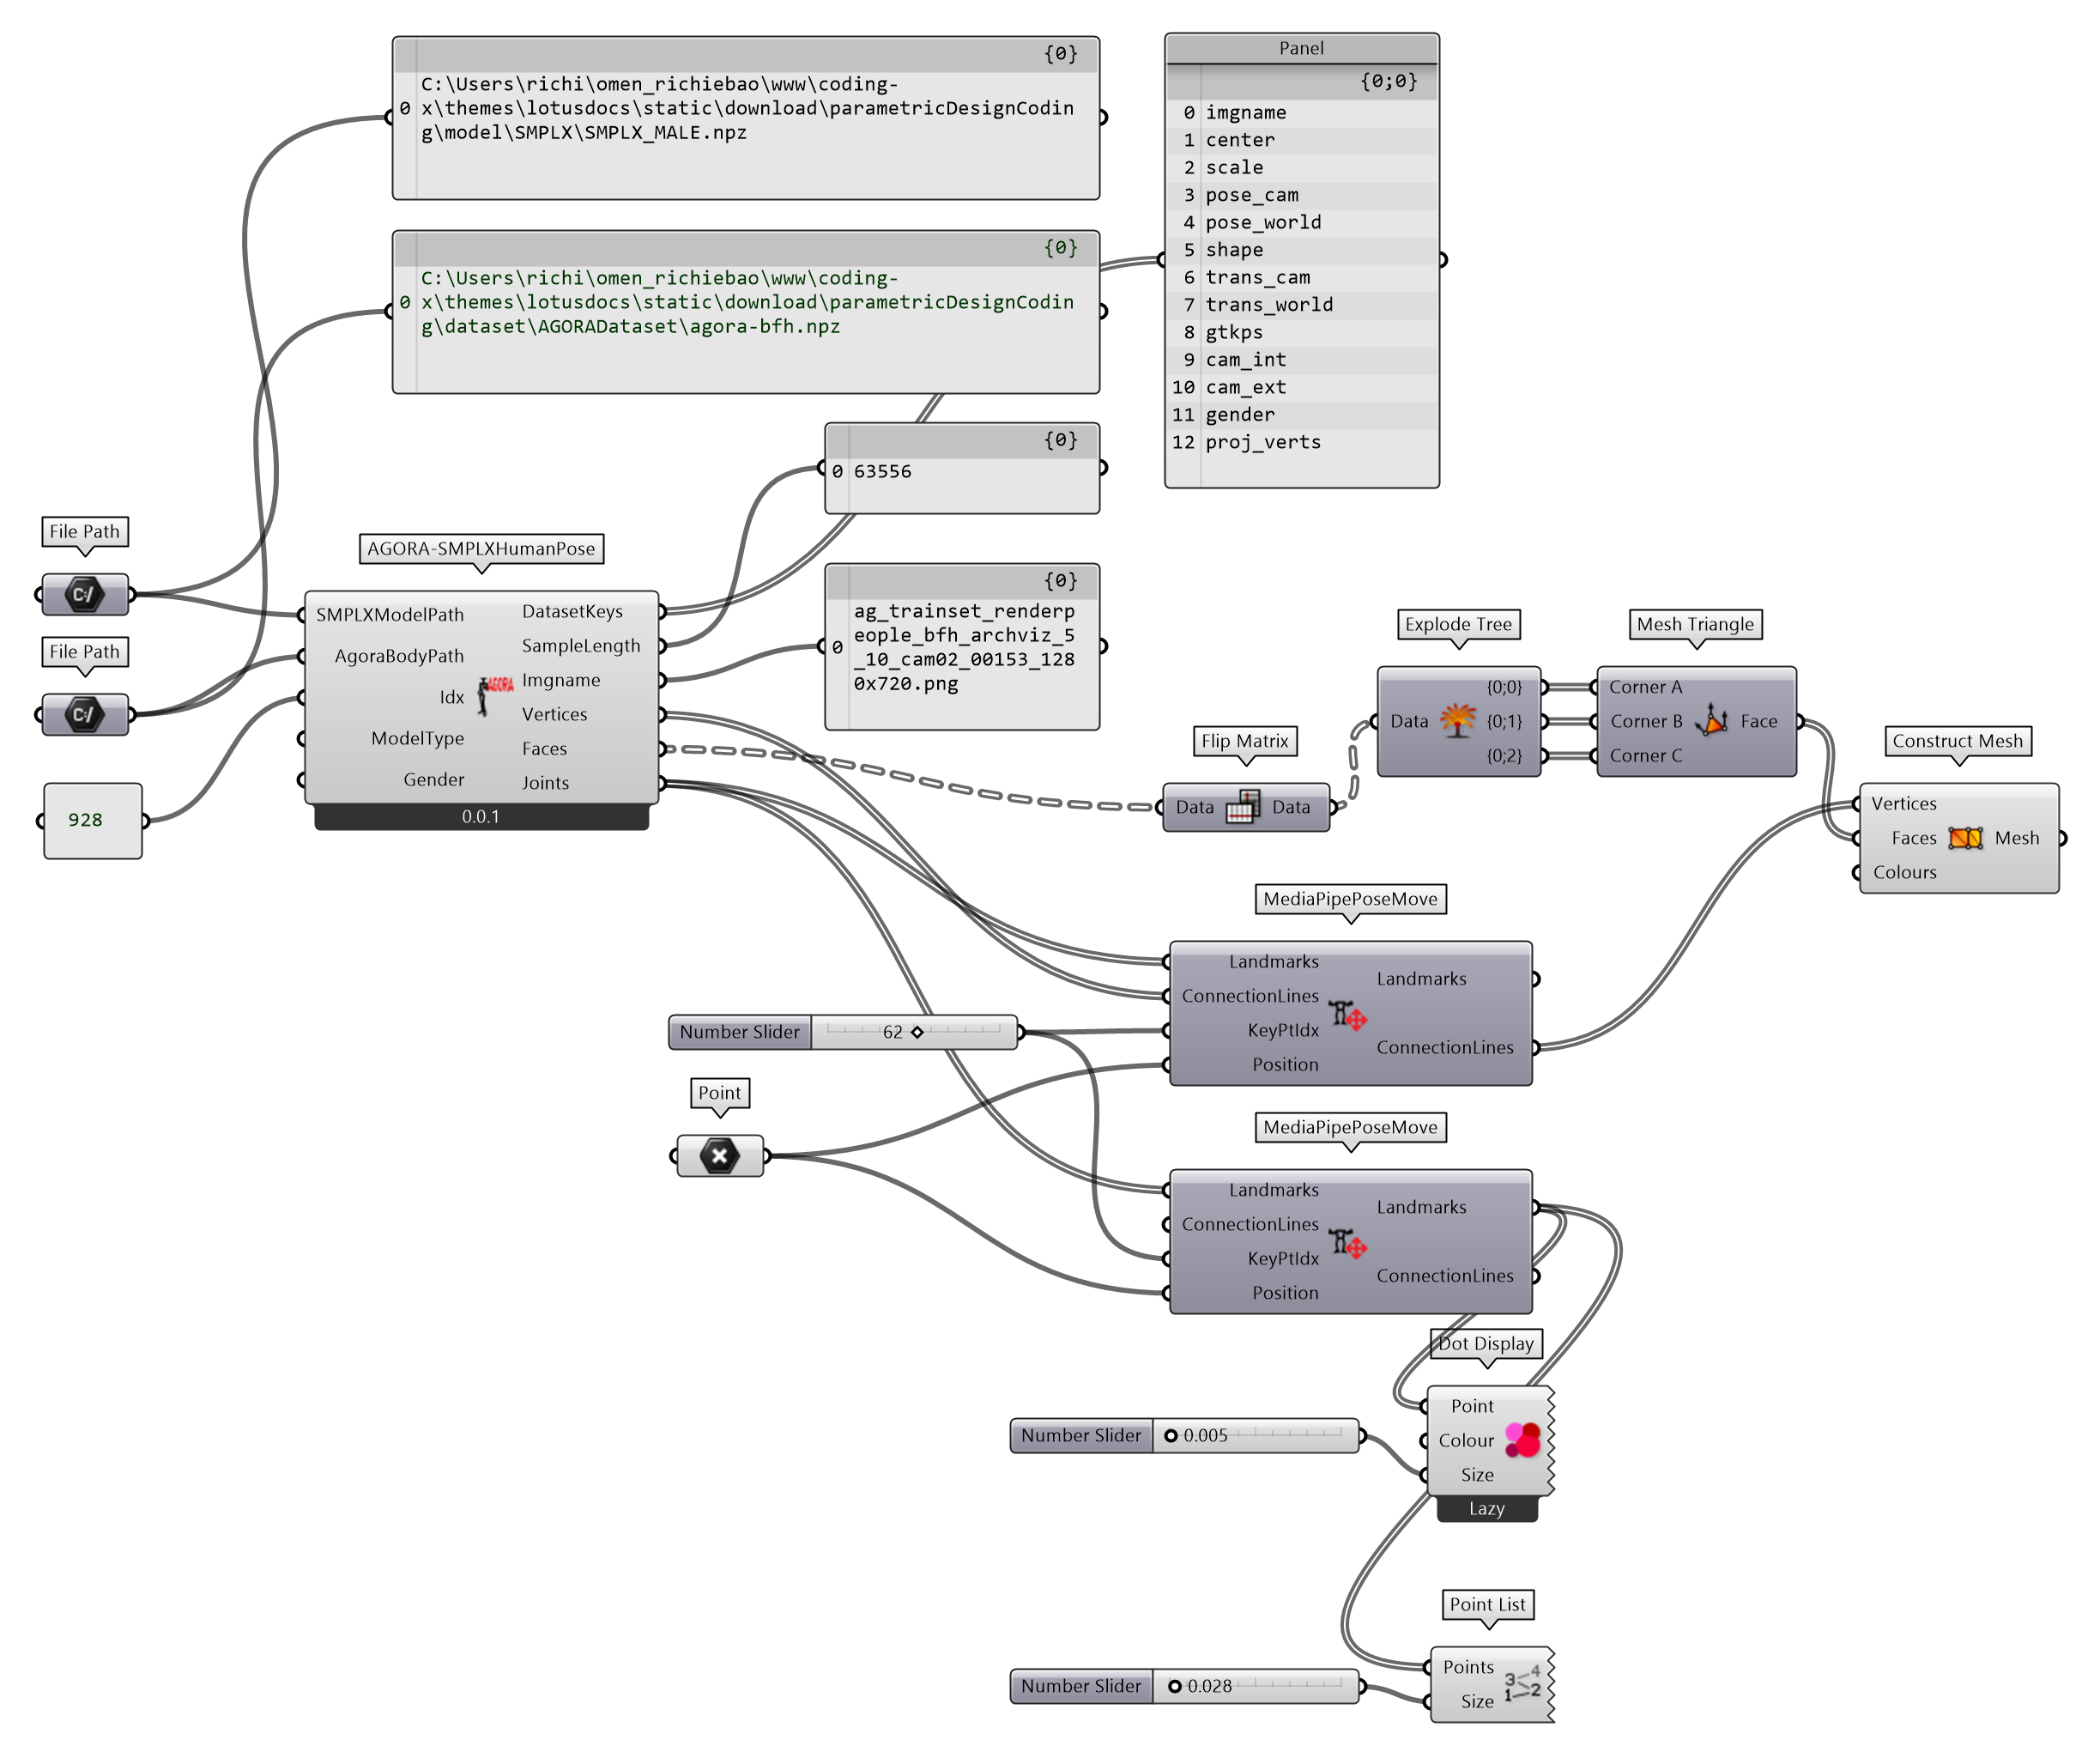
图 2.7.4-8 用 AGORA 数据集提取 SMPL-X 参数构建人体模型的程序
AGORA-SMPLXHumanPose (Python Script 组件)
  """
读取 AGORA 人体姿态估计数据集,使用 SMPL-X (Skinned Multi-Person Linear Model )蒙皮多人线性模型重建三维人体模型
Inputs:
    SMPLXModelPath: Item[str]
        SMPL-X 蒙皮多人线性模型文件路径
    AgoraBodyPath:Item[str]
         AGORA 人体姿态估计数据集文件路径
    Idx: Item[int]
        数据集数据索引
    ModelType: Item[str]
        为 SMPL 系列模型,包括 smpl、smplx、smplh 等
    Gender: Item[str]
        加载哪个性别的模型,包括 neutral、male 和female 等
Output:
    DatasetKeys: List[str]
        AGORA 人体姿态估计数据集数据名
    SampleLength: int
        样本数
    Imgname: str
        对应输入端 Idx 参数的数据集样本图像名
    Vertices: List[Point3D]
        蒙骗控制点
    Faces: Tree[int]
        蒙骗控制点的单元面索引(三边面)
    Joints: List[Point3D]
        人体姿态估计关键点
"""

import numpy as np
import torch
from smplx import SMPLX
import rhinoscriptsyntax as rs
import ghpythonlib.treehelpers as th

ghenv.Component.Name = "AGORA-SMPLXHumanPose"
ghenv.Component.NickName = "AGORA-SMPLXHumanPose"
ghenv.Component.Description = "读取 AGORA 人体姿态估计数据集,使用 SMPL-X (Skinned Multi-Person Linear Model )蒙皮多人线性模型重建三维人体模型"
ghenv.Component.Message = "0.0.1"
ghenv.Component.Category = "Moths"
ghenv.Component.SubCategory = "Human Pose Estimation"
ghenv.Component.PanelSection = 1


def load_agora_parameters(npz_file_path):
    """
    Load SMPL-X parameters from an AGORA .npz file.

    Args:
        npz_file_path (str): Path to the agora-body.npz file.

    Returns:
        dict: Dictionary containing SMPL-X parameters like 'betas', 'body_pose', 'global_orient', and 'transl'.
    """
    # 加载 AGORA 数据集 .npz 文件
    data = np.load(npz_file_path)

    # 从 .npz 文件中提取必要的 SMPL-X 参数
    smplx_params = {
        "betas": torch.tensor(
            data["shape"], dtype=torch.float32
        ),  # 形状参数 Shape parameters (10D or more)
        "body_pose": torch.tensor(
            data["pose_world"], dtype=torch.float32
        ),  # 姿态参数 Body pose parameters (21*3 = 63D)
        "global_orient": torch.tensor(
            data["trans_world"], dtype=torch.float32
        ),  # 全局朝向 (3D)
        "transl": torch.tensor(
            data["trans_world"], dtype=torch.float32
        ),  # 在 3D 空间中的变换 (3D)
    }
    return smplx_params


# 创建自定义人体姿势的函数
def create_custom_pose(
    smpl_model_path,
    body_pose_params,
    global_orient_params,
    betas_params=None,
    transl=None,
    model_type="smplx",
    gender="neutral",
    batch_size=1,
):
    # 加载 SMPL-X 模型
    smplx_model = SMPLX(
        smpl_model_path, model_type=model_type, gender=gender, batch_size=batch_size
    )

    # 将参数转换为张量
    body_pose = torch.tensor(body_pose_params, dtype=torch.float32).unsqueeze(0)
    global_orient = torch.tensor(
        global_orient_params, dtype=torch.float32
    ).unsqueeze(0)
    transl = torch.tensor(transl,dtype=torch.float32).unsqueeze(0)

    # 如果没有提供形状参数,则使用零姿态(模板网格)
    if betas_params is None:
        betas = torch.zeros([1, 10], dtype=torch.float32)
    else:
        betas = torch.tensor(betas_params, dtype=torch.float32).unsqueeze(0)

    # 使用提取的 AGORA 姿态参数生成SMPL-X模型输出
    output = smplx_model(
        body_pose=body_pose, global_orient=global_orient, betas=betas, transl=transl
    )

    # 提取蒙皮顶点和关键点
    vertices = output.vertices.detach().cpu().numpy().squeeze()
    joints = output.joints.detach().cpu().numpy().squeeze()

    faces = smplx_model.faces

    return vertices, joints, faces


if __name__ == "__main__":
    if ModelType is None:
        ModelType = "smplx"
    if Gender is None:
        Gender = "neutral"

    try:
        data = np.load(AgoraBodyPath)
        DatasetKeys = data.files

        smplx_parameters = load_agora_parameters(AgoraBodyPath)
        custom_body_pose = smplx_parameters["body_pose"][Idx].reshape(55, 3)[
            1:22
        ]
        custom_global_orient = smplx_parameters["global_orient"][Idx]
        betasParams = smplx_parameters["betas"][Idx][:10]
        transl = smplx_parameters["transl"][Idx]

        imgnames = data["imgname"]
        Imgname = f"{imgnames[Idx]}"
        SampleLength = len(imgnames)

        vertices, joints, faces = create_custom_pose(
            SMPLXModelPath,
            custom_body_pose,
            custom_global_orient,
            betasParams,
            model_type=ModelType,
            gender=Gender,
            transl=transl
        )
        XYZ_Trans = [0, 2, 1]
        vertices = vertices[:, XYZ_Trans]
        Vertices = rs.AddPoints(vertices)
        Faces = th.list_to_tree(faces.tolist())
        joints = joints[:, XYZ_Trans]
        Joints = rs.AddPoints(joints)
    except Exception as e:
        print(e)
图 2.7.4-9 为测试结果。输入端参数Idx设置为 928,对应 AGORA 数据集索引图像为左图,图像名为输出端参数Imgname的输出结果ag_trainset_renderpeople_bfh_archviz_5_10_cam02_00153_1280x720.png。从输出端SampleLength也可以查看当前所用数据集的长度;DatasetKeys可以查看数据内容名称。
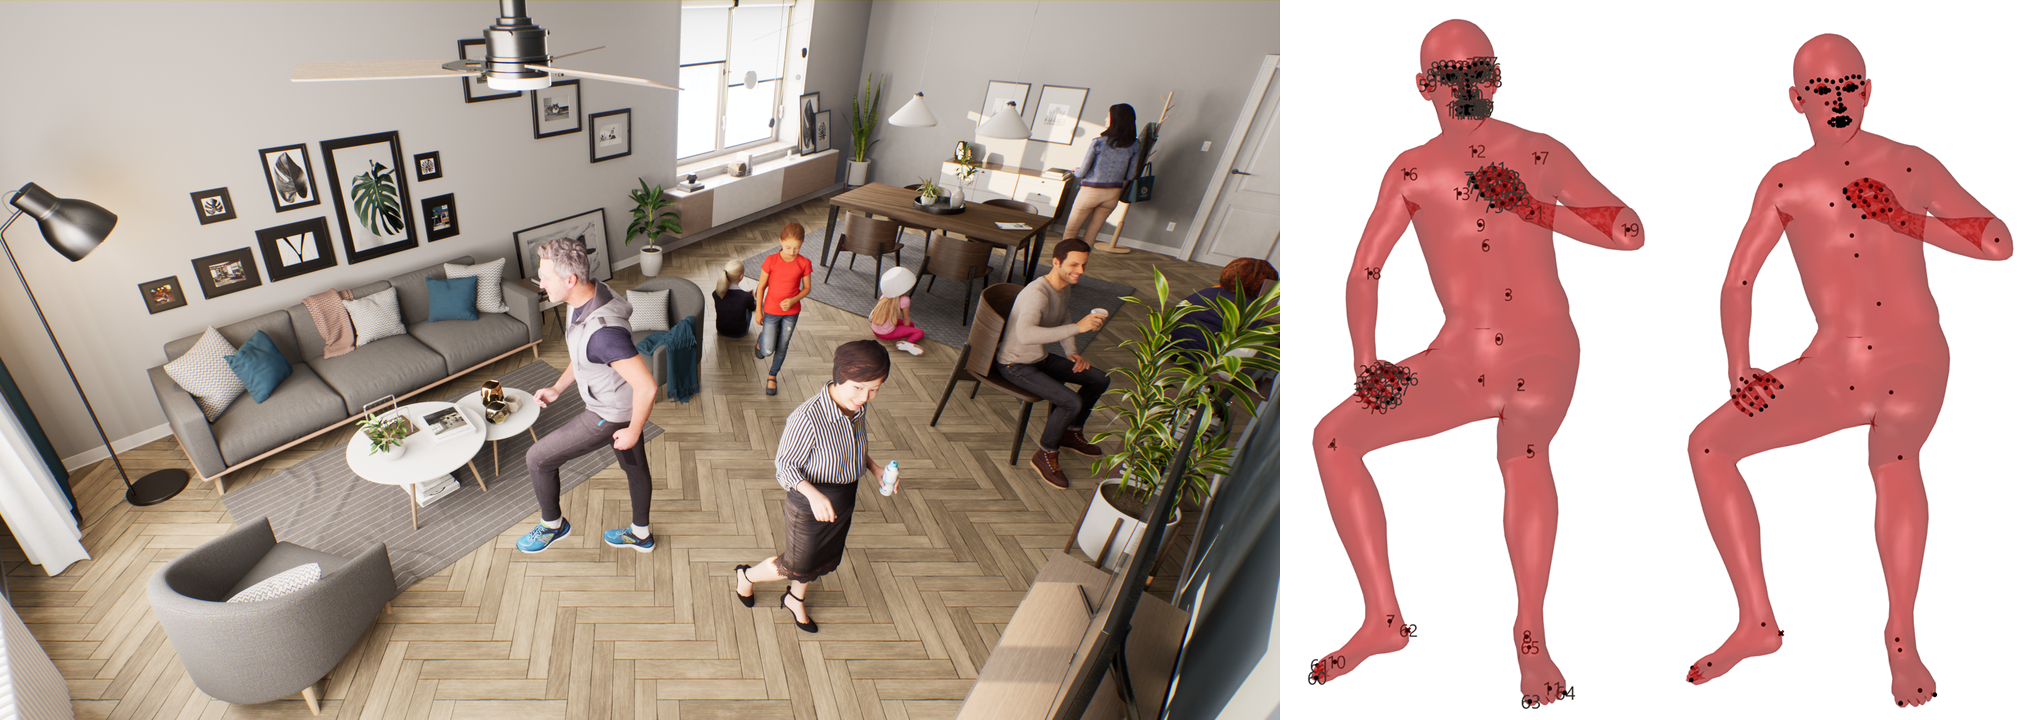
图 2.7.4-9 用 AGORA 数据集提取 SMPL-X 参数构建人体模型的示例,左图为使用 AGORA 数据对应索引的图片,图片来源于AGORA 数据集;右图为提取参数后用 SMPL-X 生成的 3D 人体模型
2.7.4.3 VPoser——变分人体姿态先验
VPoser(Variational Human Pose Prior)⑨变分人体姿态先验(分布)为从一个表示为 SMPL 的大型人体姿态数据集训练学习而来,其定义了 SMPL 姿态参数的一个先验;且端到端可微;提供了一种方法来惩罚不可能的姿势,同时认可有效的姿势;有效地模拟了人体关节(joints)间的相关性;并引入一种高效、低维的人体姿态表示;可以用来为依赖数据任务生成有效的 3D 人体姿态。
定义VPoserSMPL-X组件(图 2.7.4-10)实现从变分人体姿态先验中建立 3D 人体姿态模型,该模型的输入端参数需要输入两个模型,一个为 VPoser 变分人体姿态先验模型(VposerModel);另一个为 SMPLX 人体姿态估计模型(SMPLXModel)。输入端的BetasParams参数为形状成分参数,为包含 10 个数值的列表。输入端NumPoses参数可以控制生成连续 3D 人体模型的数量,如果不提供该参数值,则仅生成一个人体模型。Seed为随机种子,可以控制生成不同的人体模型结果。
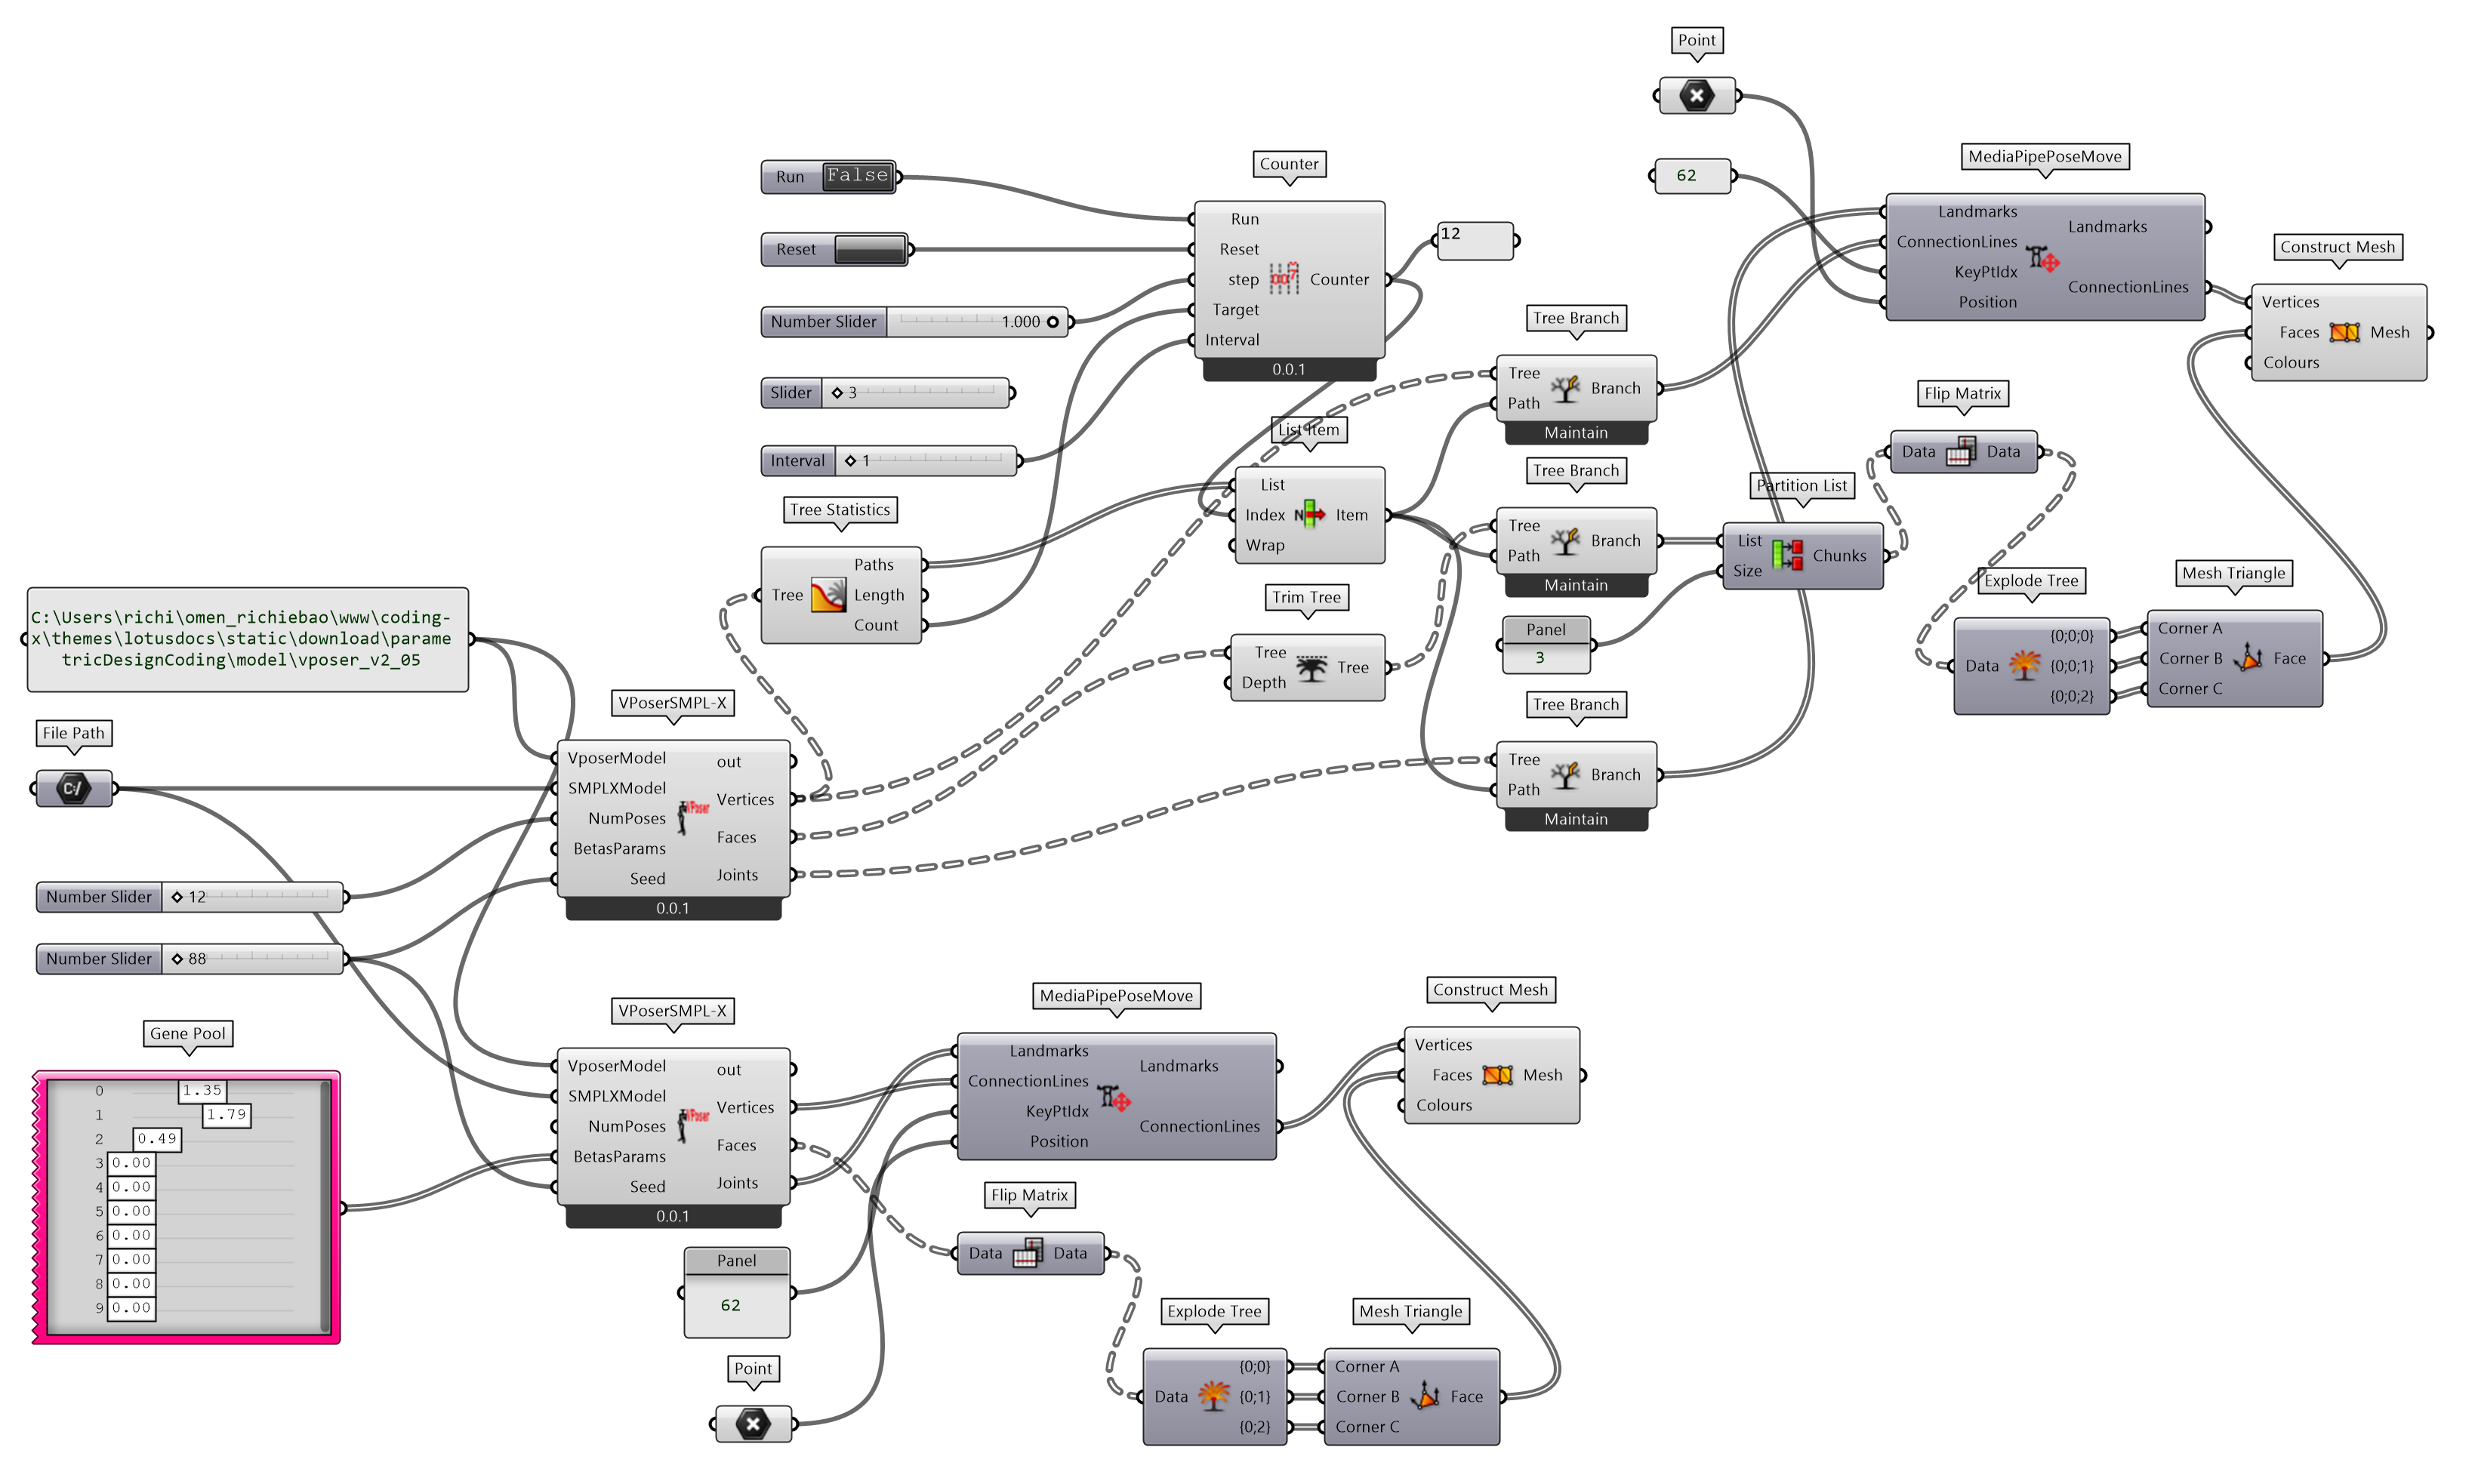
图 2.7.4-10 VPoser 构建人体模型程序
VPoserSMPL-X (Python Script 组件)
  """
使用 VPoser (Variational Human Pose Prior )先验分布模型提取 SMPL-X 的姿态参数(pose)后建立 3D 人体模型。除了在 Python Script 环境下安装 SMPL-X 库,也需要按照 omegaconf 和 loguru库
Inputs:
    VposerModel: Item[str]
        Variational Human Pose Prior(VPoser)模型文件路径
    SMPLXModel: Item[str]
        SMPL-X 模型文件路径
    NumPoses: Item[int]
        生成连续姿态人体模型的数量
    BetasParams: Iist[float]
        形状成分参数
    Seed: Item[int]
        随机种子
Output:
    Vertices: Tree|List[Point3D]
        人体模型蒙皮顶点。如果 NumPoses 参数不为0,则输出为 Tree;否则为 List
    Faces: Tree[int]
        人体模型蒙皮顶点三边面索引
    Joints: List[Point3D]
        人体模型关键点列表
"""

import numpy as np
import torch
from human_body_prior.tools.model_loader import load_model
from human_body_prior.models.vposer_model import VPoser
from smplx import SMPLX
import rhinoscriptsyntax as rs
import ghpythonlib.treehelpers as th

print(f"cuda.is_available:{torch.cuda.is_available()}")

ghenv.Component.Name = "VPoserSMPL-X"
ghenv.Component.NickName = "VPoserSMPL-X"
ghenv.Component.Description = "使用 VPoser (Variational Human Pose Prior )先验分布模型提取 SMPL-X 的姿态参数(pose)后建立 3D 人体模型"
ghenv.Component.Message = "0.0.1"
ghenv.Component.Category = "Moths"
ghenv.Component.SubCategory = "Human Pose Estimation"
ghenv.Component.PanelSection = 1

def create_custom_pose(
    smpl_model_path,
    body_pose_params,
    global_orient_params,
    betas_params=None,
    model_type="smplx",
    gender="neutral",
    batch_size=1,
):
    '''同 AGORA-SMPLXHumanPose 组件定义的 create_custom_pose 函数'''
    return vertices, joints, faces


def vposeModel2SMPLx():
    vp, ps = load_model(
        VposerModel,
        model_code=VPoser,
        remove_words_in_model_weights="vp_model.",
        disable_grad=True,
    )
    vp = vp.to("cuda")
    custom_global_orient = np.zeros(3)
    if BetasParams is None:
        betasParams = np.zeros(10)
    else:
        betasParams = np.array(BetasParams)
    XYZ_transpose = [0, 2, 1]

    print("++#", NumPoses)

    if NumPoses is None or NumPoses < 1:
        # 从正态分布中采样一个 32 维向量
        poZ_body_sample = torch.from_numpy(
            np.random.randn(1, 32).astype(np.float32)
        ).to("cuda")
        pose_body = (
            vp.decode(poZ_body_sample)["pose_body"].contiguous().view(-1, 63)
        )

        print(
            f"poZ_body_sample.shape={poZ_body_sample.shape}"
        )  # torch.Size([1, 32])
        print(f"pose_body.shape={pose_body.shape}")  # torch.Size([1, 63])

        custom_body_pose = pose_body[0].reshape(21, 3).cpu().numpy()
        vertices, joints, faces = create_custom_pose(
            SMPLXModel,
            custom_body_pose,
            custom_global_orient,
            betasParams,
        )
        vertices = vertices[:, XYZ_transpose]
        Vertices = rs.AddPoints(vertices)
        Faces = th.list_to_tree(faces.tolist())

        joints = joints[:, XYZ_transpose]
        Joints = rs.AddPoints(joints)
    else:
        sampled_pose_body = (
            vp.sample_poses(num_poses=NumPoses)["pose_body"]
            .contiguous()
            .view(NumPoses, -1)
        )  # 将生成一个 Nx1x21x3 维度的人体姿态向量
        Vertices, Faces, Joints = [], [], []
        for sample_pose in sampled_pose_body:
            vertices, joints, faces = create_custom_pose(
                SMPLXModel,
                sample_pose.cpu().numpy(),
                custom_global_orient,
                betasParams,
            )
            vertices = vertices[:, XYZ_transpose]
            Vertices_g = rs.AddPoints(vertices)

            joints = joints[:, XYZ_transpose]
            Joints_g = rs.AddPoints(joints)

            Vertices.append(Vertices_g)
            Faces.append(faces.tolist())
            Joints.append(Joints_g)

        Vertices = th.list_to_tree(Vertices)
        Faces = th.list_to_tree(Faces)
        Joints = th.list_to_tree(Joints)

    return Vertices, Faces, Joints


if __name__ == "__main__":
    try:
        Vertices, Faces, Joints = vposeModel2SMPLx()
    except Exception as e:
        print(e)
图 2.7.4-11 为忽略NumPoses输入端参数,并配置BetasParams输入端参数的测试结果。
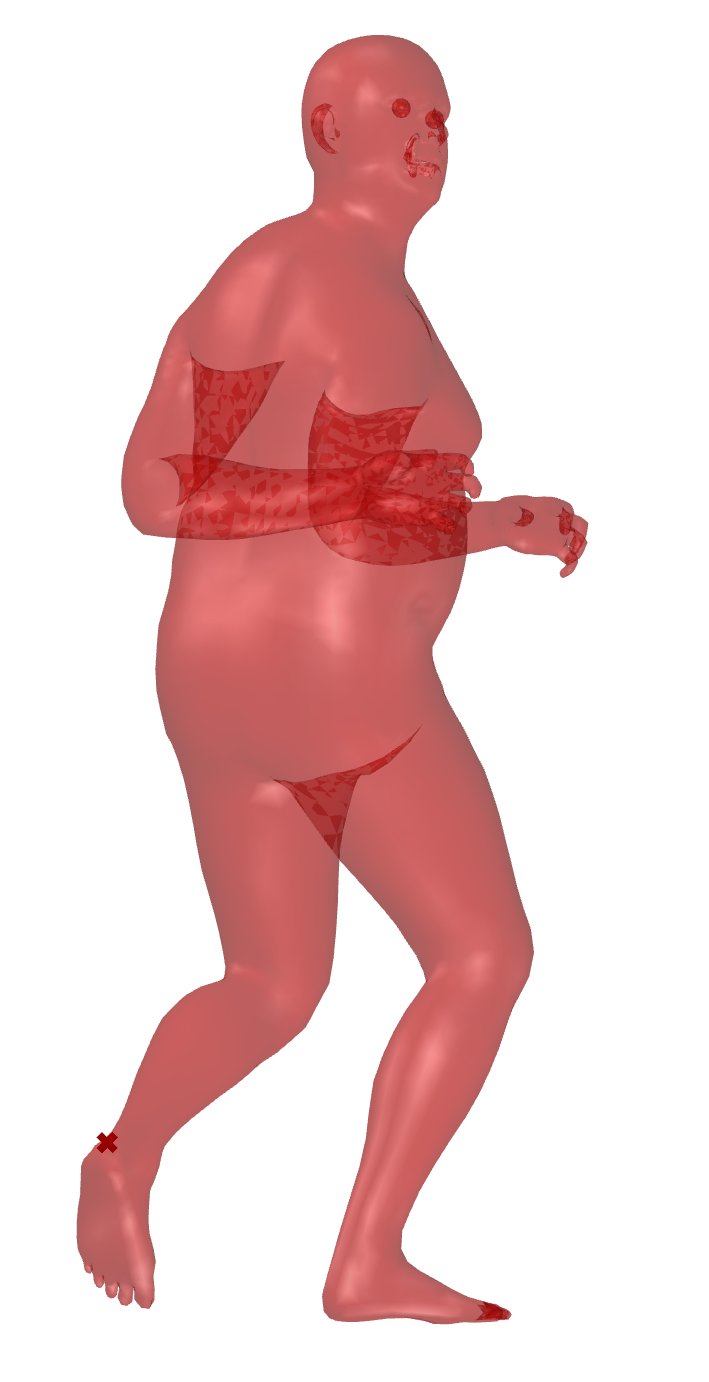
图 2.7.4-11 VPoser 构建人体模型结果示例(未配置 NumPoses 参数;但配置了 BetasParams 参数)
图 2.7.4-12 为配置NumPoses输入端参数为 12 后的测试结果。

图 2.7.4-12 VPoser 构建连续人体模型结果示例(配置 NumPoses 参数)
2.7.4.4 Multi-HMR 多人人体 3D 建模
Multi-HMR⑩是一个简单但有效的单次模型,用于多人人体姿态估计。该模型以单幅 RGB 图像作为输入,能够高效地在相机空间中对多个人体进行 3D 重建。为了方便 Multi-HMR 方法的应用,将其迁移至 moths⑪ 库,用pip install moths方法安装。通过定义Multi-HMR组件实现 Multi-HMR 多人人体 3D 建模。输入条件包括 SMPLX 模型SMPLX_DIR及其均值参数数据MEAN_PARAMS和 Multi-HMR 模型MultiHMR。为了方便处理 Multi-HMR 估计的 SMPLX 参数结果humans,将前文中定义的create_custom_pose()函数结合对输出结果的处理单独定义为一个组件Multi-HMR2SMPLX。同时为了方便建立的 3D 人体模型的方位调整,封装组件Rotation-3Planes,可以在给定点的位置檐 XY、XZ 和 YZ 参考平面旋转对象。
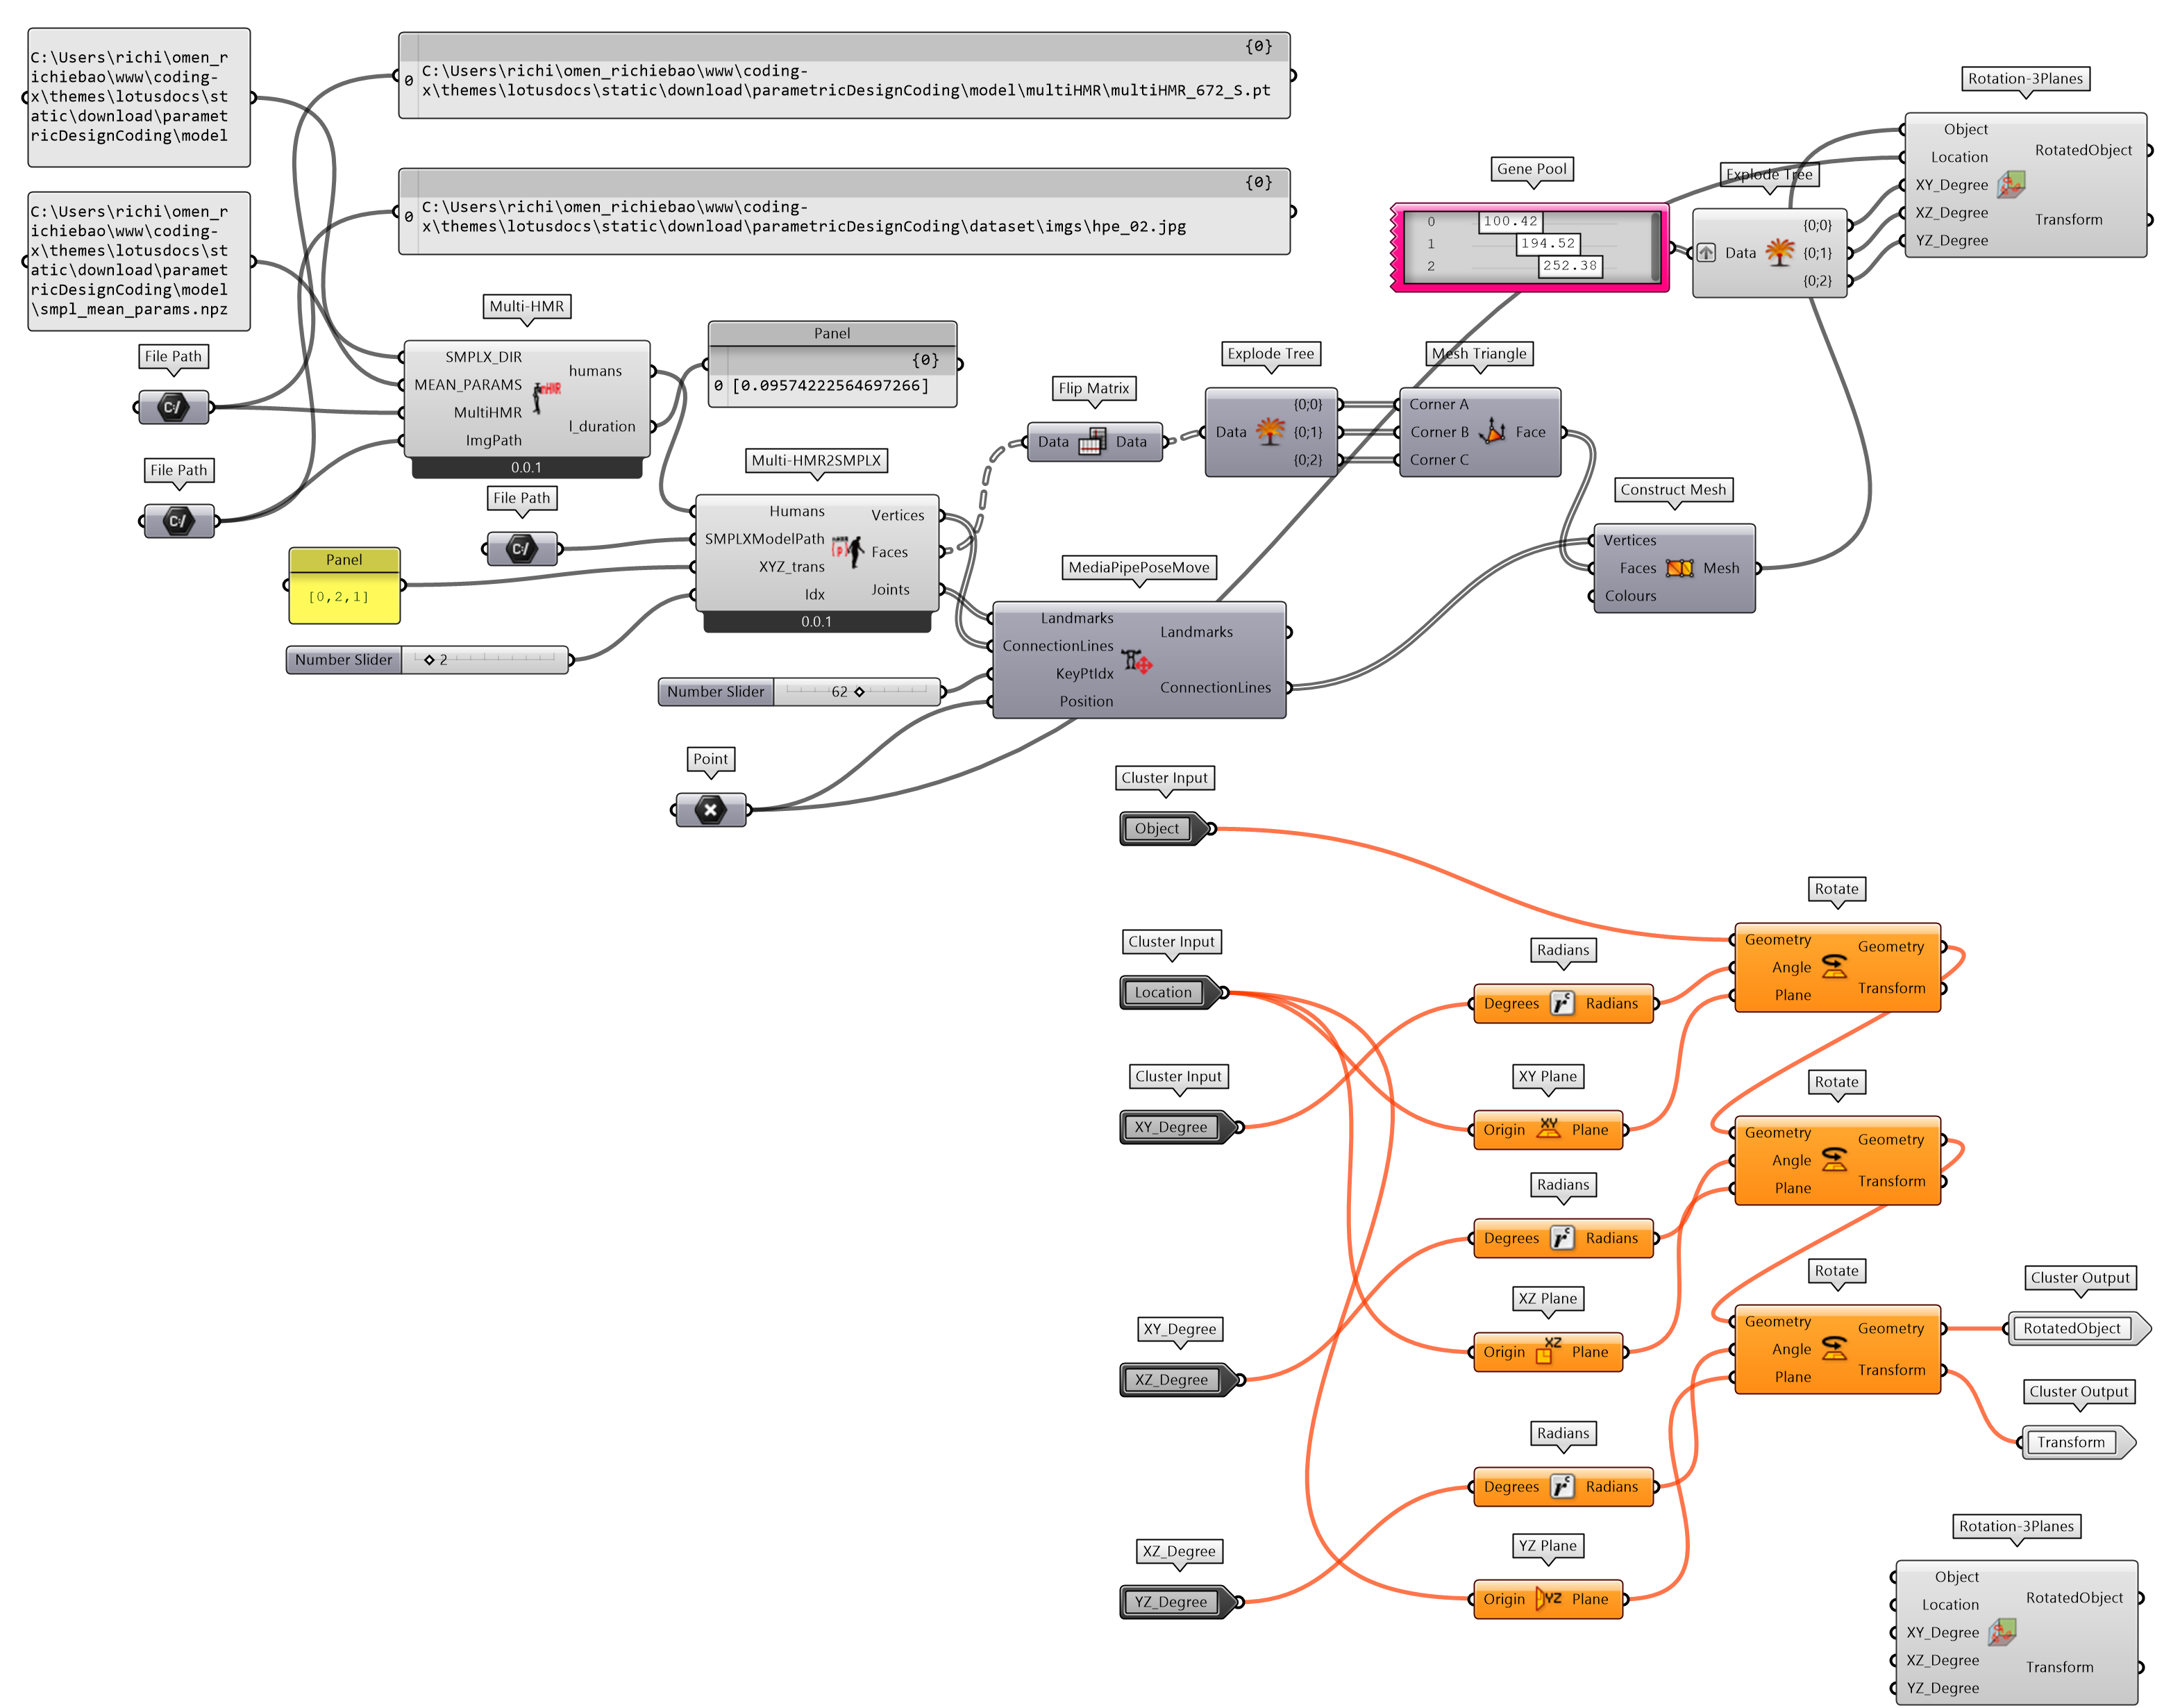
图 2.7.4-13 Multi-HMR 多人人体 3D 建模程序
Multi-HMR (Python Script 组件)
  '''
对单幅 RGB 图像,相机空间中的多人进行人体 3D 建模(使用 SMPL 模型)。迁移代码地址:https://github.com/naver/multi-hmr
Inputs:
    SMPLX_DIR: Item[str]
        SMPLX 模型所在文件夹路径名
    MEAN_PARAMS: Item[str]
        smpl_mean_params.npz 文件路径。下载地址为:https://openmmlab-share.oss-cn-hangzhou.aliyuncs.com/mmhuman3d/models/smpl_mean_params.npz?versionId=CAEQHhiBgICN6M3V6xciIDU1MzUzNjZjZGNiOTQ3OWJiZTJmNThiZmY4NmMxMTM4
    MultiHMR: Item[str]
        Multi-HMR 预训练模型,下载地址:https://github.com/naver/multi-hmr
    ImgPath: Item[str]
        图像文件路径名
Output:
    humans: List[Dict]
        图像中所有识别提取的人体模型参数,包含 SMPLX 人体姿态估计的参数
    l_duration: List[floatt]
        模型计算所花费的时间
'''

import os

os.environ["PYOPENGL_PLATFORM"] = "egl"
os.environ["EGL_DEVICE_ID"] = "0"

from argparse import ArgumentParser
import random
import numpy as np
from PIL import Image, ImageOps
import torch
import time

from moths.multi_hmr.utils import (
    normalize_rgb,
    get_focalLength_from_fieldOfView,
)
from moths.multi_hmr import Model

ghenv.Component.Name = "Multi-HMR"
ghenv.Component.NickName = "Multi-HMR"
ghenv.Component.Description = "对单幅 RGB 图像,相机空间中的多人进行人体 3D 建模"
ghenv.Component.Message = "0.0.1"
ghenv.Component.Category = "Moths"
ghenv.Component.SubCategory = "Human Pose Estimation"
ghenv.Component.PanelSection = 1

torch.cuda.empty_cache()
np.random.seed(seed=0)
random.seed(0)


def open_image(img_path, img_size, device=torch.device("cuda")):
    """打开图像,调整大小并填充"""
    img_pil = Image.open(img_path).convert("RGB")
    img_pil = ImageOps.contain(
        img_pil, (img_size, img_size)
    )  # 保持相同的纵横比

    # 为可视化保留一份副本
    img_pil_bis = ImageOps.pad(
        img_pil.copy(), size=(img_size, img_size), color=(255, 255, 255)
    )
    img_pil = ImageOps.pad(
        img_pil, size=(img_size, img_size)
    )  # 用值 0 填充

    resize_img = np.asarray(img_pil)

    # 标准化
    resize_img = normalize_rgb(resize_img)
    x = torch.from_numpy(resize_img).unsqueeze(0).to(device)
    return x, img_pil_bis


def get_camera_parameters(
    img_size, fov=60, p_x=None, p_y=None, device=torch.device("cuda")
):
    """给定图像大小、视场(fov)和主点坐标(principal point coordinates),返回相机参数矩阵 K"""
    K = torch.eye(3)
    # 获取焦距(focal length)
    focal = get_focalLength_from_fieldOfView(fov=fov, img_size=img_size)
    K[0, 0], K[1, 1] = focal, focal

    # 设置主点(principal point)
    if p_x is not None and p_y is not None:
        K[0, -1], K[1, -1] = p_x * img_size, p_y * img_size
    else:
        K[0, -1], K[1, -1] = img_size // 2, img_size // 2

    # 增加维度
    K = K.unsqueeze(0).to(device)
    return K


def load_model(
    model_name, SMPLX_DIR, MEAN_PARAMS, multiHMR, device=torch.device("cuda")
):
    """打开模型快照(checkpoint),使用保存的参数构建 Multi-HMR,加载模型权重"""
    ckpt = torch.load(multiHMR, map_location=device)

    # 获取保存在模型快照中的参数来重建模型
    kwargs = {}
    for k, v in vars(ckpt["args"]).items():
        kwargs[k] = v

    # 建立模型.
    kwargs["type"] = ckpt["args"].train_return_type
    kwargs["img_size"] = ckpt["args"].img_size[0]
    kwargs["SMPLX_DIR"] = SMPLX_DIR
    kwargs["MEAN_PARAMS"] = MEAN_PARAMS
    model = Model(**kwargs).to(device)

    # 向模型中加载权重
    model.load_state_dict(ckpt["model_state_dict"], strict=False)
    print("Weights have been loaded")

    return model


def forward_model(
    model,
    input_image,
    camera_parameters,
    det_thresh=0.3,
    nms_kernel_size=1,
):
    """对输入的图像和相机参数进行前向传播"""

    # 模型的前向传播.
    with torch.no_grad():
        with torch.cuda.amp.autocast(enabled=True):
            humans = model(
                input_image,
                is_training=False,
                nms_kernel_size=int(nms_kernel_size),
                det_thresh=det_thresh,
                K=camera_parameters,
            )

    return humans

if __name__ == "__main__":
    parser = ArgumentParser()
    parser.add_argument(
        "--model_name", type=str, default="multiHMR_672_S"
    )  # 'multiHMR_896_L_synth'
    parser.add_argument("--img_folder", type=str, default="example_data")
    parser.add_argument("--out_folder", type=str, default="demo_out")
    parser.add_argument("--save_mesh", type=int, default=0, choices=[0, 1])
    parser.add_argument("--extra_views", type=int, default=0, choices=[0, 1])
    parser.add_argument("--det_thresh", type=float, default=0.3)
    parser.add_argument("--nms_kernel_size", type=float, default=3)
    parser.add_argument("--fov", type=float, default=60)
    parser.add_argument(
        "--distance",
        type=int,
        default=0,
        choices=[0, 1],
        help="add distance on the reprojected mesh",
    )
    parser.add_argument(
        "--unique_color",
        type=int,
        default=0,
        choices=[0, 1],
        help="only one color for all humans",
    )

    args = parser.parse_args()
    dict_args = vars(args)
    assert torch.cuda.is_available()

    try:
        model = load_model(args.model_name, SMPLX_DIR, MEAN_PARAMS, MultiHMR)
        l_duration = []
        img_size = model.img_size
        x, img_pil_nopad = open_image(
            os.path.join(args.img_folder, ImgPath), img_size
        )

        # Get camera parameters
        p_x, p_y = None, None
        K = get_camera_parameters(model.img_size, fov=args.fov, p_x=p_x, p_y=p_y)

        # Make model predictions
        start = time.time()
        humans = forward_model(
            model,
            x,
            K,
            det_thresh=args.det_thresh,
            nms_kernel_size=args.nms_kernel_size,
        )
        duration = time.time() - start
        l_duration.append(duration)
    except Exception as e:
        print(e)
Multi-HMR2SMPLX (Python Script 组件)
  """
提取 Multi-HMR 组件输出端 humans 中,对应 SMPLX 的参数,并建立 3D 人体模型
Inputs:
    Humans: List[Dict]
        Multi-HMR 组件输出端 humans 数据
    SMPLXModelPath: Item[str]
        SMPLX 模型文件路径
    XYZ_trans: Item[str]
        X,Y,Z 坐标置换,例如 [0,2,1]
    Idx: Item[int]
        提取对象索引值
Output:
    Vertices: List[Point3D]
        蒙骗控制点
    Faces: Tree[int]
        蒙骗控制点的单元面索引(三边面)
    Joints: List[Point3D]
        人体姿态估计关键点
"""

from smplx import SMPLX
import rhinoscriptsyntax as rs
import ghpythonlib.treehelpers as th
import torch

ghenv.Component.Name = "Multi-HMR2SMPLX"
ghenv.Component.NickName = "Multi-HMR2SMPLX"
ghenv.Component.Description = "提取 Multi-HMR 组件输出端 humans 中,对应 SMPLX 的参数,并建立 3D 人体模型"
ghenv.Component.Message = "0.0.1"
ghenv.Component.Category = "Moths"
ghenv.Component.SubCategory = "Human Pose Estimation"
ghenv.Component.PanelSection = 2

def create_custom_pose(
    smpl_model_path,
    body_pose_params,
    global_orient_params,
    betas_params=None,
    transl=None,
    model_type="smplx",
    gender="neutral",
    batch_size=1,
):
    '''同前文定义的 create_custom_pose() 函数'''
    return vertices, joints, faces


if __name__ == "__main__":
    smplxParams = Humans[Idx]
    custom_body_pose = smplxParams["rotvec"].cpu().numpy()[1:22]
    custom_global_orient = smplxParams["transl_pelvis"].cpu().numpy()
    betasParams = smplxParams["shape"].cpu().numpy()

    vertices, joints, faces = create_custom_pose(
        SMPLXModelPath, custom_body_pose, custom_global_orient, betasParams
    )

    if XYZ_trans is not None:
        orientation = eval(XYZ_trans)
    else:
        orientation = [0, 1, 2]

    vertices = vertices[:, orientation]
    vertices[:, 2] = -vertices[:, 2]

    Vertices = rs.AddPoints(vertices)
    Faces = th.list_to_tree(faces.tolist())

    joints = joints[:, orientation]
    joints[:, 2] = -joints[:, 2]
    Joints = rs.AddPoints(joints)
应用定义的 Multi-HMR 组件,用OpenArt⑫生成一个图像测试估计的结果,如图 2.7.4-14。
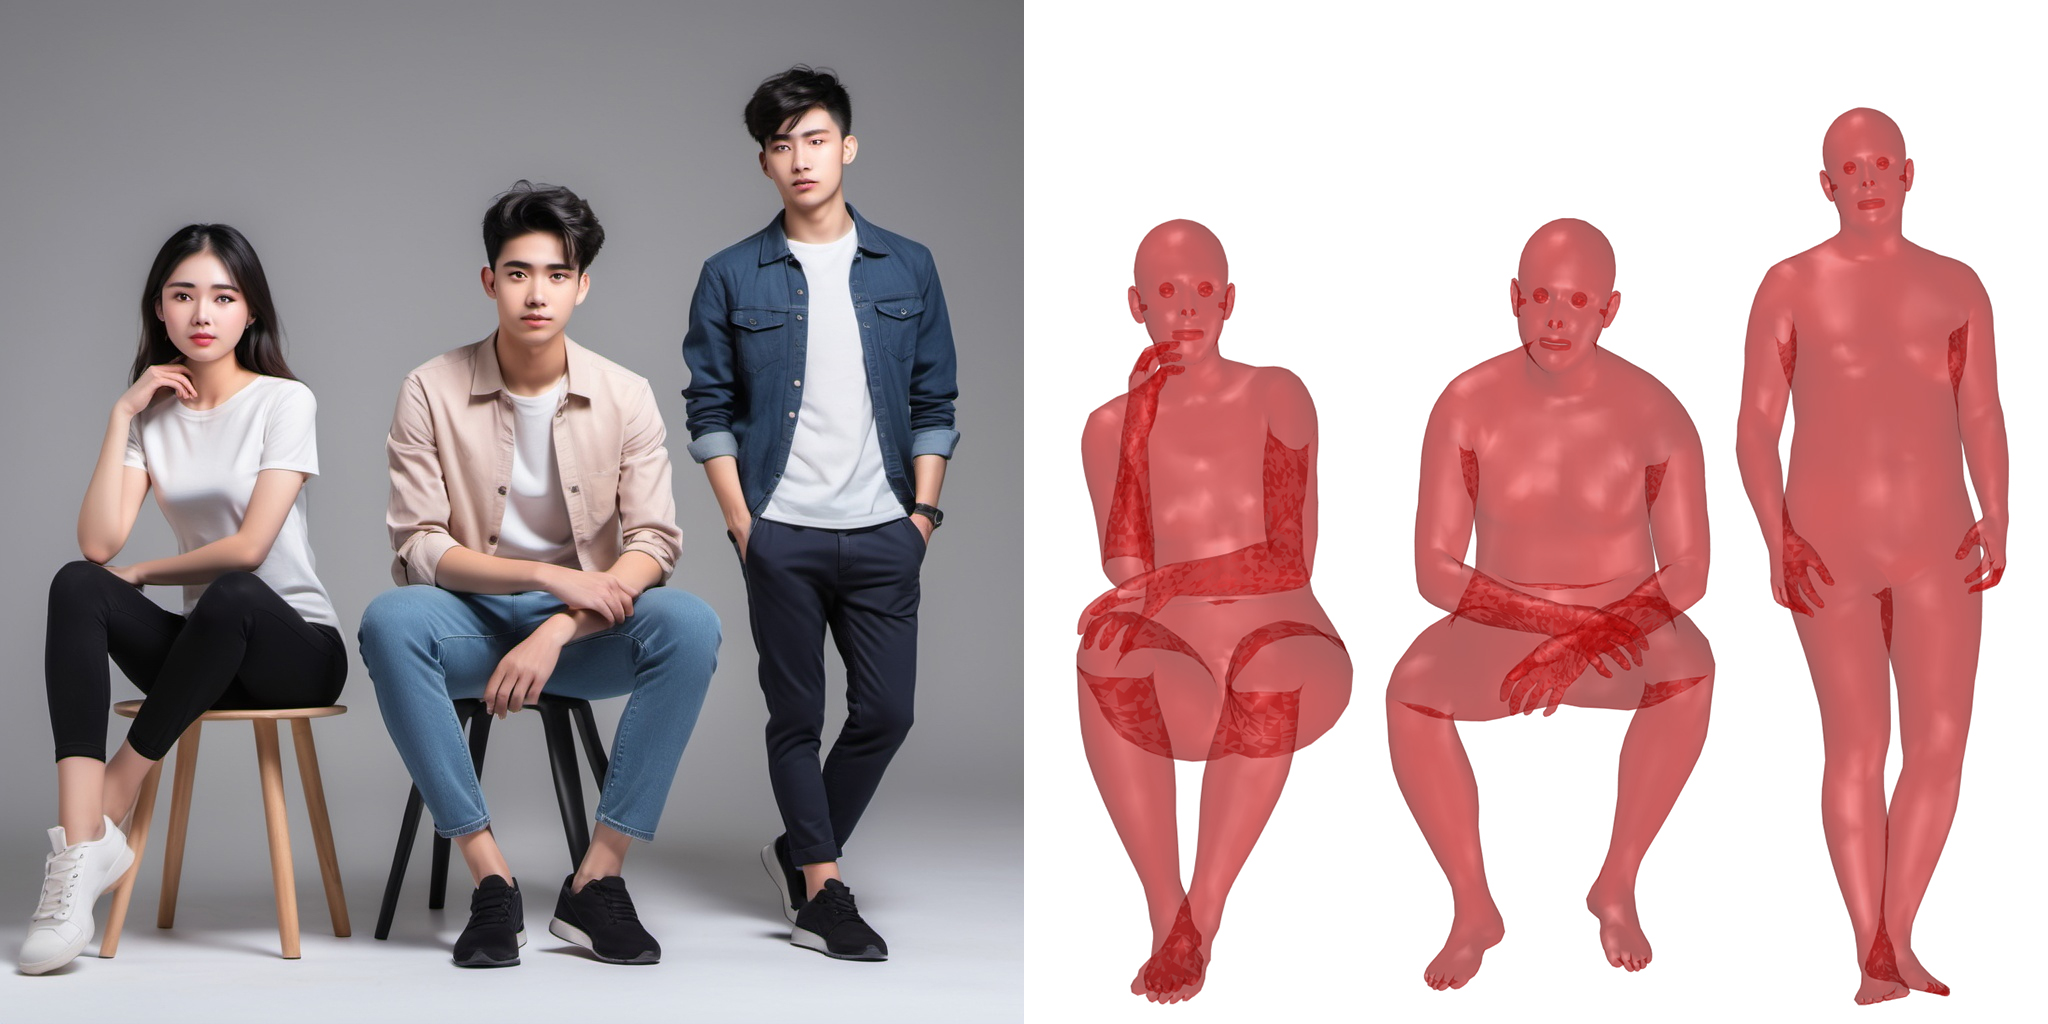
图 2.7.4-14 Multi-HMR 多人人体 3D 建模程序测试结果,左图为OpenArt 生成的图像⑫;右图为估计结果
注释(Notes):
① MediaPipe,(https://ai.google.dev/edge/mediapipe/solutions/guide)。
② 人体姿态估计(Pose landmark detection),(https://ai.google.dev/edge/mediapipe/solutions/vision/pose_landmarker)。
③ MediaPipe PyPI 网页地址,(https://pypi.org/project/mediapipe/)。
④ OpenCV PyPI 网页地址,OpenCV是世界上最大的计算机视觉库,开源,并包含 2500 多个算法,由非营利的开源视觉基金会运营(https://pypi.org/project/opencv-python/)。
⑤ OpenCV 官网,(https://opencv.org/get-started/)。
⑥ PHOX Boutique,一个服装品牌(https://www.instagram.com/phoxba_/reel/C7MidYhOlMX/)。
⑦ MediaPipe Studio,(https://mediapipe-studio.webapps.google.com/home)。
⑧ AGORA 数据集,(https://agora.is.tue.mpg.de/index.html)。
⑨ VPoser(Variational Human Pose Prior),(https://github.com/nghorbani/human_body_prior)。
⑩ Multi-HMR,(https://github.com/naver/multi-hmr)。
⑪ moths,为本书 Grasshopper 参数化设计模组 moths 的支持工具(https://pypi.org/project/moths/)。
⑫ OpenArt,图像生成工具(https://openart.ai/home)。
参考文献:
[1] Loper, M., Mahmood, N., Romero, J., Pons-Moll, G., & Black, M. J. (2015). SMPL: a skinned multi-person linear model. ACM Trans. Graph., 34(6). doi:10.1145/2816795.2818013